
Purpose
This purpose of this troubleshooting article is to provide you with techniques, best practices, and “quick fixes” to resolve the most frequently encountered x360Recover questions and/or issues.
This article is not intended to be a comprehensive, step-by-step manual, but rather a troubleshooting resource for common x360Recover functions.
Which x360Recover issues are you troubleshooting?
How to download your initial x360Recover ISO software for BDR
To install x360Recover, you will need to download the x360Recover ISO file and burn the ISO to a bootable flash drive.
1. Before you begin your x360Recover Software download, note that x360Recover may automatically start the installation without any prompts when using certain hardware; therefore, please use a machine that you do not need to preserve any data on, as x360Recover may delete your computer’s contents during the install process.
2. Download the latest version of the x360Recover Software using the link below:
https://axcient.helpjuice.com/software-downloads/downloads
NOTE: The downloading process may take up to five minutes (the typical download is approximately 1.5 GB); so please check your “View Downloads” – internet explorer pop-up window for a status if needed.
BDR (appliance) agent registration errors
Understand agents | Configure agents
If you are experiencing registration issues, please check the following:
- License availability—Check to ensure you have sufficient licenses to register the agent.
- Network connectivity—The agent must be able to communicate with the appliance. If networking errors or other issues interfere with this communication process, the agent will not successfully register with the appliance.
Direct-to-Cloud (D2C) agent registration errors
Additional resources:
- D2C Quick Start Guide
- D2C Onboarding Playbook
- Introduction to Direct-to-Cloud (D2C)
- Understand agents | Configure agents
If you are experiencing registration issues, please check the following:
- Network connectivity—The agent must be able to communicate with the vault. If networking errors or other issues interfere with this communication process, the agent will not successfully register with the vault.
- Previous Installations—The Direct-to-Cloud agent cannot currently be installed over an existing agent. If an agent has been previously installed, it must be uninstalled. You must also delete the existing agent folder. Failure to remove the previous agent files will prevent the Direct-to-Cloud agent from registering with the vault.
- Firewall considerations—The agent needs to communicate outbound on the internet to the vault on the following ports: 443, 9079, 9082, and 9090.
Use the Analysis Tool
What is the Analysis Tool (AT)?
Once you have installed x360Recover, we recommend that you check your backups.
Test your backups by:
- mounting,
- booting as a VM,
- exporting as a virtual disk, and as a Bare Metal Restore.
if you experience any failed backup jobs, please troubleshoot using the following procedures:
- Download the latest copy of the Analysis Tool from this KB article:
The Analysis Tool will analyze the health of a protected system, capture logs, and creates a text file with a synopsis of any issues it finds.
NOTES:
- You will need Administrator Privileges to run the Analysis Tool.
- You will need to run the tool on the protected system from an elevated command prompt after stopping the x360Recover service.
- The tool will create a .zip file in the C:\x360RecoverAnalysisTool\x360Recover folder along with all other files.
- Please send Axcient only the .zip file when directed.
- When you run the tool, please click the Enter button when prompted to keep the data local.
After the tool is finished, you can open up the text file it created (problems.txt file) and start troubleshooting the items it detected.
Some of the x360Recover Backup Analysis Tool integrity tests include:
- Ensuring that x360Recover can traverse the directory structure,
- Numerating out the directories,
- Reading-down the Master File Table and looking for orphan objects,
- Checking for a bad pointer within the Master File Table,
- Checking for high fragmentation levels (which affects virtualization from Windows),
- Checking for any DLL mismatches,
- Running a real-time tracking mechanism that creates a hash file,
- Running a full differential in the last backup day (automatically) to compare every block in the backup set to that of the production set,
- Real-time resilvering of data,
- Tracking Window Boot DLL files’ expectation of virtualization (proper modifications to Boot DLL files greatly impacts stability and performance on Virtualization).
If any piece of the data set exceeds the tolerances, x360Recover will proactively fail the backup so you can troubleshoot.
Resolve backup events, alerts and errors
|
Note: If you follow these instructions and are still unable to resolve the issue yourself, we are standing by to lend a hand. Please see the section Escalate recovery troubleshooting later in this article for details on how to open a Support ticket and run our Analysis Tool. |
1. Basic troubleshooting with aristos.log
On the protected system, open the aristos.log.
- Scroll to the bottom, to locate the newest entries.
- Note that this log continually updates.
- To renew the log information, close and reopen it.
How to recognize a successful backup
The beginning of a backup begins with the following line:
INFO: Loading configuration from: C:\Program Files (x86)\Replibit\aristos.cfg
A successful backup ends with the following line:
INFO: Backup job completed successfully
and you will see INFO: Main function returned with: 0.
You will then see a succession of INFO: Main function returned with: -1.
The -1's are counting off until the next backup.
How to identify errors
If you do not see the backup successfully end, search (ctrl f) for Error.
Note that 99% of errors are Windows-based. (This is often because the agent calls to the Windows Volume Shadow Copy Service (VSS) for a shadow copy to process.)
Common errors are:
| ERROR | CAUSE |
| Snapshot creation for volume failed |
VSS will not or cannot run
|
| Get queued completion failed |
VSS cannot complete because some process is stuck or failing |
| VSS_E_PROVIDER_VETO |
VSS was (a) cut off by another program stealing VSS to run its own backup or (b) the AV/firewall killed the shadow copy.
|
| VSS_E_INSUFFICIENT_STORAGE |
The shadow copy storage needs to be increased to 15% of the volume in order to be backed up |
| VSS_E_NESTED_VOLUME_LIMIT |
The agent will not back up user profile disks (UPDs) or mapped drives |
Where to look for contributing events/errors
Once an error is found, check the following:
- date/time in the Windows Event Viewer
- Windows application log
- system log
You can see from these sources which Windows events/errors may be contributing to VSS failure to complete. These events could be related to system IO, AV/firewall, permissions or hard disk issues.
If you are experiencing registration issues:
- Check license availability, to ensure you have sufficient licenses to register the agent. Refer to appliance-based license billing
- If network connectivity is an issue, determine if the agent is able to communicate with the appliance. If networking errors or other issues interfere with this communication process, the agent will not successfully register with the appliance. Refer to Install an agent
2. Antivirus exclusions
Notes:
- Some anti-virus systems will delete the agent files.
- Should an exclusion require a file path, you can create a text document for axecomsvc.exe and axecom.exe in C:\Windows\System32, then rename each .txt file as .exe
Ensure that C:\Program Files (x86)\Replibit contains .exe files and then add the exclusions below.
Exclusions to be created for the backup agent in the antivirus firewall:
Files to exclude in the Replibit directory:
- The entire folder C:\Program Files (x86)\Replibit
- The following files within C:\Program Files (x86)\Replibit
- ManagementService.exe
- UpdaterService.exe
- agentservice.exe
- efsvss*.exe (there are 6 files with a different version for each type of system)
- uefi-check.exe
- FastDelta.exe
- xcloud-analysis-tool.exe
- Allowlist the domain efscloud.net
Files to exclude that are not in the Replibit directory. (These files are injected post-backup during the boot or live virtual machine.:)
- %systemroot%\system32\axecomsvc.exe
- %systemroot%\system32\axecom.exe
How to escalate troubleshooting
After you have performed your own investigation (by following the suggested processes above), you may still have issues to be resolved.
If you are unable to resolve the issues yourself, you'll need to (a) open a new Support ticket and (b) run our Analysis Tool.
Instructions on how do perform these two important steps are below:
2.2. Open a new Support ticket from the dashboard of your x360Portal account.
2.2.1. As you create the new Support ticket, remember to record the unique ticket number. (You will need to input that specific Support ticket number when you run the Analysis Tool later. Instructions on entering the ticket number in the Analysis Tool are below.)
2.2.2. Be sure to mention in the new Support ticket that you plan to run the Analysis Tool.

2.3. Run the Analysis Tool from x360Recover in your x360Portal
From the appliance or vault user interface:
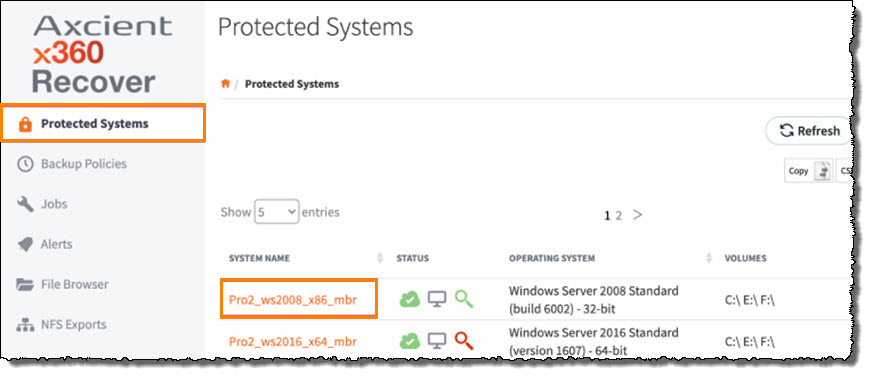
2.3.1. Click the protected systems tab on the left navigation.
2.3.2. Click on the System Name of the troubled protected system.
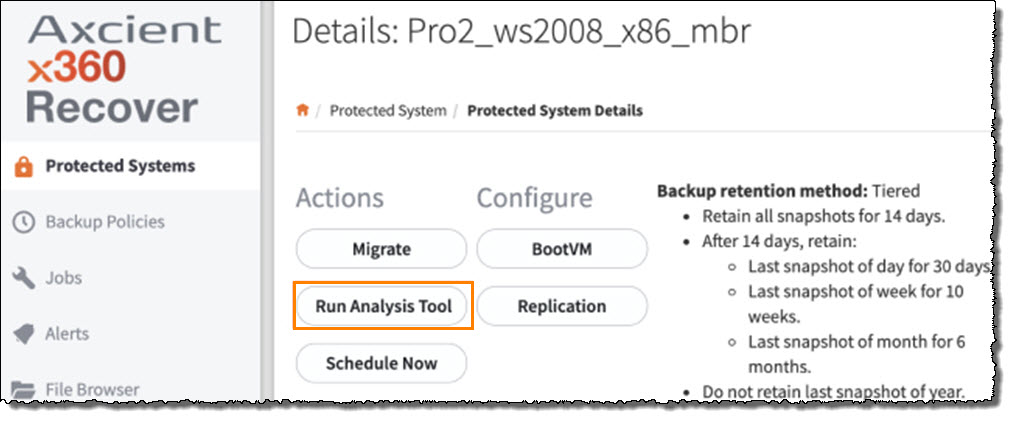
2.3.3. In the protected systems Details page, click Run Analysis Tool.
2.3.4. When requested, input the Support ticket number you recorded earlier
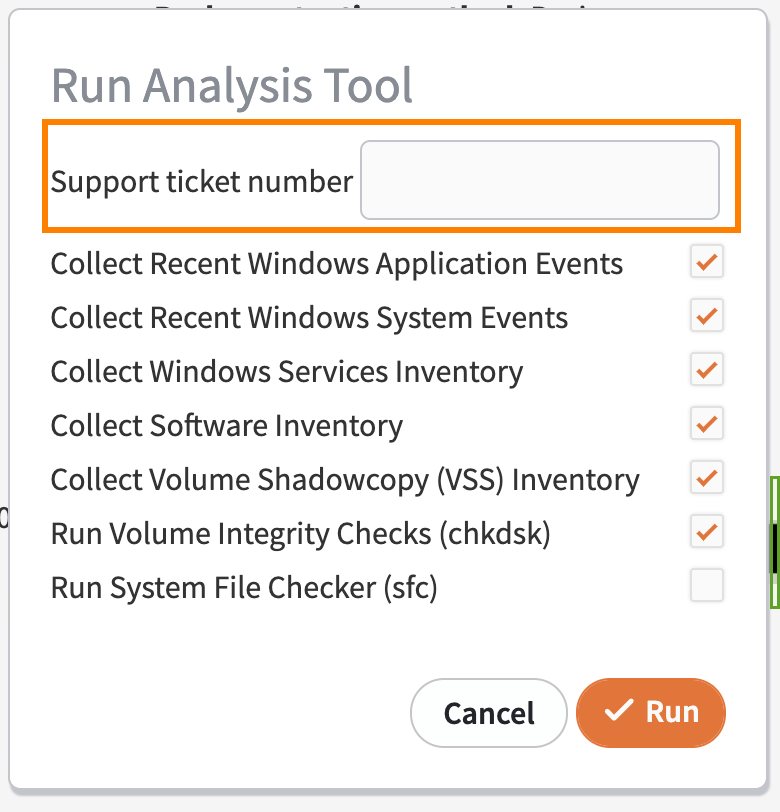
2.3.5. Finally, click Run to complete the process.
SUPPORT | 720-204-4500 | 800-352-0248
- Contact Axcient Support at https://partner.axcient.com/login or call 800-352-0248
- Free certification courses are available in the Axcient x360Portal under Training
- To learn more about any of our Axcient products, sign up for a free one-on-one training
- Subscribe to the Axcient Status page for a list of status updates and scheduled maintenance
1319
Find and fix VSS errors
Overview
- For a detailed listing of VSS errors when working with x360Recover: see VSS error codes
- For detailed VSS troubleshooting, please refer to the VSS Troubleshooting Guide
x360Recover uses the 'volume shadow copy' (VSS) technology built in to Windows to safely perform backups of open files. VSS provides the functionality to take a snapshot of a volume, allowing backups to backup data from the unchanging snapshot instead of the volume that is changing all the time.
IMPORTANT NOTE: The Microsoft Volume Shadow copy Service is a standard Windows service and is not installed by x360Recover. The x360Recover agent and x360Recover backups cannot cause VSS to fail because they simply use the VSS service. If you are receiving backup failures which point to VSS, it is caused by other software or system configuration problems and will affect every program that uses VSS.
VSS has three parts that work together:
- VSS Providers: Providers implement the logic to actually take and maintain a snapshot of a volume. Windows comes with a default provider authored by Microsoft. It works with any volume so long as there is at least one volume in the system that is formatted with NTFS. Expensive NAS/DAS devices may provide their own hardware-based VSS provider.
- VSS Writers: Writers represent server applications that need to flush cached data to disk before a snapshot is taken, so that the snapshot represents good, consistent data. Both Exchange 2003 (or better) and SQL Server 2000 (or better) provide VSS writers. Many times problems with VSS are caused by the failure of some application-specific writer, outside the control of the backup application.
- VSS Requestor: Requestors represent applications that need to make, release, and use snapshots. For example, a backup application.
Diagnose VSS failures
When a x360Recover backup fails, the problem is almost always caused by the failure of the Microsoft VSS provider or one of the application-specific VSS writers.
- The C:\Program Files (x86)\x360Recover/aristos.log log should contain informational messages that could give more information about which provider or writer failed.
- You should inspect the Windows application and system logs (Start, run, eventvwr) for any vss, volsnap, or other entries around the time when the backup started.
- The error number and the word VSS can often be used in a web search to find specific information about the possible causes of the error.
- You should consider events from applications whose VSS writer has failed. For example, if the backup log indicates that the Exchange writer failed, then you should also look for Exchange events in the Windows event log.
- You should use the information in the logs to troubleshoot before trying any repair steps. Find the error and search for it on the web. Chances are you will find the resolution faster this way and will have issue resolved without the need following the below steps. This will save you hours of work.
Another source of information is the vssadmin command line utility that comes with Windows. You should try the following commands at a command prompt to see the status of the providers and writers in your system, and whether any are in a failed state:
vssadmin list providers
vssadmin list writers
VSS problem resolution
Most VSS related errors are temporary and are fixed by rebooting the server. You should also try applying the following Microsoft hotfixes to ensure the issue is not related to a bug in VSS:
http://support.microsoft.com/kb/891957
http://support.microsoft.com/kb/903234
http://support.microsoft.com/kb/940349
Resolving a VSS problem is usually very specific and related to the specific VSS provider or writer failure. Many others on the web have usually encountered the same error. Searching for the VSS error code listed in the backup log (usually begins with 0x8.......) along with VSS and/or the name of the VSS writer will usually find relevant information. Our support team is also able to assist you in finding solutions to failures in your VSS providers and writers.
When you contact our support team please send them the backup log showing the VSS errors, any related errors and events from the windows event log, and the output of the vssadmin commands listed above. This will help our team find the resolution for your specific failure. The types of failures are very diverse and very specific, so the more information you provide the better our support team will be able to assist you.
Re-register VSS System Files
CAUTION: The below scripts are only tested to work on Windows XP or below and Server 2003 or below. Do not run the below scripts on more modern operating systems without first getting confirmation from Microsoft.
Certain VSS errors may be resolved by re-registering the operating system's lower-level VSS components. This step should only be taken after other diagnostics have been failed to correct the failure. To re-register VSS components, execute the following within a command prompt:
cd /d %windir%\system32
net stop vss
net stop swprv
regsvr32 ole32.dll
regsvr32 oleaut32.dll
regsvr32 vss_ps.dll
vssvc /register
regsvr32 /i swprv.dll
regsvr32 /i eventcls.dll
regsvr32 es.dll
regsvr32 stdprov.dll
regsvr32 vssui.dll
regsvr32 msxml.dll
regsvr32 msxml3.dll
regsvr32 msxml4.dll
net start swprv
net start vss
Additional problem solving approaches
STEP 1. Run the following commands at a command prompt to see the status of the providers and writers in your system, and whether any are in a failed state:
vssadmin list providers vssadmin list writers
If you see any providers or writes in a failed state, reboot the system and run them again to see if it clears up the error. If it does, then try another backup. If the backup still fails with VSS issues, try the next steps:
STEP 2. During step 1 above, if you see any third party providers from other backup applications, you must uninstall the applications.
After they are uninstalled, check again.
If they are still there, open regedit and look at
HKEY_LOCAL_MACHINE\SYSTEM\CurrentControlSet\services\VSS\Providers
Under that key you should find the third party key which should be exported and then deleted.
Reboot and run step 1 again.
STEP 3. Clean up any old shadow copies by entering this at the cmd prompt
- vssadmin delete shadows /all
Reboot and run Step One
You should also try applying any Microsoft hotfixes and updates that are related to VSS
Our support team is able to assist you in finding solutions to failures in your VSS providers and writers.
When you contact our support team, please send them the backup log showing the VSS errors, any related errors/events from the windows event log, and the output of the vssadmin commands listed above. This will help our team find the resolution for your specific failure. The types of failures are very diverse and very specific, so the more information you provide the better our support team will be able to assist you.
1213 | 1340
How to escalate troubleshooting
After you have performed your own investigation (by following the suggested processes above), you may still have issues to be resolved.
If you are unable to resolve the issues yourself, you'll need to (a) open a new Support ticket and (b) run our Analysis Tool.
Instructions on how do perform these two important steps are below:
2.2. Open a new Support ticket from the dashboard of your x360Portal account.
2.2.1. As you create the new Support ticket, remember to record the unique ticket number. (You will need to input that specific Support ticket number when you run the Analysis Tool later. Instructions on entering the ticket number in the Analysis Tool are below.)
2.2.2. Be sure to mention in the new Support ticket that you plan to run the Analysis Tool.
2.3. Run the Analysis Tool from x360Recover in your x360Portal
From the appliance or vault user interface:
2.3.1. Click the protected systems tab on the left navigation.
2.3.2. Click on the System Name of the troubled protected system.
2.3.3. In the protected systems Details page, click Run Analysis Tool.
2.3.4. When requested, input the Support ticket number you recorded earlier
2.3.5. Finally, click Run to complete the process.
ADVANCED TOPICS
Modify the agent - Set volumes and worker threads with aristos.cfg
As with the CPU, monitor the RAM and page file use prior to, and during, a backup.
If the protected system is already using all of the available RAM, the VSS service will end up using the slower page file.
Adding more RAM is the best option but you can also look at reducing the amount of RAM other services are using.
Exchange and SQL by default, will use all available RAM.
A quick web search will guide you on setting the maximum RAM that different services can use.
Run chkdsk and then defrag all the partitions being backed up.
Remember that VSS needs free disk space to create the ShadowCopies.
If changing worker threads to as low as [1] still does not work, you can try changing the affinity on aristosagent to lower CPU usage while a backup is running by executing these two commands from a raised CMD or .BAT file:
wmic process where name="AristosAgent.exe" CALL setpriority "below normal" PowerShell "$Process = Get-Process AristosAgent; $Process.ProcessorAffinity=1"
Troubleshoot an appliance not communicating with the Licensing Portal
- When you set up your x360Recover appliance for the first time, you will need to logon with a x360Recover reseller account so you can choose the Customer and Location.
- If you are having trouble connecting to: licesing.x360Recover.com, please follow the troubleshooting steps below:
- The URL should not contain http:// or https://
- Change the DNS setting to 8.8.8.8; try to log on again.
- Verify that outbound traffic is not being blocked.
Migrate an appliance
- Stop and disable the x360Recover service on the protected system.
- Disable replication of the protected system on the original appliance.
- Add 20 days to the Retention Policy on both the appliance and the vault so data will not be deleted during this process.
- Migrate the protected system via USB or Network in the Details page of that protected system on the appliance.
- Once the migration is complete, verify on the new appliance that the data is there and is recoverable. Additionally, boot in Test
- Change the IP address of the appliance in cfg located in c:\program files (x86)\x360Recover to the new appliance's IP.
- Enable the x360Recover service on the protected system.
- After several backups have run, repeat the verification process by ensuring that the data is present and is recoverable.
- Enable Replication on the new appliance to the Vault.
- After the replication is back in sync, remove the 20 days on the retention policy.
Replace a failed disk in the Backup Storage Pool
If your pool has lost a disk but the RAID is still intact (you have not lost two disks in a RAID5 or three disks in a RAID6), your pool will be in a degraded state.
1. Use the Storage Pool drop-down to find the Failed Disk(s) In this section you should be able to see your failed disk.
2. After physically replacing the failed disk:
3. Recreate the disk as a RAID0 (if the RAID controller is not passing the disks as JBOD) with a disk of equal or greater size. In this scenario you will need to reboot.
4. Once complete, use the Storage Pool drop-down to find the Unused Disk(s) In this section, you should find an unused disk.
5. Return to the Failed Disk(s) section, and click Replace next to the failed disk. Select the correct Unused Disk and click
6. You will see a popup notifying you that the disk is being replaced.
7. While the disk is being replaced, you will see the resilvering status under Storage Status.
8. When the resilvering process is complete, the pool will return to an Online Status.
SUPPORT | 720-204-4500 | 800-352-0248
- Contact Axcient Support at https://partner.axcient.com/login or call 800-352-0248
- Free certification courses are available in the Axcient x360Portal under Training
- To learn more about Axcient products, sign up for a free one-on-one training
- Subscribe to the Axcient Status page for updates and scheduled maintenance
1340