
Overview
You can create backup policies (schedules) and apply these backup policies to protected systems - even before the agent is installed on the machine.
- All backup policies are created and maintained within the vault.
- Backup policies allow for full flexibility when defining your Recovery Point Objectives (RPO) for each customer and protected system. x360Recover supports an RPO of 15 minutes for systems that require industry-leading RPOs.
- You can create backup policies for the initial full backup and also for incremental backups.
Backup types
When you create a backup policy, you define two types of backups: ·
- The initial backup (also called a full backup) which copies all sectors of the image.
- The incremental backups (also called snapshots) which back up only the changes (saving time and disk space.) You cannot schedule an incremental backup unless you have completed the initial backup (full backup). Because x360Recover is chain-free, snapshots are not dependent on previous snapshots.
Create backup policies in the vault web interface
Within the vault web interface, you can use the Backup Policies page to define (a) initial backup policies and (b) ongoing incremental snapshot backup policies. You can create backup policies and assign them to different machines according to special requirements or technical limitations. You can also adjust the initial backup policies to run during certain hours of the day and pause at other hours of the day to limit user impact during office hours.
After a backup policy is created, you must assign that backup policy to a protected system from the Protected Systems page.
To create a backup policy:
1. Log in to the vault web interface.
2. In the left-hand navigation menu, click the Backup Policies tab.
3. In the Schedules page, click the Add Policy button.

4. In the Create Schedule page, enter information about the new backup policy:
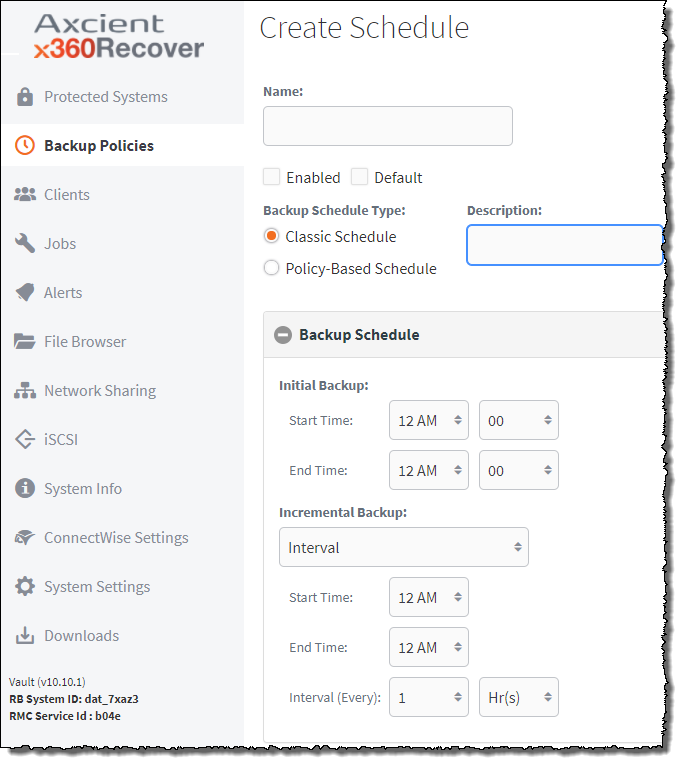
- In the Name field, enter a descriptive name for the backup policy. For example, you might create a backup policy titled Critical for servers requiring 15-minute incremental backups; and Non-Critical for servers that only require incremental backups every hour.
- Ensure the Enabled checkbox is selected to activate this new backup policy. If the backup policy is not enabled but later assigned to a protected system, backups for the protected system will be disabled.
- Optionally, click the Default checkbox to assign this backup policy as the default backup policy for all protected systems.
- Choose a backup schedule type: either Classic or Policy-based.
- If a description of this backup schedule type is needed, enter that information here.
- Open the Backup Schedule dropdown menu.
- In the Initial Backup section, define a Start Time and End Time for the first, full initial backup. This timeframe allows you to limit the impact of the initial backup on the user experience.
- In the Incremental Backup section, you can optionally use the drop-down menu to change the incremental backup type from Interval to Manual. The Manual setting allows you to create snapshots at specific times instead of intervals.
- If you selected Interval in the drop-down menu, define a Start Time, End Time, and Interval for all future incremental backups.
- Click the Save button when you are finished. The backup policy is now created and will be listed in the Schedules page. You can manage and edit backup policies in the Schedules page.
5. After the backup policy is created, you can assign the backup policy to a protected system.
a. In the left-hand navigation menu, click the Protected Systems tab.
b. Find the desired protected system and use the Schedule drop-down menu to select the appropriate Schedule. The schedule is now assigned to the protected system.
SUPPORT | 720-204-4500 | 800-352-0248
- Contact Axcient Support at https://partner.axcient.com/login or call 800-352-0248
- Free certification courses are available in the Axcient x360Portal under Training
- Subscribe to the Axcient Status page for a list of status updates and scheduled maintenance
956 | 1706