Each Axcient Continuity Cloud node is provisioned with a virtual firewall to handle internet traffic for your restored virtual machines and provide secure access to your servers.
|
|
This guide includes the following sections to configure your firewall completely: |
ACCESS THE VIRTUAL FIREWALL |
Use the information provided by Axcient to gain access to the pfSense virtual firewall running on your assigned Continuity Cloud (CC) Node.
1. Log in to your CC Node using RDP.
2. Open the Hyper-V Manager to ensure the firewall is started. Double click to open.

3. Ensure the firewall is On.

4. If it is listed as Off, right click and choose Start.

Allow a few minutes for the firewall to start. The state will switch to Running.

5. Open the shortcut on the desktop for your CC Node’s virtual firewall.
![]()
Alternatively, open a web browser and go to the WAN Alias IP address of your virtual firewall.
Example: https://10.x.x.x:37038
This is a locally accessible private IP address.
6. Enter admin for the Username. The default Username is always admin.
7. Enter the CC Node Admin Password you were provided to access the node with. This is the same password you used to RDP to the node itself.
| Please note that both the Username and Password credentials are case sensitive. |
8. After both the Username and the Password credentials are entered, click Sign In.

CONFIGURE THE LAN INTERFACE |
Configure the LAN interface of the pfSense virtual firewall with the proper IP address and subnet mask required for the virtual machines you are restoring. This IP address will serve as the default gateway for all virtual machines you restore to the Continuity Cloud node.
1. From the menu, click on Interfaces and then select LAN from the drop-down list:

2. In the Static IP Configuration section of the page, enter the IP address for the virtual firewall:

IMPORTANT: Do not check the block private networks option. This would block traffic from the WAN-DMZ.
This IP address will become the default gateway IP for virtual machines on your LAN.
In the example shown above, the VM used to be on the network 192.168.1.0/24 (netmask 255.255.255.0) with the default gateway having an IP of 192.168.1.1.
3. Make sure that the IP Upstream gateway is set to None.
IMPORTANT: Do not check the Block private networks and loopback addresses option. This would block traffic from the WAN-DMZ. Leave this box unchecked.

Click Save when you’re finished.
4. Click Apply Changes at the top if you want the changes to take effect now.

SET UP THE DHCP SERVER |
Next, enable and configure the DHCP server (or leave it disabled within your environment.)
1. In the menu at the top of the page, choose Services> DHCP Server.

2. Click the LAN tab.
• If you do not want the firewall to act as a DHCP server, uncheck the Enable option.
• If you need a DHCP server on the LAN network, click the Enable box and then enter the Range of IPs the DHCP server should use in its pool.

Note: Typically, you can leave the DNS servers entry blank, and Axcients ’s DNS infrastructure will automatically be used.

3. Click the Save button.
CONFIGURE FIREWALL RULES AND NAT |
Now, configure any required firewall rules to allow external access to services running on your restored virtual machines.
Set outbound traffic
By default, all outbound traffic is allowed.
1. To disable all outbound traffic, browse to the Firewall menu and select Rules.

2. Click the LAN tab.
3. Find the rule(s) from the Source LAN net to any destination.
4. Click the green check mark on the left to disable the rule:

5. Finally, remember to click the Save button.

Port forwarding
Next, set up any ports to be forwarded from your assigned public IPs to internal IPs.
1. Click on Firewall in the main menu and select NAT.

2. Under the Port Forward tab, click the Add icon to add a new rule.

Normally, you should leave the Interface set to WAN and Protocol set to TCP:

3. For Destination, choose the proper IP address that corresponds to your desired public IP.

Note: The WAN address entry (shown) is your primary public IP.
If you have additional public IP addresses assigned, they will be present at the bottom of the drop-down list.

In this example, we have selected the third WAN IP.
4. Using the two Destination port range drop-down lists, select the protocol you want to forward from and to. You can also manually enter a range of ports. In this example, we are forwarding remote desktop:

5. For the Redirect target IP and Redirect target port, enter the virtual LAN IP address of the server that should receive the forwarded traffic.
Note: The Redirect target port is normally the same as the destination port. (In this example, remote desktop):

6. Typically, NAT reflection should be enabled with the Use system default setting.
This allows servers in your internal LAN to connect to forwarded ports using your assigned public IPs. (This is sometimes called NAT loopback.) Note that this may not work in all scenarios.

7. The Filter rule association setting determines whether to automatically add a firewall rule allowing port-forwarded traffic. Select Add associated filter rule.

8. After configuring the port forward rule, click Save. Then click Apply Changes.

Repeat this for all ports that you want to forward. Note: You can also setup 1:1 NAT if desired. Normally you do not need to customize Outbound NAT.
CONFIGURE THE OPENVPN SERVER |
Configuring an OpenVPN Server allows remote users to access resources on the LAN side of the virtual firewall.
1. To access the OpenVPN configuration, go to the VPN drop-down menu on the main navigation bar and select OpenVPN.

2. Any configured OpenVPN servers will be displayed. If none are present (as in the screenshot below), click on the Wizards tab on top to begin configuring a new server.

3. The OpenVPN Remote Access Server Setup Wizard will launch.
Under the Type of Server menu, select Local User Access and then click Next.

4. Add a new certificate authority (CA)

5. Enter your information in the form to generate a new certificate authority (CA).
- Ensure the Key length is set to 4096 bit.
- All fields are required.
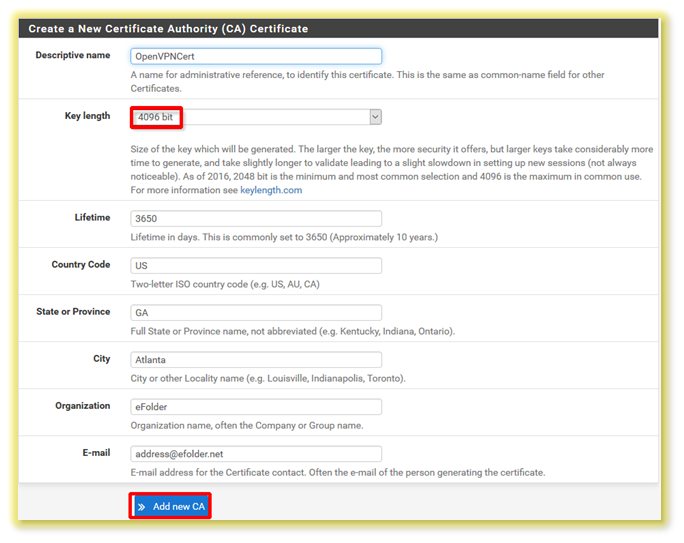
6. After all fields are complete, click Add new CA.
7. Add a new server certificate.

8. Enter your information in the form to generate a new server certificate.
- Ensure the Key length is set to 4096 bit.
- All fields are required.
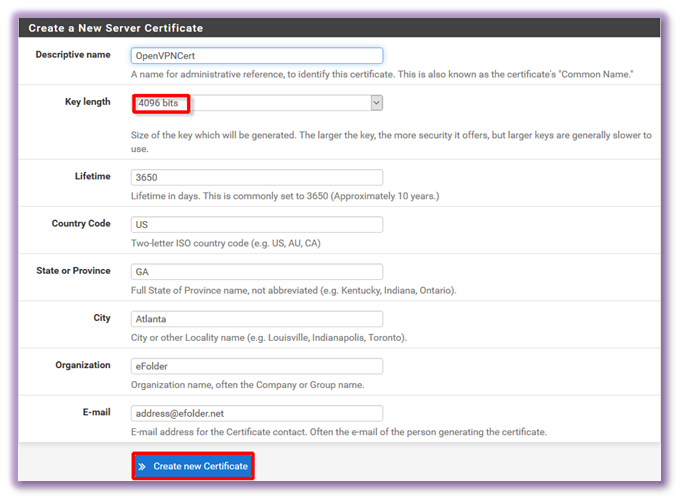
9. After all of the fields are complete, click Create new Certificate.
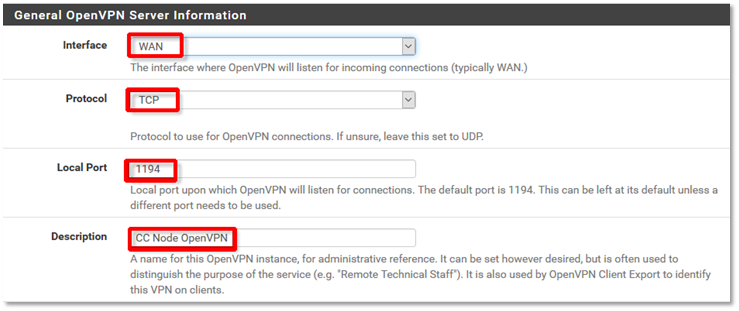
10. Configure General OpenVPN Server information:
a) Set Interface to WAN.
b) Set Protocol to TCP.
c) Make sure the Local Port is set to 1194.
d) Enter a Description for the OpenVPN server.
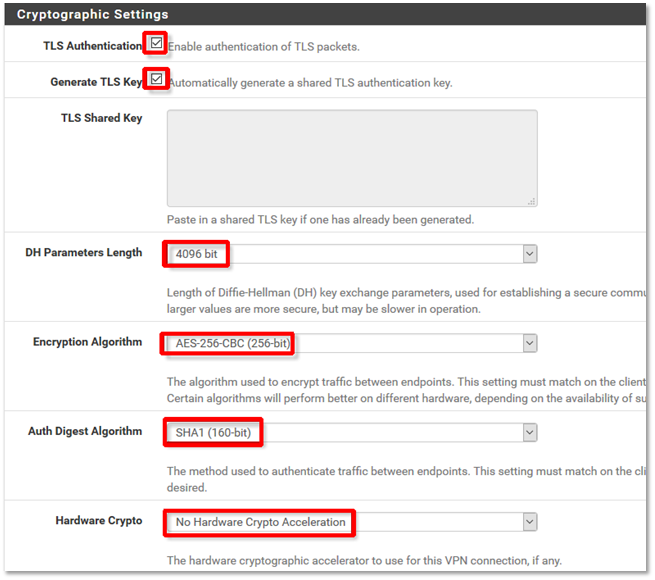
11. Configure the Cryptographic Settings for OpenVPN connections.
Use the settings as shown in the following screenshot:
a) Check the box by TLS Authentication to enable it.
b) Check the box by Generate TLS Key to enable it.
c) No TLS Shared Key is required. You may leave this field blank.
d) DH Parameters Length should be set to 4096 bit.
e) Set Encryption Algorithm to AES-256-CBC (256-bit).
f) For Auth Digest Algorithm, select SHA1 (160-bit).
g) Select No Hardware Crypto Acceleration for Hardware Crypto.
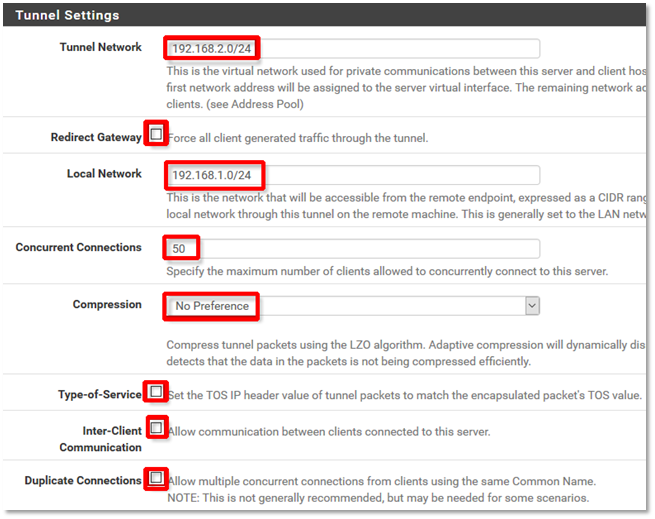
12. Configure Tunnel Settings
Notes: Set Tunnel Network to the unique private network used for communication between the remote hosts and this OpenVPN server.
a) Set Local Network to the LAN subnet of your pfSense firewall. This is the network that will be accessible to your remote hosts that connect to the Open VPN server.
b) Ensure that Concurrent Connections is set high enough to accommodate the number of expected remote hosts.
All remaining fields should be left at their defaults, as shown below:
13. Configure Client Settings:
a) Enable Dynamic IP by checking the box.
b) Set Topology to Subnet – One IP address per client in a common subnet.
c) Set DNS Default Domain to the domain name you want appended to the connection for remote hosts.
d) Set DNS Server 1 to the IP address of the remote DNS server you want remote hosts to use for name resolution.

e) Enable NetBIOS over TCP/IP to allow for propagation of NetBIOS traffic over the VPN connection.

14. After all Client Setting fields are configured, click Next.

15. On the Firewall Rule Configuration screen:
a) Check the Traffic from clients to server checkbox.

b) Check the Traffic clients through VPN checkbox.

16. Then click Next.
17. Next, click Finish on the completion screen.

18. Click the Edit icon and verify these two settings:

a) OpenVPN server has Server mode set to Remote Access ( SSL/TLS+User Auth
b) Local Database is selected as Backend for authentication.

19. Adjust settings if needed, and click Save at the bottom of the page.

SET UP REMOTE USER ACCOUNTS |
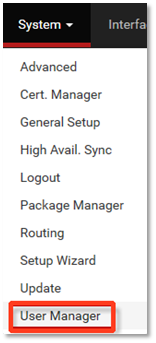
1. To setup user accounts for remote users, hover over System in the navigation bar on the main screen and select User Manager.
2. On the Users tab, select the Add button in the bottom right corner.

3. Set the Username and Password for the new user. Enter a full name for reference, if needed.

4. Check the Certificate box that states Click to create user certificate.

5. Click Save at the bottom of the page. The new user account will now be listed on the Users tab of the User Manager.

Download a fully-configured Open VPN client software installer
The following steps, performed on the newly created user accounts, give users access to the OpenVPN client download page.
1. Select privileges
a) Once a new user is created, click the Edit icon ,  then scroll down to the Effective Privileges section of the User Configuration page.
b) Click Add.

c) In the User Privileges section, under Assigned privileges, scroll down to WebCfg – OpenVPN: Client Export Utility and highlight that privilege by clicking on it.

d) Once highlighted, scroll to the bottom of the page and click Save.

2. Back on the User Properties editing screen, the newly effective privilege for the user should look like this:

3. Create user certificates. An internal User Certificate is required for each user to access the OpenVPN client.
a) In the User Properties screen, scroll down and click Add in the User Certificate section.

b) In the certificate creation section, be sure that the selected Method is Create an Internal Certificate

c) Scroll down to the Common Name field and enter a unique name for the certificate. This could be any name that is currently not being used by other services.

d) After the Common Name has been entered, scroll to the bottom of the page and click Save.

4. After the new internal certificate has been created for the user, the User Certificates section of the user edit screen should look like the image below:

5. The download can be accessed from two locations.
NOTE: This installer will fully install and configure the client software to a remote host. Users will only need to enter their username and password after installation.
Location 1
a) Click on VPN and go to OpenVPN at the top of the page.

b) Click on Client Export

c) Scroll to the OpenVPN Clients section and choose the installer appropriate for you. In most cases, you will use the Current Windows Installer option.

Location 2
a) Log out of pfsense with the admin username.

b) Log in with the newly created user account.

c) Scroll down to the OpenVPN Clients section and choose the installer appropriate for you. In most cases, you will use the Current Windows Installer option.

IPSEC VPN |
If you want to tie your virtual LAN to your actual LAN through an IPSec site-to-site VPN tunnel, please see the detailed instructions at: http://doc.pfsense.org/index.php/VPN_Capability_IPsec
Still need help? Submit questions to https://axcient.com/partner-support/
