
Table of Contents
STEP 1. Start a new recovery jobSTEP 2. Create a recovery jobSTEP 3. Select a recovery pointSTEP 4. Select a recovery path: (a) local cache or (b) directly from cloudSTEP 5. Select how to mount volumesSTEP 6. Monitor jobs in progressClean up, stop and delete jobsWhat to do if something goes wrong
What is Recovery Center?
Recovery Center is a companion recovery platform for Direct-to-Cloud (D2C) protected systems. It is a stand-alone application that allows you to perform file and folder recovery, virtual disk exports, and Hyper-V virtualization of protected systems.[Complete details on Recovery Center]
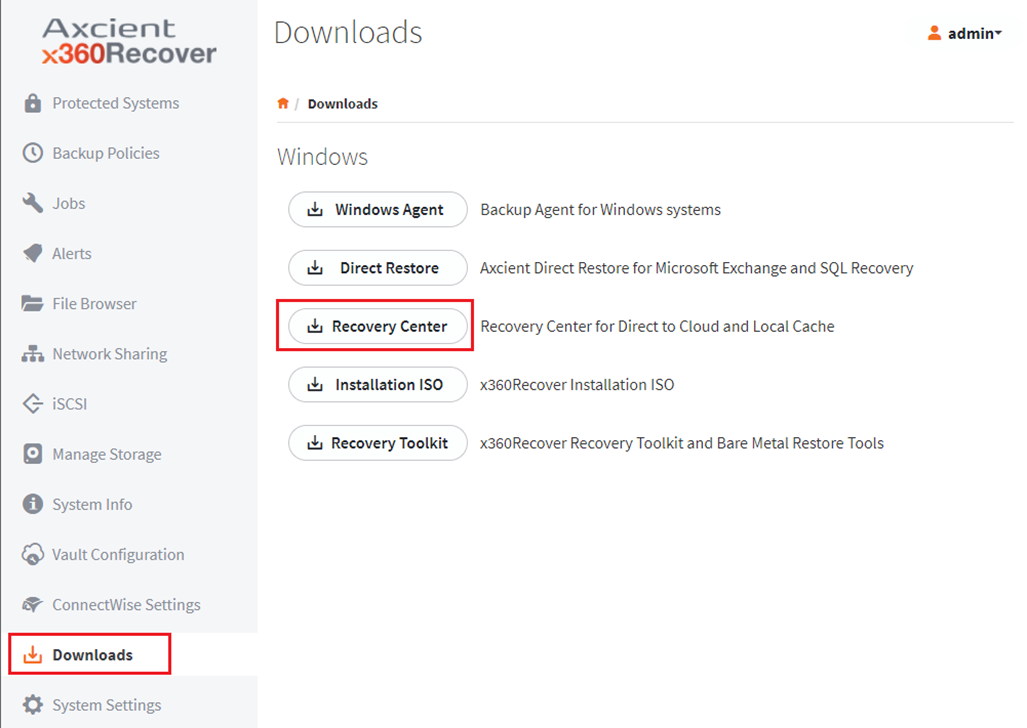
DeleteWhere do I download Recovery Center?
- Download the Recovery Center application installer from the Axcient Downloads page or at https://axcient.helpjuice.com/software-downloads/iso-terms-x360recovery-center
- You can also find download links to the latest installer version on the Downloads page of any x360Recover appliance or vault
 Delete
What are the pros and cons of this method?
| Advantages of using Recovery Center to restore files and folders |
|
Disadvantages of using Recovery Center to restore files and folders
|
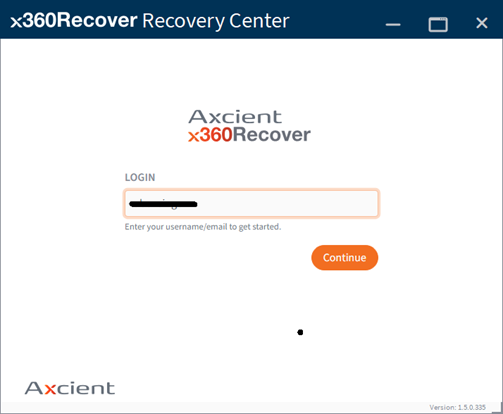
Log in to Recovery Center
- Open the application and the login screen will appear.
- Enter your username and click continue.
- Enter your password and click Login.
You may use either
(a) your x360Recover License Portal Partner username and password
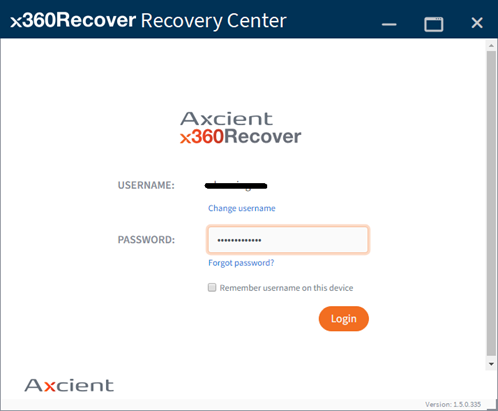
or (b) your x360Portal Partner user account credentials:
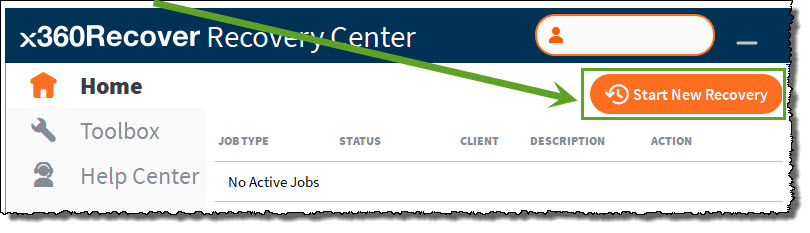
STEP 1. Start a new recovery job
After you log in, the main application window will appear.
Click the Start New Recovery button to begin a new recovery job.
STEP 2. Create a recovery job
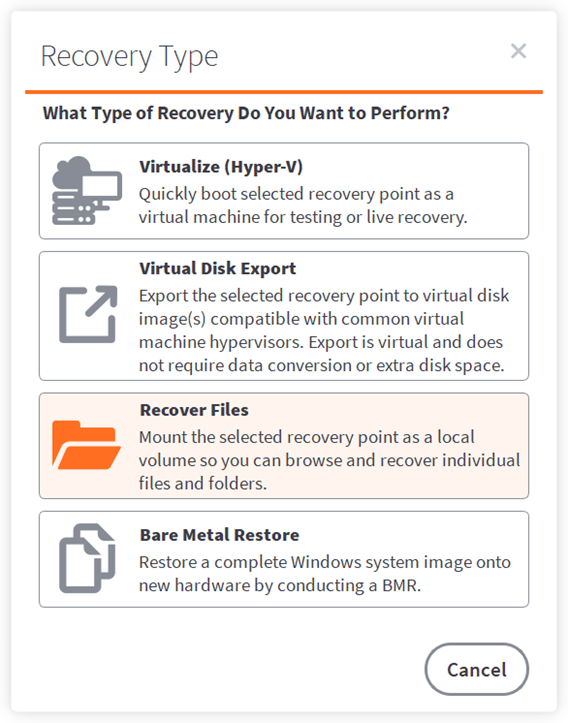
When the job wizard opens, select Recover Files from the Recovery Type page:
2a. When the Recovery Target window opens, choose a recovery target client by scrolling through the Client field and clicking the client whose data you wish to recover.
If the client list is long, narrow the contents by typing in the search box. Any partial match you type will be visible in the Results field.
2b. Select a Data Source. The field displays the vaults with protected system data belonging to the selected client. You have the option to select a local appliance, if available.
2c. Select a Protected System from the list of systems whose data is available on the selected vault.
Click Next to continue.
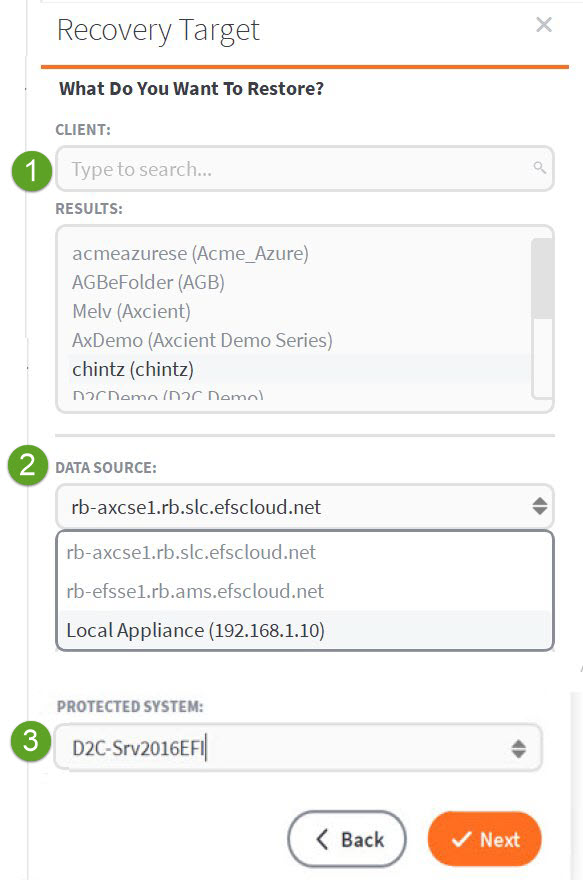
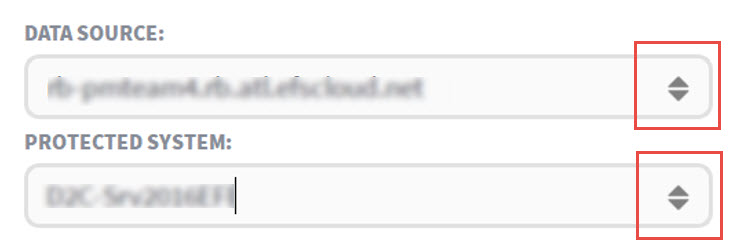
Note: To perform a partial search in either the the Data Source or Protected System fields, you can (a) begin typing in either field or (b) click directly on the up/down arrow to open a dropdown list of choices
STEP 3. Select a recovery point
When the Recovery Point screen opens, the default will be the most recent day for which snapshots exist.
- Browse forward or backwards by clicking Previous Day or Next Day.
- Or click to open the calendar and go directly to a date.
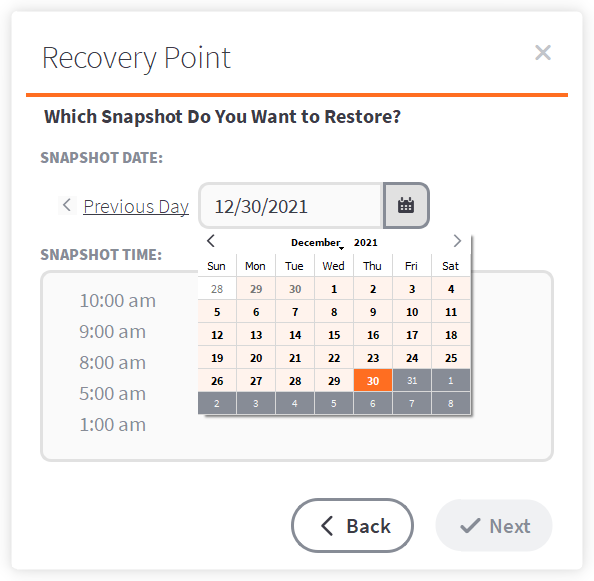
Note: Days on the calendar in orange have snapshots available.
Once you have selected the appropriate day, click to select an individual recovery point by hour of the day.
Click Next to continue.
STEP 4. Select a recovery path: (a) local cache or (b) directly from cloud
Next, select how the data will be accessed.
You can chose to access data either from (a) local cache or (b) directly from the cloud.
(a) Local cache
If you have a local cache repository available for this endpoint, select Restore Using Local Cache.
(i) Enter an (optional) friendly job description if desired, which will be shown in the application main window while the job is active.
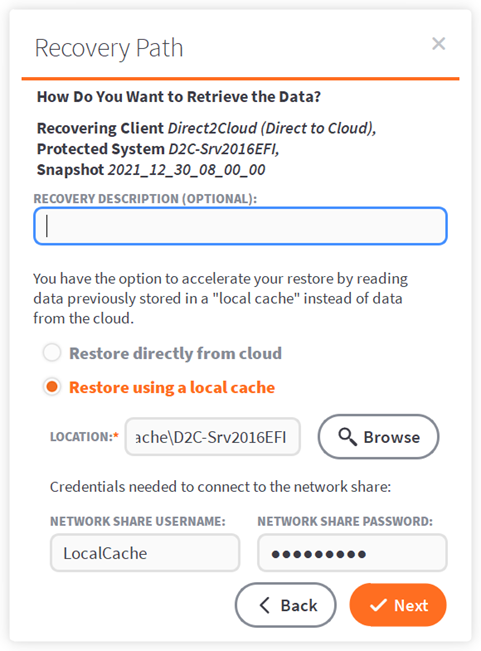
(ii) Type or browse to the location of the local cache data folder.
(iii) If your local cache is located on a network share, you must provide user credentials for accessing the data.
Click Next to continue.
(b) Restore directly from cloud
If you do not have a local cache repository available for this endpoint, select Restore Directly From Cloud.
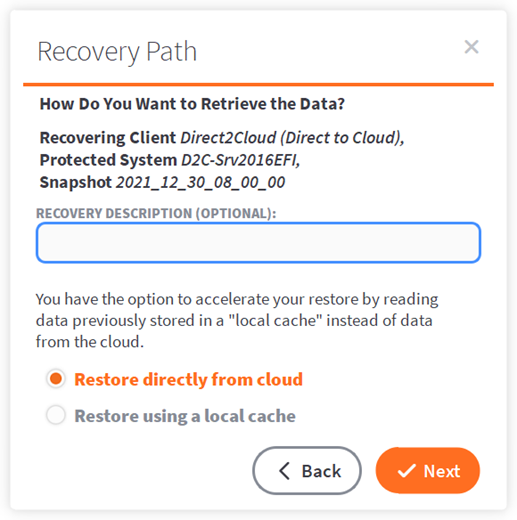
You may enter a friendly job description if desired, which will be shown in the application main window while the job is active.
Click Next to continue.
STEP 5. Select how to mount volumes
Next, specify how the protected system disk volumes will be mounted to the recovery workstation.
- Mount to Drive Letters assigns the first disk volume to the drive letter you specify. All remaining volumes will be assigned drive letters based on the next available letter.
- Mount to Filesystem Path creates a folder inside the target path for each disk on the protected system (for example: Drive0, Drive1)
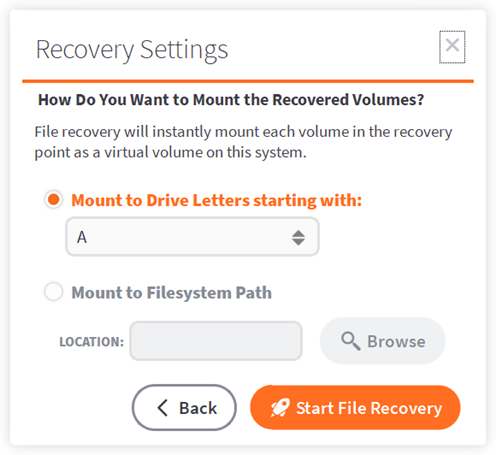
Click Start File Recovery to continue.
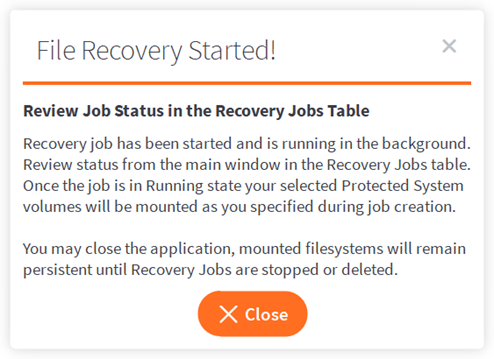
You may close the confirmation dialog box or application window.
The job will continue to run in the background.
STEP 6. Monitor jobs in progress
The job in progress will download needed metadata from the cloud to reconstruct the disk volumes.
You can monitor the job progress from the Recovery Center home page, under the Status column. Once the job status indicates Running, the disk volume has been created and mounted on this system.
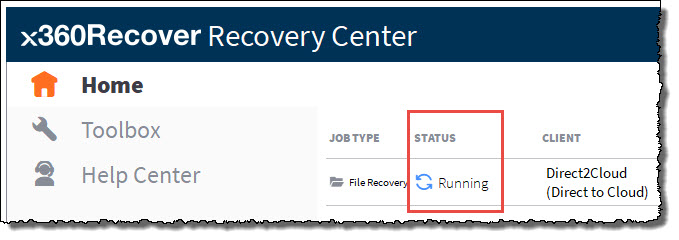
The protected system volumes should now be accessible from Windows Explorer.
Files and folders can now be browsed, searched, and copied wherever necessary to perform recovery.
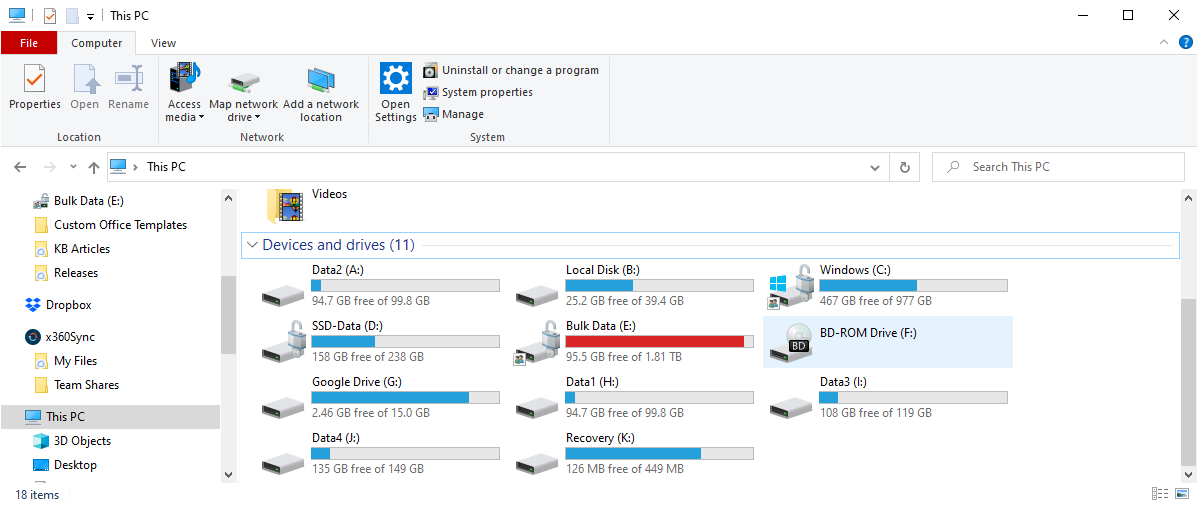
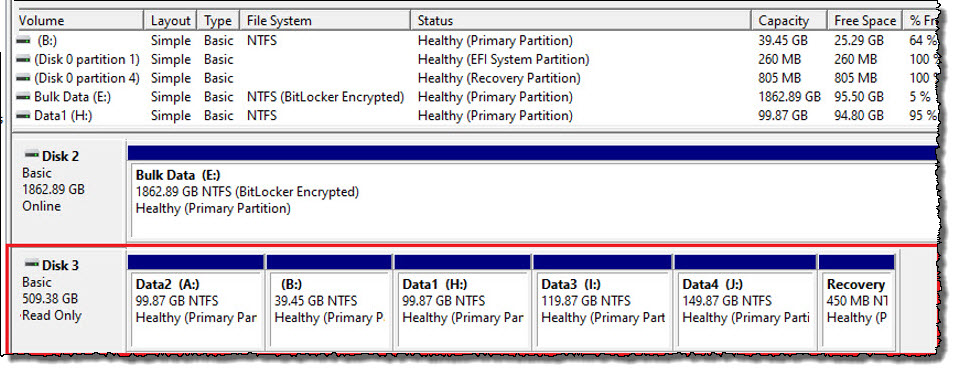
Where are volumes mounted?
To review where volumes are mounted, select Disk Management from the Control Panel -> Administrative Tools. This is handy when you are uncertain which protected system volumes were mounted to which drive letters.
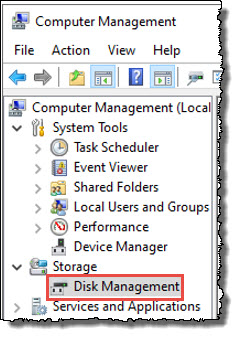
The display will show information for all disks.
You can now review the details of the mounted protected system volumes:
Notes:
- Recovery Center jobs are persistent until stopped and deleted. If a reboot occurs, the host workstation jobs will resume their previous run state (i.e. running or stopped).
- Files and folders within the mounted virtual disk retain the same Windows security permissions they had on the original protected system environment. If you are recovering secure files from a Windows domain server environment, you may not have access to files and folders if you are not logged in to the same domain with an appropriate user account
- In Recover Files mode, Recovery Center creates a read-only virtual hard disk with one partition created for each volume on the protected system. Each volume will retain its original volume Label and be assigned a drive letter or mount point as specified in the job configuration.
Clean up, stop and delete jobs
After you have finished copying and restoring your files, it is best practice to clean up the running jobs and exit Recovery Center.
- Click Stop from the Action column of the main Recovery Center window for that job.
- Click Delete from the Action column to permanently remove the job and clean up temporary files.

What to do if something goes wrong
Two steps: (a) Contact Axcient Support for assistance and (b) run the Analysis Tool.
(a) Contact Axcient Support for assistance and generate a ticket ID number
Log in to the x360Portal (https://partner.axcient.com), and select Create New from the Support page:
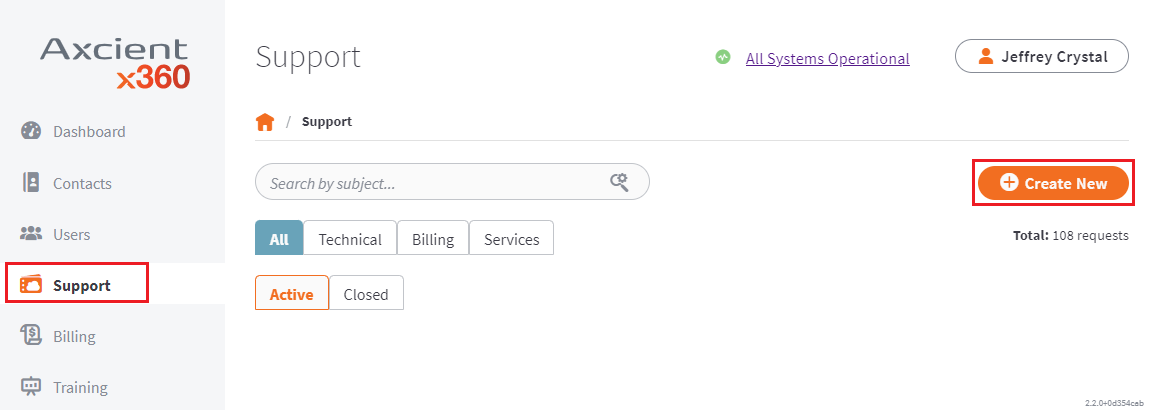
Then, provide a detailed description of the issue you have.
Finally, note the support ticket ID number that is created. (You'll need this for the next step, when you run the Analysis Tool.)
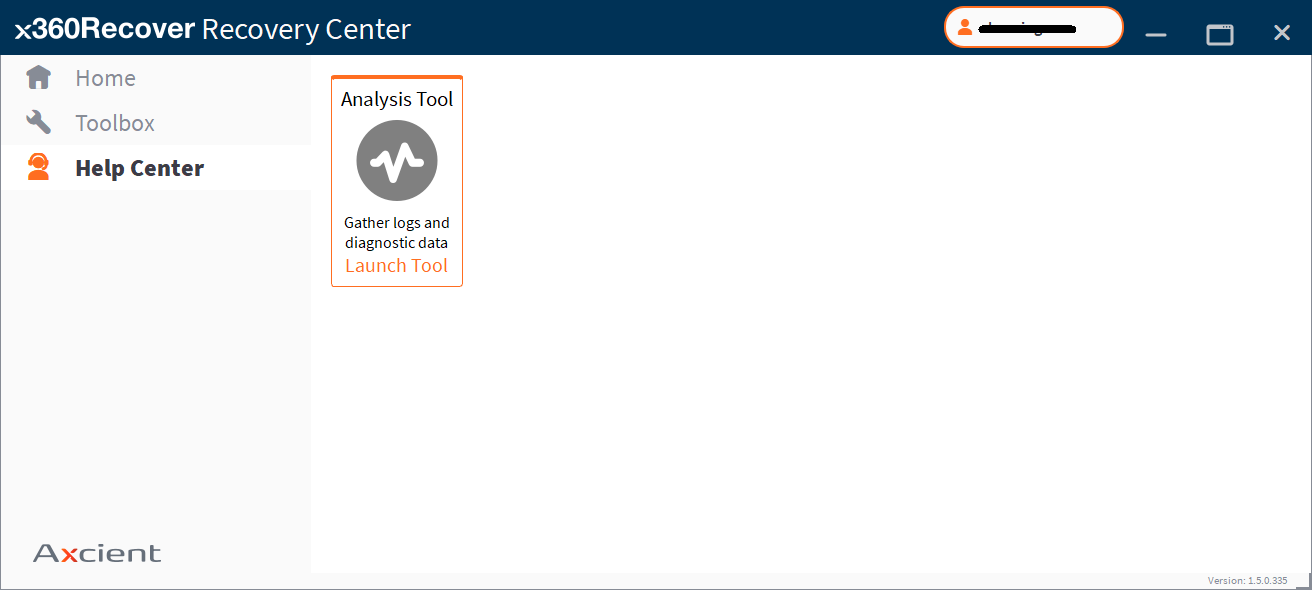
(b) Run the Analysis Tool
After you have noted your support ticket ID number from above, run the Analysis Tool from within the Help Center in Recovery Center.
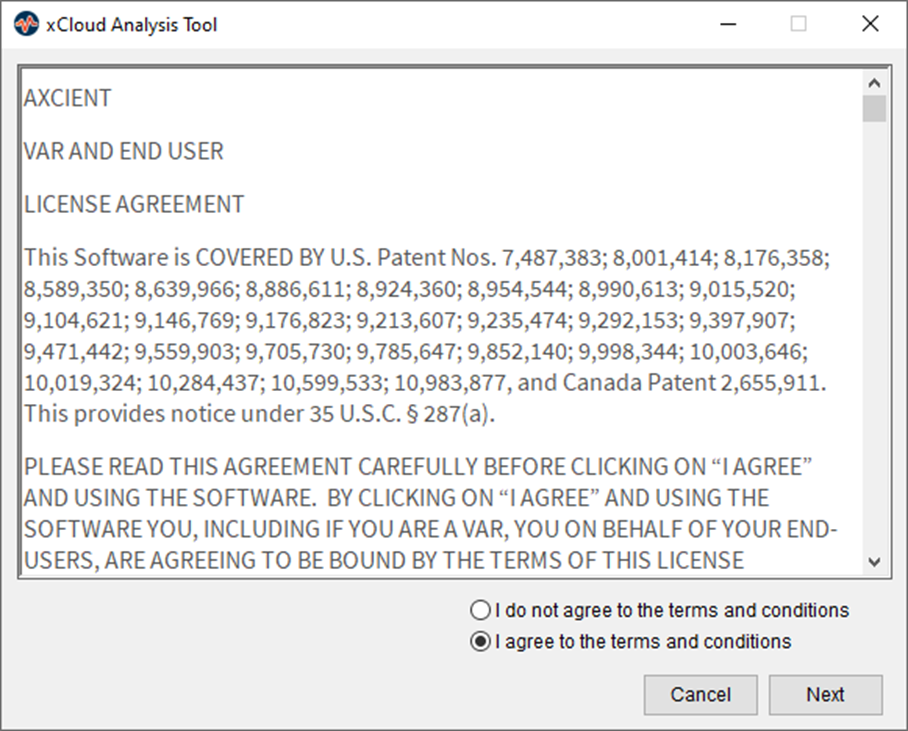
Accept the End User License Agreement and click Next to continue.
- Accept the default testing criteria.
- Enter the support ticket ID number generated from your request above.
- Click Analyze to begin.

- Testing will take a few moments.
- Results will be uploaded to your support ticket automatically once complete.
- Click Finished to close the application.

SUPPORT | 720-204-4500 | 800-352-0248
- Contact Axcient Support at https://partner.axcient.com/login or call 800-352-0248
- Free certification courses are available in the Axcient x360Portal under Training
- Subscribe to the Axcient Status page for a list of status updates and scheduled maintenance
1053