
Overview
You can use nightly boot tests to prove the general recoverability of your protected systems. (See Autoverify for x360Recover appliances).
But those nightly boot tests do not necessarily meet requirements for proving that your client's environment can be fully recovered in the event of a disaster.
You may wish to perform more comprehensive periodic tests of disaster recovery capability for your client's complete environments. These tests may be part of your SLA requirements or included as part of your general business practice.
You have several options when performing disaster recovery tests with x360Recover:
Appliances: Perform disaster recovery tests on multiple systems
How to perform disaster recovery tests on appliances
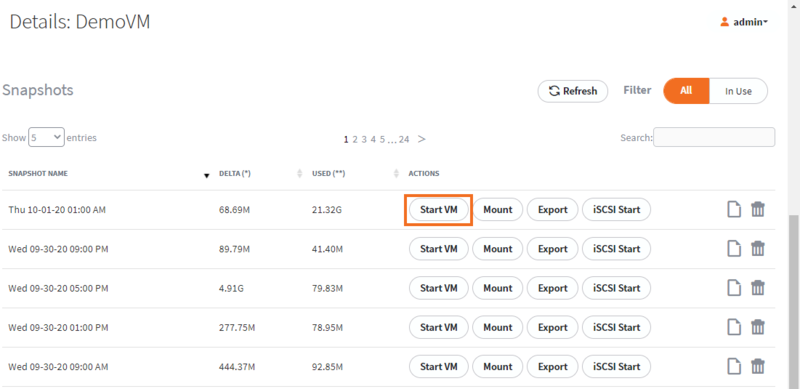
To virtualize one or more protected systems for testing, you'll use the StartVM recovery operation on the appliance.
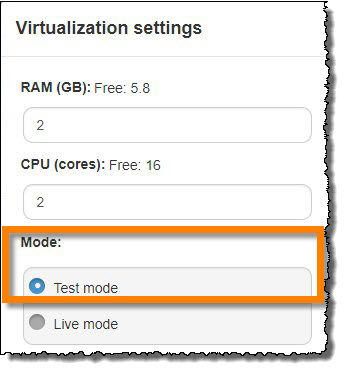
- You'll assign RAM and CPU resources when starting the virtual machine
- Boot from any point in time by selecting the desired recovery point on the Protected Systems Details page
- You may over-commit CPU resources (i.e. use more CPU cores for virtual machines than the physical host has) but you cannot over-commit RAM memory
- Start as many virtual machines on the appliance as your available RAM permits
Notes on Test mode: When performing recovery testing on an appliance, always use StartVM in Test mode rather than Live mode.
- In Test mode, the virtual machines are isolated to a private network on the appliance. There are no DHCP services or network gateways that would allow network communication outside of the testing sandbox.
- For a production recovery, you would choose Live mode, which provides the virtual machine live access to one or more networks.
Note: Never start a system in Live mode when the production server is still online. The virtual machine will conflict with the production system on the network, causing unexpected results.
Testing multiple systems
- Assign a static IP address to machines being tested
When booted in Test mode, the virtual machine will be given a new network adapter, which it has never seen before. This means it will default to DHCP. Since there is no DHCP service present in the network sandbox, Windows will assign it an APIPA (Automatic Private IP Address) address in the range 169.254.0.0/16. While this address is usable for some basic network tasks, it’s generally not very useful for Windows server testing. You will need to assign a static IP address to your protected machines being tested.
- After the system has booted, use the terminal to login, then configure a network IP address to your liking. All running systems will be on the same virtual LAN network.
Note: It is not necessary to set a default gateway address. The network does not have a gateway to allow communications outside of the network sandbox.
- You may want to set the DNS address to the address you assign to your Active Directory Domain Controller (presuming your test environment includes one or more Domain Controllers)
- You will not be able to test applications or services that require internet access
Hyper-V host: Use Recovery Center or virtual disk export to test
Methods to perform disaster recovery tests with a Hyper-V host
If your environment includes a Hyper-V host with sufficient resources to perform disaster recovery testing, you'll have several methods to connect the hypervisor host to your backup data:
HYPER-V METHOD#1 - Use Recovery Center (Recommended)
We recommend that you use Recovery Center to leverage Hyper-V with x360Recover.
Install Recovery Center directly onto the Hyper-V host. (It can only communicate with Hyper-V on the localhost adapter and does not support managing a remote Hyper-V host.)
Use Recovery Center to create one or more Hyper-V virtual machines. You can do this using the Virtualize Hyper-V job type.
- Recovery Center can provide virtualization directly from an x360Recover appliance
- If your protected system is being backed up via Direct-to-Cloud, you will require a local cache for the systems being virtualized. Local cache is needed to achieve acceptable performance. (See Local Cache)
Note: Recovery Center natively supports Test mode and Live mode recovery options. In Test mode, the virtual machine defaults to having no network connection. Also, when deleting the recovery job, the default option is to delete the virtual machine on the Hyper-V host.
IMPORTANT: You may opt to select either Test mode or Live mode with Recovery Center, but, in either case, you should specify a private virtual network that has no access to the production LAN. This enables communication between multiple virtual machines without allowing the testing environment to interfere with the production machines.
HYPER-V METHOD #2 - Use Virtual Disk export
Alternatively, you can export your protected systems to VHD or VHDX virtual disks on either an appliance or vault.
You'll download the virtual disks to the Hyper-V host and manually create virtual machines to perform testing.
IMPORTANT: When configuring your virtual machines, make sure you specify a private network connection with no access to the production LAN. This enables communication between multiple virtual machines without allowing the testing environment to interfere with the production machines.
VMware ESXi: Test using virtual disk image exports for appliances or vaults
How to perform disaster recovery testing using VMware ESXi
If your environment includes a VMware ESXi host with sufficient resources to perform disaster recovery testing, you may opt to use this hypervisor host for your x360Recover testing.
You have two options for virtual disk recovery using VMware:
IMPORTANT: When configuring your virtual machines, make sure you specify a private network connection with no access to the production LAN. This enables communication between multiple virtual machines without allowing the testing environment to interfere with the production machines.
OPTION#1: Virtual disk export with NFS sharing (Appliance)
x360Recover natively supports VMware ESXi virtual disk image exports.
- On an appliance, use the Export option on the recovery point you wish to test and then enable NFS Exports.
- VMware hosts can natively consume NFS shares as a data store, so you can mount the appliance as an NFS datastore and then manually create virtual machines using the virtual disk images on the appliance.
- Disk exports created on x360Recover 12.3.0 and newer created in static formats (fixed size, not dynamic) are read/write and can be used directly for virtualization. This includes VMDK for ESXi formatted virtual disks.
NOTE: We recommend that you create the virtual machine definition files (.vmx) on the appliance NFS share when you are creating your virtual machines. This will make it simple to later migrate the virtual machine and it’s disk volumes to another VMware data store. (VMware does not have an option to move only the storage components of a VM, so if the VM definition is located on your only native storage pool, you won’t be able to move the VM to that storage pool.)
OPTION#2: Virtual disk export with Recovery Center (vault / Direct to Cloud)
If your protected system is on a vault using Direct-to-Cloud and you have a Local Cache repository, you can use Recovery Center to generate the virtual disk export locally. This lets you avoid downloading the disk images over the internet.
- Use Recovery Center to create a Virtual Disk Export job.
- Select the desired protected system and recovery point and then generate the virtual disks on a convenient workstation or server on the same network as the VMware host.
- Upload the virtual disk images to ESXi and create your virtual machine manually.
NOTE: This recovery method requires that you have sufficient free storage space on your VMware host to accommodate the disaster recovery virtual machines.
Virtual Office: Practice disaster recovery in Virtual Office with Runbooks
How to perform disaster recovery testing with Virtual Office
Virtual Office is an excellent place to perform disaster recovery testing.
The Axcient Virtual Office is a powerful self-service cloud virtualization platform integrated with your x360Recover vault. Virtual Office provides VPN, firewall, network port forwarding, and runbooks options to streamline disaster recovery operations in the cloud. (More about Virtual Office)
-
Virtual Office is a billable service. Billing is based on the time any given protected system is actively running as a virtual machine within a Virtual Office instance. Billing is calculated in days, with quarter day increments. Use for each protected system is tracked individually. (More about Virtual Office billing)
Note: x360Recover includes 30 days of Virtual Office use for each protected system. This Virtual Office entitlement is tracked per protected system. (This is not a pool of usage like Storage.) Virtual Office entitlement can be used at your discretion — for performing tests or live disaster recovery operations.
Using Virtual Office
For users new to Virtual Office, see Getting Started with Virtual Office.
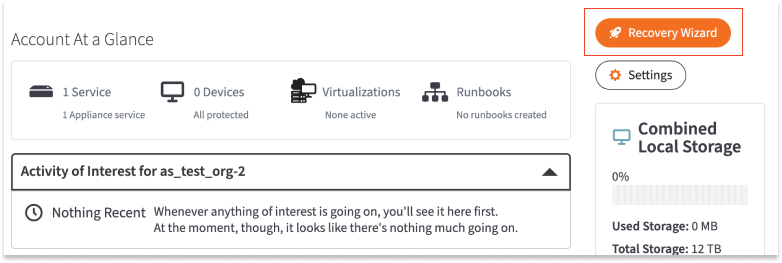
To perform a disaster recovery test in Virtual Office, start a new Virtual Office by clicking on the Recovery Wizard button from the Clients page in Recover Manager.
Select your protected systems, then configure virtual machine and network settings. Next, select recovery points, and then start the virtual machines. (See Start a Virtual Office)
Disaster recovery testing within Virtual Office can go beyond simply booting up machines and testing application operations.
Other testing options include:
- VPN and client access
- Network port forwarding and internet services (email, web, etc.)
- End-to-end DR validation
- Using runbooks to automate configuration and deployment of DR environment
Note: It is important not to enable outbound internet access from your test Virtual Office deployments. Allowing outbound internet access could cause test virtual machines to conflict with the production system.
Using Virtual Office Runbooks for practice
Practicing disaster recovery in Virtual Office provides an opportunity to pre-stage a Runbook for a given client.
- Using a Runbook, you can pre-configure the servers and the resources to be recovered in the event of a real disaster.
- You can also set up firewall and network port forwarding rules and configure VPN settings (among many other tasks.)
- With just a few clicks, you can launch a runbook and have the Virtual Office up in running in minutes, reducing the time it takes to get your client’s critical systems back up and running.
Additional reading:
SUPPORT | 720-204-4500 | 800-352-0248
- Contact Axcient Support at https://partner.axcient.com/login or call 800-352-0248
- Free certification courses are available in the Axcient x360Portal under Training
- Subscribe to the Axcient Status page for updates and scheduled maintenance
1603