
This content is outdated
|
ConnectWise Manage® PSA is professional service automation software that helps you efficiently manage all aspects of your business.
Axcient's BDR for ShadowProtect can be configured to push information about Axcient services to your ConnectWise Manage®PSA, using the ConnectWise integration APIs. The tight integration between Axcient and ConnectWise allows you to streamline your support processes and report to customers on backup health.
But before integrating your Axcient and ShadowProtect customers with ConnectWise, you must first complete the following six requirements:
Six “Must Have” Requirements BEFORE You Begin:
ConnectWise Manage® requirements:
1. Purchase the MSP ConnectWise add-on from ConnectWise*
2. Have ConnectWise System Administrator access, with All Administrator Rights*
3. Complete the ConnectWise University Training prior to setting up ConnectWise*
Axcient requirements:
4. Use Axcient's Online Backup Manager (version 3.17.35 or higher)
5. Be an Axcient Senior Manager Account Holder with All Administrator Rights
6. Complete the Axcient ShadowProtect BDR and Web Portal Training prior to setting up integration
|
*Need help with these ConnectWise Manage® requirements? If you need help with ConnectWise setup information, agreement, reports, billing, or business strategy questions, submit questions to ConnectWise Support. |
When you have completed all of these “Must Have” requirements, you’re ready to begin integrating ConnectWise Manage® with Axcient's BDR for ShadowProtect.
~~~~~~~~~~~~~~~~~~~~~~~~~~~~~~~~~~~~~~~~~~~~~~~~~~~~~~~
Step 1. Create ShadowProtect BDR accounts in Axcient's web portal
For each source ShadowProtect BDR cloud, create a new account with a ShadowProtect Cloud service plan in the Axcient BDR Portal.
Note: For detailed instructions on creating new accounts in the Axcient BDR Portal, please review the Overview of the Axcient BDR Portal video
Step 2. Set up new ticket service status
This step is only needed if you plan to use ticket integration.
Skip this step if you are not setting up ticketing integration.
ConnectWise must be told which ticket service status to use when Axcient tries to create a ticket with a “Not Responded” (new) status. Complete the following steps:
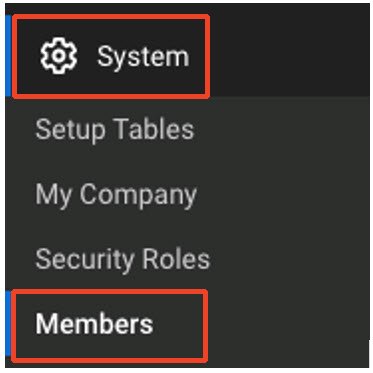
a) In ConnectWise, go to the System tab, and choose Setup Tables.
b) Locate the Service table, and then select Service Board, your Board Name, and, finally, the Statuses
c) Edit (or create) the status for new Axcient-related tickets in this service
d) Ensure the External Integration XRef field is set to Not Responded (Set).

Service boards cross-referenced in this way will now be available for integration.
Step 3.Create an API Member with security keys in ConnectWise Manage®
Effective January 1, 2020, ConnectWise has issued an end of life schedule for their legacy SOAP API.
All partners using the SOAP API must reconfigure their ConnectWise integration to use the newer REST API prior to January 1, 2020 to ensure that their ConnectWise integration continues to work without interruption.
The primary configuration difference between the SOAP and REST API interfaces is user authentication. The legacy SOAP interface utilized integrator login accounts for configuration, while the newer REST interface uses API member logins with security keys.
Axcient has released an update to the billing portal enabling ConnectWise to use the REST API, but some user configuration changes are necessary in order to activate it. Each Axcient partner currently using the ConnectWise integration feature within the billing portal will need to perform the changes to their configuration as described below.
The updated REST API depends on keys (not on login credentials.)
To generate an API key from ConnectWise for use in the Backup for Files (BFF) portal, login to ConnectWise and follow these instructions:
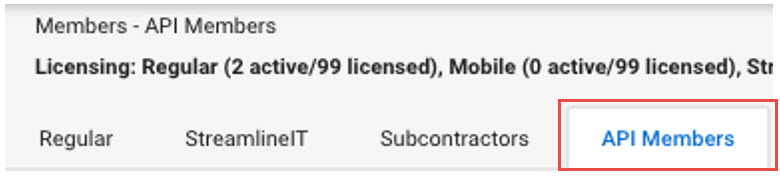
Navigate to System > Members
Find the API Members tab
API members are special login accounts valid only for performing REST API operations.
- API members cannot login to the ConnectWise client or web portal.
- API members do not consume user licenses.
- An API member account can have one or more security keys associated with it, used by third party integration for authentication to ConnectWise.
Note: ConnectWise access restrictions are configured at the API member level, when necessary.
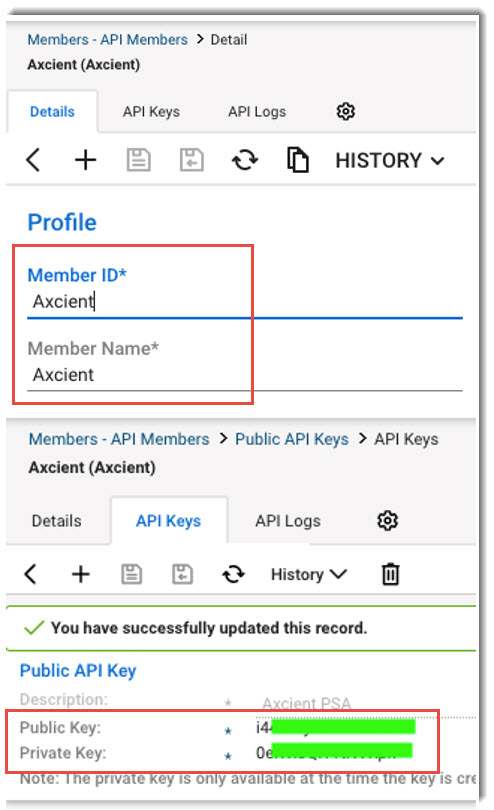
Create the API Member ID & generate the API key
Typically, you would create (a) one API member for each integration you need to configure, and (b) one API key for each member.
|
Please note that the member name and description shown in these examples is unimportant - merely a friendly name to clearly identify the integration for which it was created. After you've created and saved the member ID, create an API key for that member . The public and private keys created here serve as the username and password for your integration login. Important note on private keys: You can only view the private key immediately after it is created! There is no way to reveal this private key again at some point in the future. IMMEDIATELY capture the private key and save it within your secure password vault before proceeding. If you've lost the private key for an API member account, you must create a new key and capture the private key at the time of creation. |
Step 4. Configure the Axcient Management Solution in ConnectWise Manage®
A management solution must be set up in ConnectWise Manage® to represent your Axcient services.
- In ConnectWise, navigate to the System tab and choose the Setup Tables tab.
- Search for and open the Management IT Solution List table.
- Click the New icon and choose a management solution name (such as Axcient).
- In the Management IT Solution field, select Custom.
- In the Custom Solution Name field, enter the same management solution name you chose above in step 3 (such as Axcient).
- Do not fill in a username or password or change anything else. Instead, just click Save.

Step 5. Cross-reference ConnectWise products with Axcient Services
To set up integration cross-reference:
- In ConnectWise, navigate to the System tab and click Setup Tables.
- Search for and open the Managed Devices Integration List table.
- Select the management solution you created in the previous step and configure the Axcient Management Solution in ConnectWise.
- Select the appropriate Integrator Login.
- Select Global in the Login By field.
- Check the Disable Newly discovered Cross-References checkbox.
- Select Detailed in the Billing Level field.
- Check the Match on Serial Number checkbox.
- Leave all other options blank.
- Click Save to save the changes to the record.

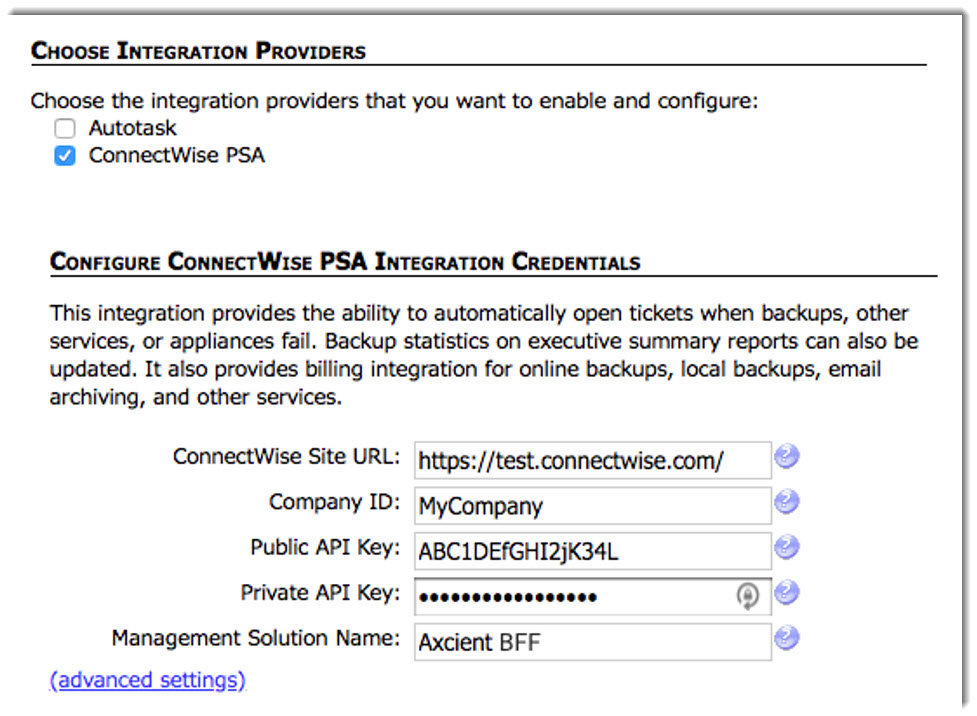
Step 6a. Configure ConnectWise Manage® credentials in the Axcient Web Portal
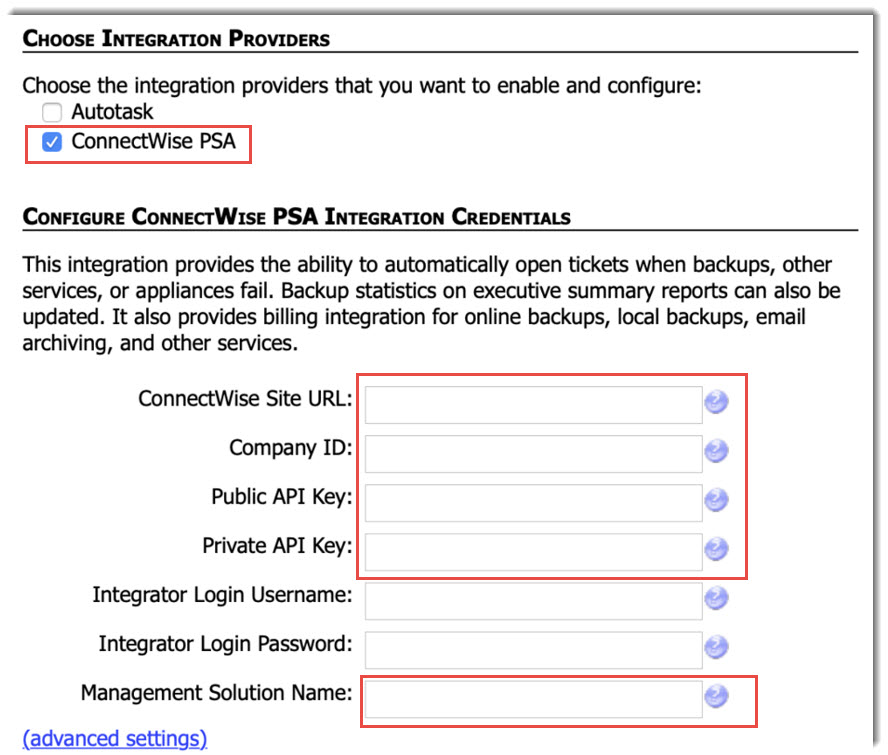
For a new configuration: Select ConnectWise PSA under the Choose Integration Providers menu,.
Note: A fresh configuration will have both the API key fields and the Integrator Login fields. (Partners with an existing SOAP API integration configured will have all fields except the public and private API keys already populated.)
|
Before REST is enabled:
|
|
Enter the following information to configure the integration:
You can ignore any existing Integrator Login information. It will be disabled when REST enables. Once you save changes with both public and private API keys, the SOAP Integrator Login fields will disappear and the integration will switch to using REST. |
After REST is enabled:
Step 6b. Configure ConnectWise integration in the Axcient Web Portal
- Login to the Axcient Web Portal with your company’s Partner Senior Manager user account.
- Select My Partnership -> Integration Setup on the main menu.

- Check the Update Backup Statistics checkbox to update the executive management report.
- Check the Update Invoice Descriptions checkbox to update the billing invoice line item descriptions with detailed, per-account disk-usage amounts.
- Check the desired checkboxes to enable the services that you configured for integration in “Step 5. Cross-reference ConnectWise Products with Axcient Services.”
- Remember to click Save Changes to save your changes.
Step 7. Configure partner-wide ticket notification on the Web Portal
To configure notifications in the Axcient Web Portal, follow these steps:
- Choose the My Partnership > Partner Notifications menu item.
- Click the Create a New Notification link at the bottom of the page.

- In the Notification Action field, select Open a ConnectWise ticket.
- Decide which event severities you are interested in. Typically, you will only want to be notified for a ticket when there is a warning or error.
- Select which types of events should trigger a ConnectWise ticket (if the event severity matches your chosen settings).
In most cases, you can leave the Subscribe to All Event Types field with its default value of Yes. You will then be notified for a warning or error of any type (backup failure, archiving failure, BDR hardware failure, and so forth).

- Finally, click Create.
Step 8. Configure Partner-Wide ConnectWise Data Synchronization
- Login and choose the My Partnership->Partner Notifications on the main menu.
- Click the Create a new notification link at the bottom of the page.

- a) Select Synchronize with ConnectWise in the Notification Action
- b) Select Yes in the Subscribe to All Event Types field to subscribe to all event
- c) Select Yes in all the other fields to subscribe to all event
- d) Click Create to create a new

Set Up a ConnectWise Company to Integrate with Axcient Services
Now that ConnectWise integration with Axcient has been configured globally, you must perform some additional steps for each ConnectWise company that needs to integrate with Axcient services. These steps will cross-reference Axcient accounts and customers with ConnectWise company records.
Note: The following sections describe the steps you must perform for each ConnectWise company.
Configure the Managed ID for a ConnectWise Company
It is necessary to configure two distinct settings for each Managed ID in ConnectWise:
The first setting is for Workstations and Servers and the second setting is for Backup Stats.
The following steps must be performed in this order for each ConnectWise company to be integrated with Axcient.
There will be a ConnectWise data flow issue if the Workstations and Servers and Backup Stats are switched in order of entry.
A. In ConnectWise, go to System, and select Setup Tables.Note: Do not make this addition from the Companies tab or you will see this error:
If you see this error, please be sure you are using this System icon, found on the bottom left:
2. Type in Managed and press enter to search. 3. Select Managed Devices Integration. 4. Select the Company tab and find the the company records to configure. 5. Click on the correct Device Integration Name. 6. Click on the Companies tab on the top navigation bar:
7. Select the Company Name. 8. Click the + icon to add a new Management Solution.
B. Next, log in to the Axcient BDR Portal using the Account Center (Visual View):9. Make a note of the Axcient Customer ID number (found in the ID column).
REQUIRED Managed ID Entry #1: Workstations and ServersC. Return to ConnectWise.10. Return to ConnectWise and enter the EFS-[efolderCustID] in the Managed ID field. For example, enter EFS-19652. 11. In the Device Type field, select Workstations and Servers. Note: The Workstations and Servers field must be the first entry. There will be a ConnectWise data flow issue if the Workstations and Servers and Backup Stats are switched in order of entry. 12. Leave the Agreement field blank. This field must be blank. 13. Click Save. REQUIRED Managed ID Entry #2: Backup Statistics14. Click the + icon to add a new Management Solution.
15. Fill out the fields again for the same Managed ID information with the EFS-[efolderCustID]. 16. In the Device Type field, select Backup Stats. (This must be the second entry only.)
17. Leave the Default Agreement field blank. This field must be blank. 18. Click Save and then Close. Note: Ensure the entry order has Workstations and Servers first and Backup Stats second, as shown. A ConnectWise data flow issue will occur if these two entries are switched.
19. Select the Company > Management tab and then click the Printer icon.
This will generate the ConnectWise Management Report , which tells you if backup sync is working properly.
|


Executive Management Reports
After the two distinct settings for each Managed ID in ConnectWise have been fully configured (the first for Workstations and Servers and the second setting for Backup Statistics), the backup statistics on the Executive Management report will be updated after each completed backup.
Here is an example report with the backup statistics updated by the Axcient integration process:

Billing Setup Instructions
1. Create ConnectWise Products for Axcient Services
This step is only needed if you plan to use billing integration.
Skip this step if you are not setting up billing integration.
- Each ConnectWise product tracks a different line item on your customer’s agreements and invoices.
- You must configure one ConnectWise product for each Axcient service to be automatically billed.
Depending on the needs of your customers, you might create new ConnectWise products for one or more of the following Axcient services, as appropriate. Axcient services are generally categorized as listed below:


The following step-by-step instructions will walk through how to create and cross-reference various ConnectWise products to a selection of Axcient services. Examples will show how to create ConnectWise products for flat monthly pricing, as well as for situations where your customers may have Axcient usage charges.
Notes on Creating ConnectWise Products for Axcient Services:
- Because Axcient online backup service plans vary, one ConnectWise product is needed for each variety of Axcient online backup service plan.
- You can customize the ConnectWise product names. Correlations between Axcient services and ConnectWise products are setup explicitly later on, so the actual names of the ConnectWise products can be customized according to your preference.
- Normally, you do not need to create a Local Backup Storage product. Typically, you will bill for local backups based on the number of servers and desktops rather than the amount of storage that is protected with local backups.
- ConnectWise products are only for usage charges. For example, set up a ConnectWise product for the usage charges related to a flat monthly service including 25 GB of online backup storage.
2a. Create ConnectWise Products For Axcient Service Usage Charges:
- In ConnectWise, navigate to the Procurement tab, and then click the Products tab.
- Click the New icon and fill in the Product ID and Description fields.
- Select a Category/Sub Category, Product Type, and Product Class .
Note: We recommend choosing Managed Services, Software, and Service, as shown below. You may need to create the options within ConnectWise Setup Tables.
- Select Each in the Unit of Measure field.
- Set a list price for the default price in the Unit Price field.
- Enter a simple one-line description in the Customer Description field, such as “Basic Online Backup, $1.50/GB.”
- Repeat these steps for each ConnectWise product to be created.

These ConnectWise products are only for usage charges. For example, set up a ConnectWise product for usage charges related to a flat monthly service which includes 25 GB of online backup storage. Do not use ConnectWise products for Axcient fixed price service fees.
2b. Create ConnectWise Products for Axcient Fixed-Price Service Fees
In some cases, you may charge your customer a fixed-price flat fee which includes an initial amount of storage. For example, you might charge a customer $8.00 and include 25GB of storage spread between unlimited accounts. In this case, you would set up two ConnectWise products but only cross reference one:
a. First, create one separate ConnectWise product with the flat monthly price of the fixed-price Axcient service.
For example:
New ConnectWise product#1: |
Fixed Price: |
Online Backup Basic Storage Flat Fee |
$ 8.00 |
b. Next, create an additional separate ConnectWise product, detailing charges for extra usage related to that first product. Describe what is included for free in the product name:
New ConnectWise product#2: |
Per Unit: |
Online Backup Basic Storage w/25 GB |
$1.50/GB (up to 25 GB free) |
c. Add both products (in this example,” Online Backup Basic Storage Flat Fee” and “Online Backup Basic Storage w/25 GB”) to your customer’s agreement.
d. When adding these products to your Agreement Additions, modify the Per-Unit product with an appropriate "Less Included" value. (In this example "25".) See section 3 "Set up Agreements to Bill for Axcient Services" for more information.
e. When adding products to Product Cross References, only cross-reference the second per-unit product.
Do not cross-reference the fixed or flat fee product.
After you have configured your ConnectWise products to your Axcient Service Plans, your product list might look like the one shown below:

3. Cross-reference ConnectWise Products with Axcient Services
- In ConnectWise, navigate to the System tab and click the Setup Tables tab.
- Search for and open the Managed Devices Integration table.
- Select the management solution created in Global Setup Step 4. Configure the Axcient Management Solution in ConnectWise.
- Select the appropriate Integrator Login.
- Select Global in the Login By field.
- Check the Disable Newly discovered Cross-References checkbox.
- Select Detailed in the Billing Level field.
- Check the Match on serial Number checkbox.
- Leave all other options blank.
- Click Save to save the changes to the record.

- The Cross-References tab appears on the bottom half of the screen:
For each ConnectWise product to be cross-referenced with an Axcient service, perform the following:
a. Click the New icon [+] in the top-left corner of the cross-reference table.

b. Complete the Level.
c. Complete the Type.
d. Complete the Configuration Type based on the Level and Type from the table below:

e. In the Agreement Type field, select Managed Service.
f. In the Product field, select the appropriate ConnectWise product for the specified Axcient service.
5. Set up Agreements to Bill for Axcient Services in ConnectWise
In this step, enter addition(s) to one or more agreements to bill for one or more Axcient services.
- In ConnectWise, open the Company screen and locate the desired company record.
- Click Company Name to start editing.
- Click the Agreements tab.
- Locate the desired agreement (or create a new agreement, if needed.)
- Click the Additions tab.
- For each Axcient service to be billed, click the New button and edit the new agreement addition.
- Click the magnifying glass icon to find and select the appropriate ConnectWise product associated with desired the Axcient service.

Review Step 5. Cross-reference ConnectWise Products with Axcient Services, if needed.
If line items on the agreement already specify an amount for the billable resource, enter that existing amount in the Less Included field. For example, if this agreement addition is for BDR offsite storage, you might use 150 in this field.
a) Customize Unit Price, if necessary
b) If you wish to track your cost, enter a Unit Cost
c) Set Effective Date to the first day of the billing cycle
d) In the SerialNumber field, enter EFS-[efoldercustomerid] (In this example, EFS-342).
e) If Axcient is not configured to update invoice line item descriptions, enter the description which should appear on the invoice in the Invoice Description field.
6. Add New ConnectWise Client Companies under Management ID
After your initial ConnectWise integration has been fully configured, you can add new ConnectWise client companies and create new Axcient Web Portal user accounts.
For each new ConnectWise Client company to be integrated with Axcient services, remember to add the two previously configured ConnectWise Management ID entries.
Viewing Axcient BDR Portal Notifications and Testing Sync
Whenever a backup ends (or a service status update is pushed into the Axcient BDR Portal), Axcient will attempt to push information into ConnectWise within 60 seconds.
Axcient will not automatically update ConnectWise for a given customer more frequently than every 12 hours. However, a manual sync can be initiated for a specific customer via the "Reprocess Notifications" link contained inside the Event details described below.
Inside the event log for each customer account, Axcient records the success or failure of pushing information into ConnectWise. Each customer account is synced and the status of that sync is reported in the account level Event Log. One sync occurs per twelve hour billing. If an account is processed after the billing sync occurs but before the twelve hours is up, the Event Log entry will note "Skipping ConnectWise synchronization (only updating every 12 hours)."
A ticket sync will still occur, if needed, when that particular Event is processed by the Integration.
Viewing the Event Log In the Axcient Web Portal:
1. Select Accounts> Account List (Detailed View) on the Main Menu bar.
2. Enter the user account in the Quick Search box and click Search.
3. In the Account No. column, click the [E] beside the Account Number.

4. For example: “EFS123456789 [I] [L] [E] [License Keys]”) to view the Event Log.
5. In the Event Information column, each row represents a different event.
Click the Notifications link in the Event Information row.
6. Click the Reprocess Notification link to reprocess the old entry and force the process to re-sync.

Important! ConnectWise tickets must remain on the board selected when going through Step 2. - Setup new ticket service status. Tickets cannot be moved to a different service board or changed to a child ticket, as doing so will break the integration sync and cause errors with duplicate tickets.
This content is outdated
|
CUSTOMER SUPPORT | 720-204-4500 | 800-352-0248
- To learn more about any of our Axcient products, sign up for free one-on-one training.
- Please contact your Partner Success Manager or Support if you have specific technical questions.
- Subscribe to the Axcient Status page for a list of status updates and scheduled maintenance.
1013