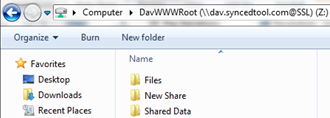
WebDAV allows you to map a network drive to your files in the cloud.
This means, with WebDAV, you will not have to download files or install them.
Before configuring WebDAV, you should check with your administrator to ensure that this option is enabled in your system.
[See Troubleshoot WebDAV]
Map a network drive on a Windows machine
To map a drive on a Windows machine:
1. In your start menu, click Computer. The Computer dialog box displays.
2. In the Computer dialog box, click the Map Network Drive button.

The Map Network Drive dialog box displays.
3. In the Map Network Drive dialog box, configure the appropriate drive and folder.
a. In the Drive drop-down menu, select a drive letter.
b. In the Folder field, enter the location of the folder (for example, https://dav.syncedtool.com).

c. When you are finished, click the Finish button.
4. Enter your username and password when prompted and click the OK button.
Your personal folders and Team Shares will now display.
You will be able to access the WebDAV folder in My Network Places.

Map a network drive on a Mac OS X machine
To map a drive on a Mac machine:
1. In Finder, click the Go menu and select Connect to Server. The Connect to Server window displays.

2. In the Connect to Server window, enter your server address (for example, https://dav.syncedtool.com), and click the Connect button.
3. When prompted, enter your username and password. Active Directory users must enter credentials as domain\username.
4. When you are finished, click the Connect button.
SUPPORT | 720-204-4500 | 800-352-0248
- Contact Axcient Support at https://partner.axcient.com/login or call 800-352-0248
- Free certification courses are available in the Axcient x360Portal under Training
- Subscribe to the Axcient Status page updates and scheduled maintenance
1446