
If your vault is configured and accessible, you can begin the replication process for protected systems. Scheduling replication is a multi-step process:
- First, navigate to the appliance web interface and enter vault details into the vault settings page. As part of this process, you will define a replication schedule.
- Then, for each protected system, assign a replication schedule and select a snapshot to serve as the base image.
- Optionally, preload (or seed) a large data set to the vault.
Consider preloading (seeding) options
Before you begin the replication process, you should determine if preloading (or seeding) a protected system data set is right for you. You might want to preload if a data set is large and bandwidth is limited at the customer location.
Axcient offers a round-trip preloading service for U.S. partners, which includes everything required to properly preload a protected system data set. Shipping and processing might take several days, so we recommend starting the process as soon as possible. You can choose from the following preloading options:
- USB—After submitting a request to the Axcient team, we will send you an Axcient USB seeding device. You can then copy your data to the device and ship it back to us. Contact Axcient to request a preload (seed) drive.
- WebSeed—With WebSeed, you can copy data to your own USB device and then upload the data to the cloud from a location with sufficient bandwidth. For most preloading operations, we recommend WebSeed as the least expensive and more efficient option. Please reference the Knowledgebase for complete instructions on using WebSeed.
Create a vault schedule and assign replication to the vault
After considering preloading (seeding options), you can begin configuring the replication process.
To schedule replication to the vault:
1. Log in to the appliance web interface.
2. Optionally, if you are preloading (or seeding) a protected system data set, attach a USB drive to the appliance.
3. In the left-hand navigation menu, click the Vault Settings tab.
4. In the Vault Settings page, click the Add Vault button.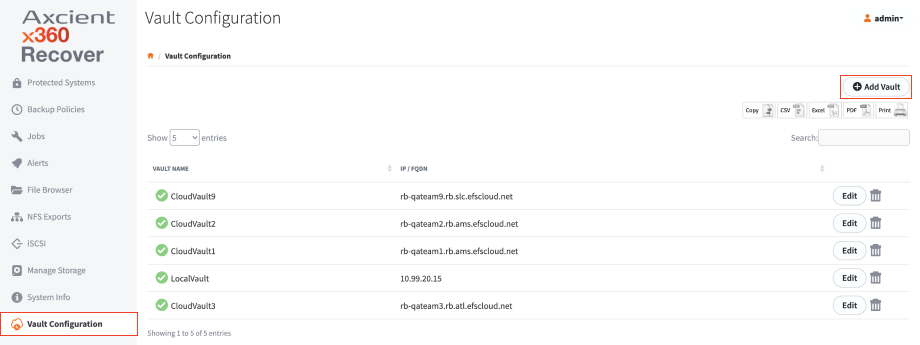
5. In the Vault Settings page, enter information about the vault:
- In the Name field, enter a descriptive name for the vault.
- In the IP Address field, enter the server name or FQDN of your vault. Do not include https. Click the Test Connection button to verify the connection.
- Click the Enabled checkbox to active replication.

6. In the Vault Schedules & Bandwidth section of the page, define the Days, Start Time, End Time, and Bandwidth (Mbps).
7. Click the Add button to define an additional schedule. You can define schedules with different bandwidths for each day and hour.
8. Click the Save button to save your settings. Schedule changes take effect immediately. This new replication schedule will display in the Vault Settings page and can be edited if needed.
9. To assign replication to a protected system, click the Protected Systems tab in the lefthand navigation.
10. Find the protected system and click the appropriate System Name.

11. In the Protected Systems Details page, click Replication.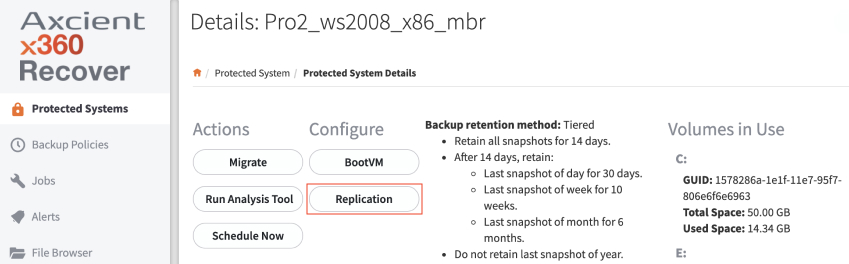
12. With the Enabled checkbox selected, use the dropdown menus to select the vault and the initial snapshot that should serve as the base image.
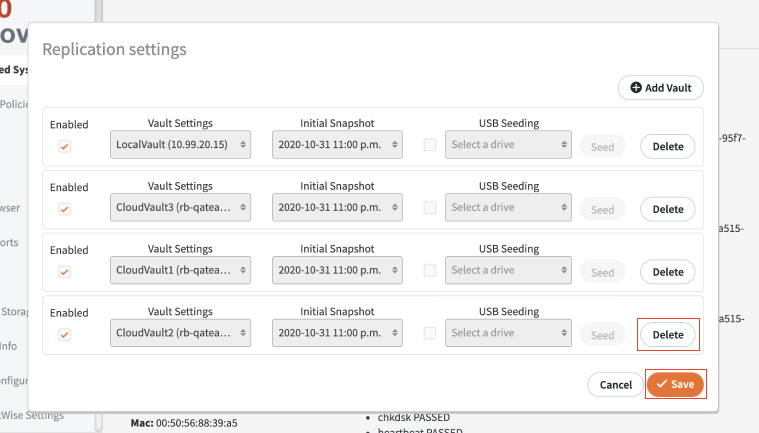
Optionally, if you have decided to preload (or seed) a dataset, click the USB Seeding checkbox and select the drive where you attached the USB device. Click the Seed button to begin the seeding process.
13. Click the Save button when you are finished.
- If you did not select the USB Seeding checkbox, replication will begin over the Internet within a 15-minute time period.
- If you did select the USB Seeding checkbox, you can monitor the export process from the Jobs page (in the Seeding subtab).
SUPPORT | 720-204-4500 | 800-352-0248
- Contact Axcient Support at https://partner.axcient.com/login or call 800-352-0248
- Have you tried our Support chat for quick questions?
- Free certification courses are available in the Axcient x360Portal under Training
- Subscribe to Axcient Status page for updates and scheduled maintenance