
Once the underlying x360Recover operating system has been installed, the next steps are to complete the provisioning and configuration of the new device.
What is the workflow for adding a new appliance?
Important note on new appliance licenses: The license provisioning process for new appliances has changed since our legacy License Portal was retired. (See announcement)
As of October 24, 2023, you are no longer required to create locations or sites when assigning licenses for appliances. Instead, new appliances will appear within the Licenses page automatically, once they have been provisioned.
Steps to add a license for a new appliance:
1. Create the client in x360Recover Manager (if the client does not yet exist)
2. Install x360Recover on your BDR (if you are using BYOD hardware)
3. Provision the new BDR by connecting to the appliance IP address with a web browser and completing the registration wizard
4. Assign licenses to the appliance within x360Recover Manager from the Licenses tab
5. Once the provisioning process has been completed, the new appliance will appear within x360Recover Manager under 'Services' 'Clients' and 'Licenses'
For help with creating and managing Clients see: Manage Client accounts in x360Recover Manager
For help with managing Licenses see: Manage Licenses in x360Recover Manager
Appliance setup
Launch the Setup Wizard, apply updates and set passwords
STEP 1. To begin the device setup, open a web browser and navigate to the IP address of the new x360Recover device.
Locate the IP address of the device on the console above the login prompt.
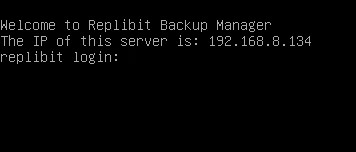 Note: If there is no IP address displayed, wait one minute and press <Enter> to refresh the display.
STEP 2. Launch the Setup Wizard, open a web browser and navigate to the IP address of the newly installed device.
Note: You must have internet access for the Setup Wizard to complete the setup and registration process.
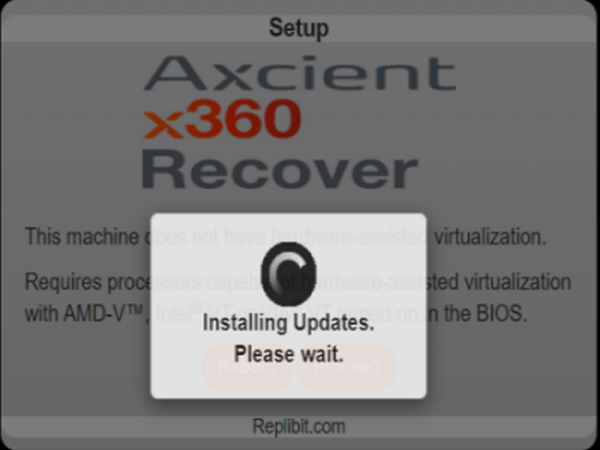
If required software updates are available, you will see a prompt to either Update Now or Skip when you first access the device.

If you choose Skip, updates will be applied automatically later, after provisioning of the device has been completed.
If you choose Update Now, allow up to 20 minutes to complete the process. The device will reboot and return to the provisioning wizard after the update has completed.
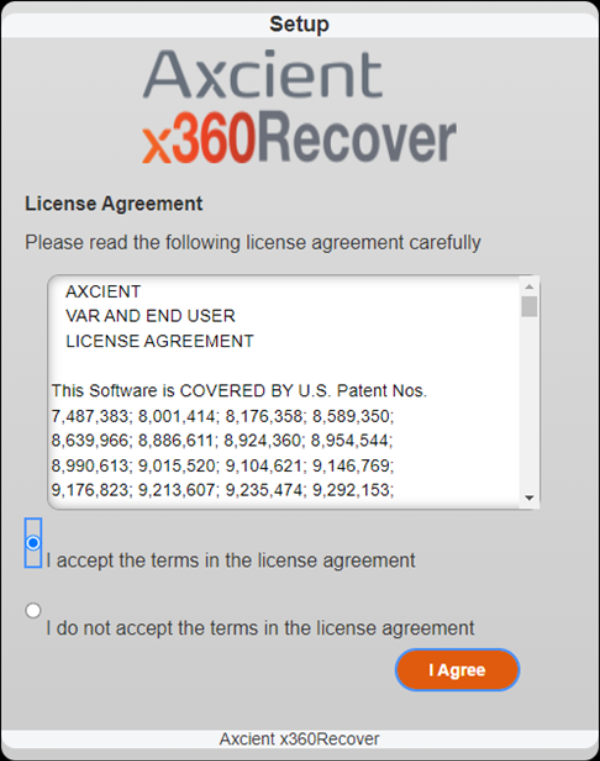
STEP 3. Next, the x360Recover License Agreement screen appears.
Read the agreement before continuing.
If you accept the terms of the agreement, select the radio button I accept the terms in the license agreement.
Click on the I Agree button to continue the configuration process.
STEP 4. Enter passwords.
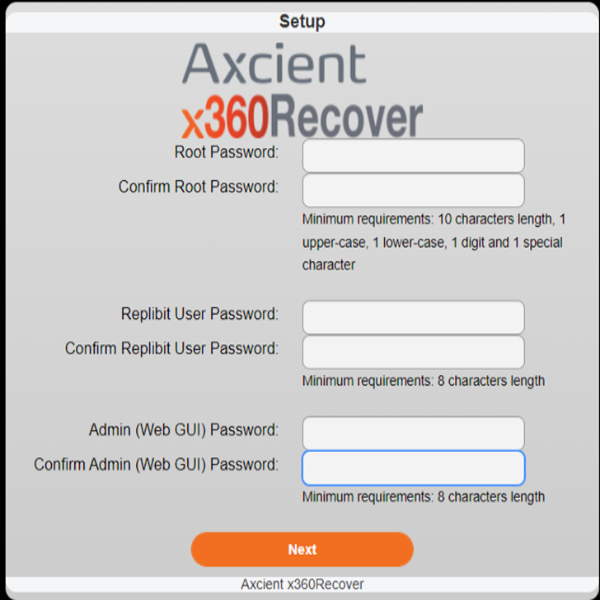
- Root Password is the Linux root user (the core operating system super-user) and requires a highly secure password. Enter a root password at least 10 digits long containing upper case characters, lower case characters, numbers and special characters (for instance, #$%^&@!*)
- Replibit User Password user is a limited access shell account whose password should be at least 8 characters long.
- Admin (Web GUI) Password is used to access the Web Interface and all x360Recover features. This password should be at least 8 characters long.
Click the Next button to proceed.
Select a role for the device
STEP 5. Select the intended role for the new device. These include:
- Appliance, which resides at the customer site, and receives backup data from agent software installed on the customer’s protected systems.
- Vault, which resides at the off-site recovery location or datacenter, and receives replication of recovery points created by one or more appliances.
-
Management Portal, which collects statistics from connected appliance and vault devices, and provides secure remote access and management. Partners typically deploy only a single Management Portal for all managed devices.
- Note: The Management Portal role has been deprecated by x360Recover Manager.
- OS Recovery. Performing an OS recovery restores the previous role and settings of an existing system after the operating system has been lost and reloaded on a new boot disk. For detailed instructions on performing an OS recovery for an appliance, see this KB article.
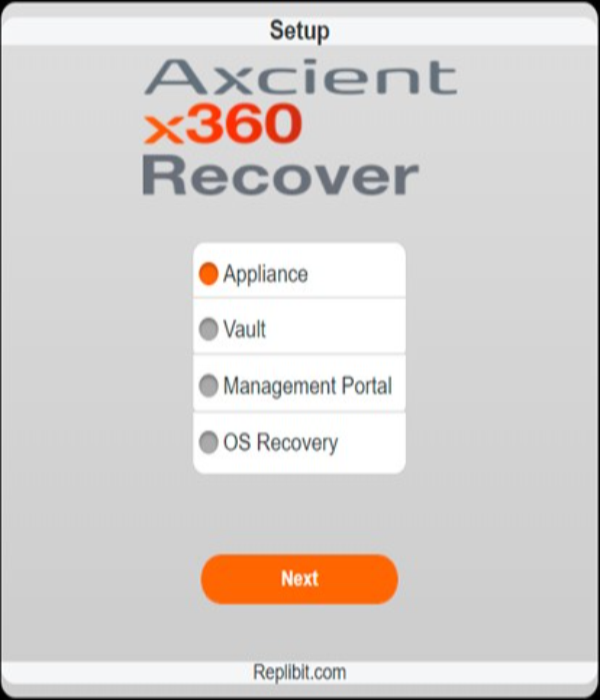
Click the Next button to proceed.
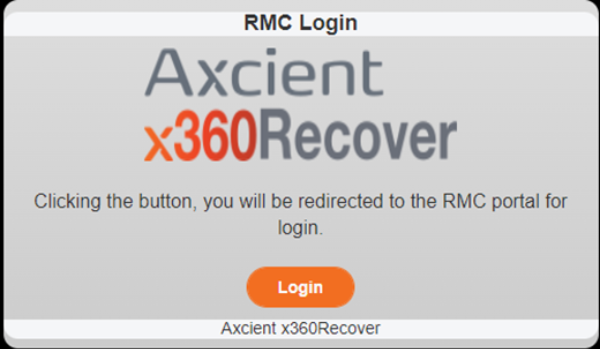
Log in as an x360Recover Organization Administrator user
STEP 6. In the next steps, you will be redirected to a login page, where you will provide credentials for authentication with x360Recover
 .
.
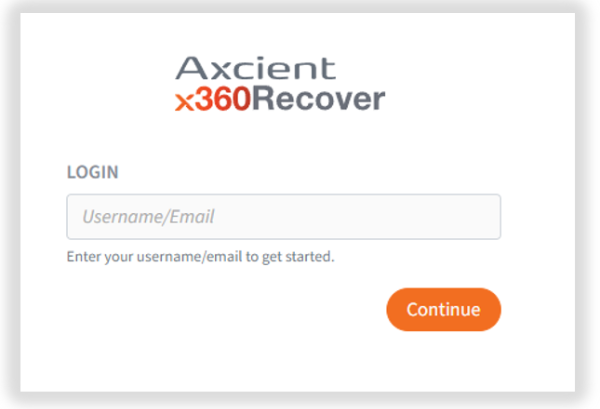
Enter the login credential when the login page appears and then click Continue:
Enter the Email and Password credentials and click Submit when you are ready to continue:
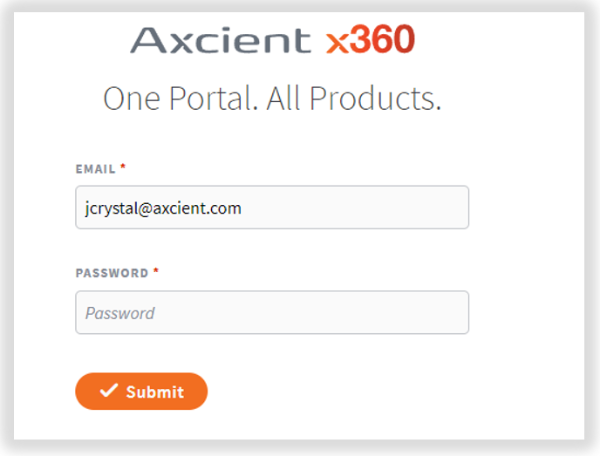
Once you have completed the authentication steps, you will be redirected to back to the provisioning wizard.
Note: If you are currently logged in to x360Portal and/or x360Recover with Org Admin permissions, the wizard will skip authentication and proceed directly to the next step.
STEP 7. If deploying a new appliance, select a customer to which this appliance will be provisioned, and assign a Service Alias value. Service Alias is the name under which the appliance will appear on the Services page in Recover Manager.
To refresh the list of clients, click Get Clients to re-populate the list of customers from Recover Manager.
If you are deploying a vault, after entering the Reseller Username and Password, the wizard will proceed directly to the next step.

Click Next to proceed.
Complete the network setup
STEP 8. The network Setup screen appears.
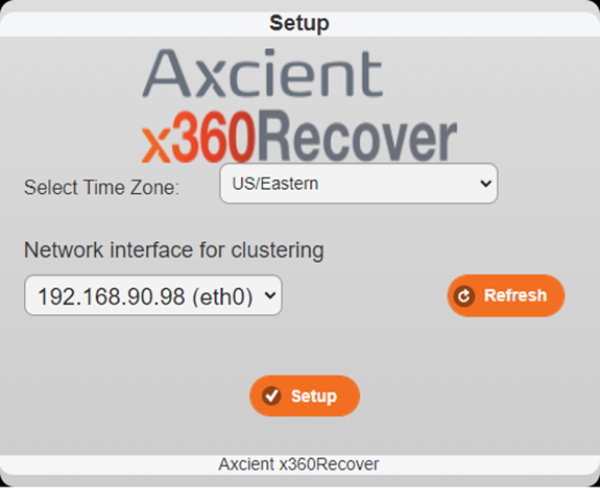
- Select the appropriate Time Zone.
- Select a Network interface for clustering with a valid DHCP IP address.
By default, Axcient x360Recover is configured for DHCP.
- Click Setup to continue.
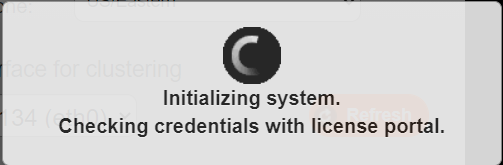
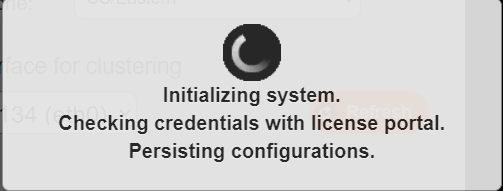
STEP 9. Your device and role assignment selections will be saved, and the device setup will be completed.
- You will see the screens below, indicating that the system is being initialized.
- Once initialization has completed, the device will reboot automatically one last time.

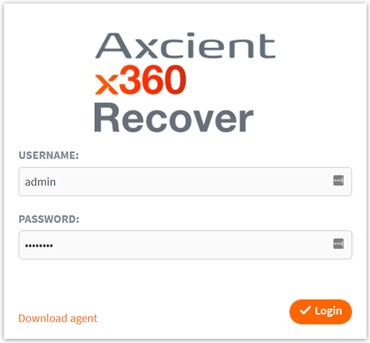
- When reboot completes and the browser refreshes, the login page appears.
- You will now need to complete the steps for first-time login.
Note: It may take 3-5 minutes to complete the registration of the node. Linux package optimization is being performed on the system to remove packages no longer required by the installation mechanism.
Note: The login page may appear before the device has rebooted, but you will not be able to log in until the reboot has been completed. This may take up to three minutes on some systems.
If you receive an error that the user is not authorized for login, wait another minute or two, and try again.
First-time login
Log in and complete configuration
STEP 1. Once the machine has rebooted, log in and complete configuring settings.
- In the Username field, enter the default username which is ‘admin.’
- In the Password field, enter the password you provided for the Admin (Web GUI) user during the setup and configuration process.
Click Login to continue.

Note: You may also login to the device via Recover Manager rather than connecting locally.
We recommend that you enable Lockdown Mode for the new device at this time, to enforce MFA user credentials for access.
For more information on enabling Lockdown Mode, see Configure Lockdown Mode for MFA.
Enable Remote Assist
On the initial login, you will be presented with the option to automatically enable Remote Assist after applying updates.
We recommend enabling this feature. (See below for notes.)
Click Yes or No.
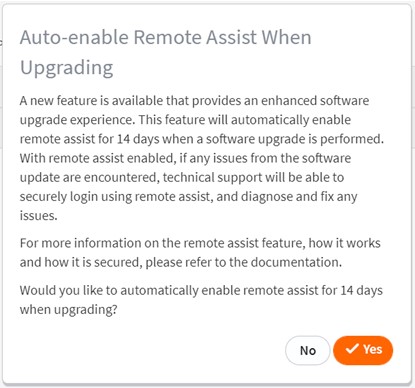
Note: When this option is enabled, the Remote Assist feature will automatically be enabled for 14 days after an upgrade is deployed.
Axcient recommends enabling this feature.
In the event that something goes wrong during an update, it may not be possible to access the UI to enable Remote Assist later.
Enabling Remote Assist now, during setup, will allow Axcient Support to proactively access failed devices after an upgrade and resolve problems.
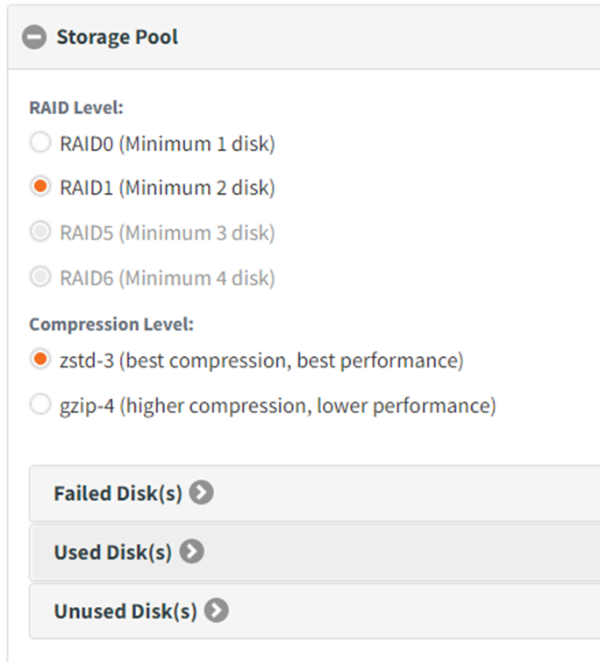
Configure the storage pool
Once you have enabled Remote Assist, you must configure the storage pool.
[For first-time setup of the storage pool, refer to this KB article.]
STEP 1. Expand the storage pool configuration section.
- Select the desired RAID Level. More about RAID here
- Select the desired Compression Level.
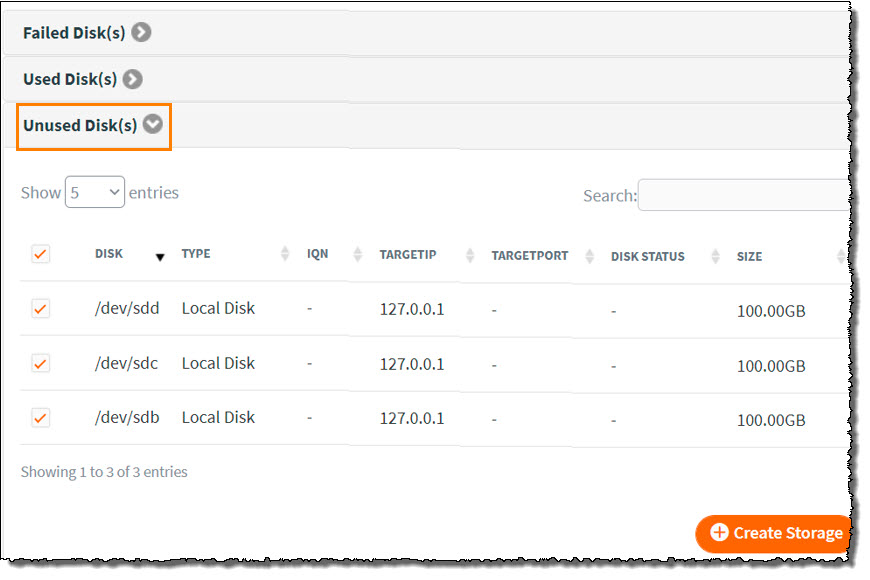
STEP 2. Expand the Unused Disks section.
Select the available drives.
Click Create Storage to create the storage pool.
For complete details on first-time setup of the storage pool, refer to this KB article.
Finish up
Once the storage pool is created, there are a few more items to configure before deploying x360Recover agents and beginning backups.
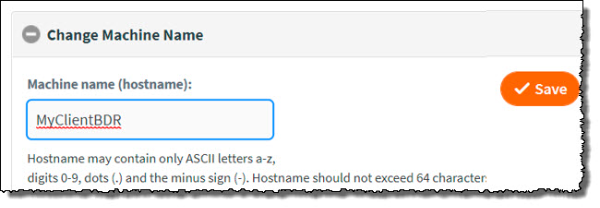
Set machine name
- Create a friendly name for this backup server that will identify the device.
- Click System Settings from the left menu pane.
- Expand Change Machine Name
- Enter a friendly name in the Machine Name field and click Save.
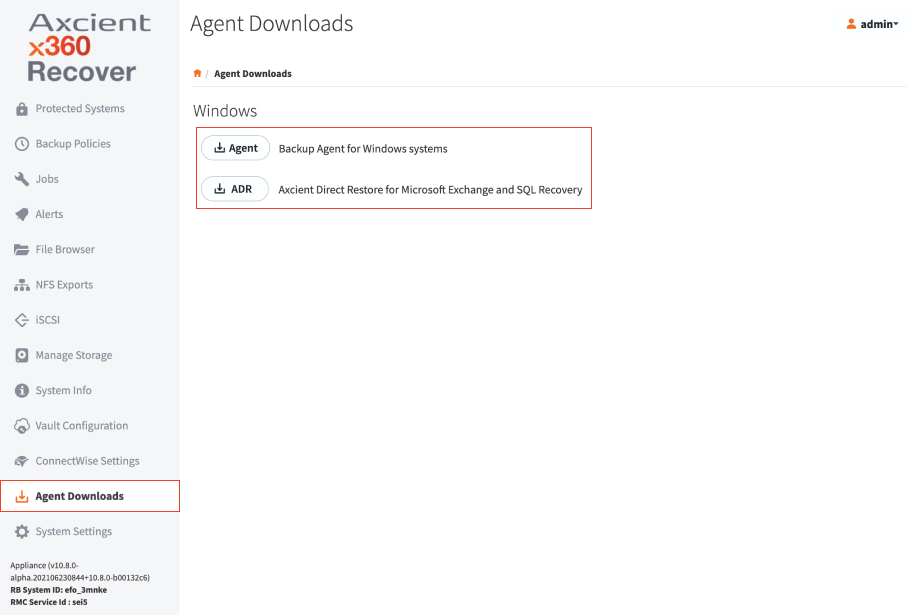
Ready to deploy x360Recover agents
You are now ready to begin deploying x360Recover agents and performing backups of your client protected systems.
Select the Agent Downloads page from the left menu pane to download the agent installer.
You can chose to deploy the agent manually on protected systems, or you can use your RMM tool to push agent installs to your managed devices.
For details on silently deploying the Agent via your RMM tool, refer to this article.
SUPPORT | 720-204-4500 | 800-352-0248
- Contact Axcient Support at https://partner.axcient.com/login or call 800-352-0248
- Free certification courses are available in the Axcient x360Portal under Training
- Subscribe to the Axcient Status page for a list of status updates and scheduled maintenance
873 | 1496 | 1649 | 2016