
Overview
Recovery of files and folders on Axcient-hosted vaults can now be performed directly from Manager (RMC) - without having to navigate to the vault.
- Virtual disk image downloads are also directly available from Manager (RMC).

How to chose a recovery method from within Manager (RMC)
To begin a recovery, login to Manager (RMC) and navigate to the Client or Protected System Details page for the system you wish to recover.
Click the Recovery Wizard button to begin a new recovery.
Once the wizard launches, select the type of recovery you wish to perform.
You may choose from these recovery methods :

A. Recover files and folders from Windows, Linux or macOS devices or recover complete disk images from Windows and Linux devices
B. Start a Virtual Office to virtualize one or more protected systems in the Axcient cloud.
|
For detailed instructions on starting and configuring a Virtual Office see: |
C. Export Virtual Disk images to facilitate full system recovery via local virtual machine hosts or for Bare Metal Recovery

Choice A. Recover files and folders
A1. From the Recovery Wizard, click Recover Files & Folders

A2. Click on the protected system you wish to recover:
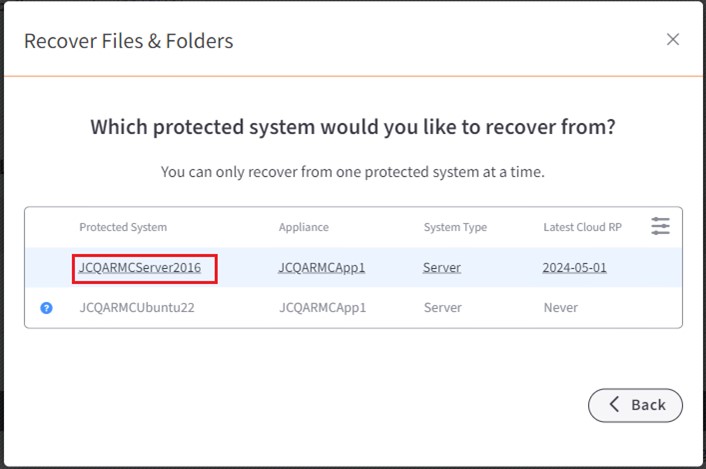
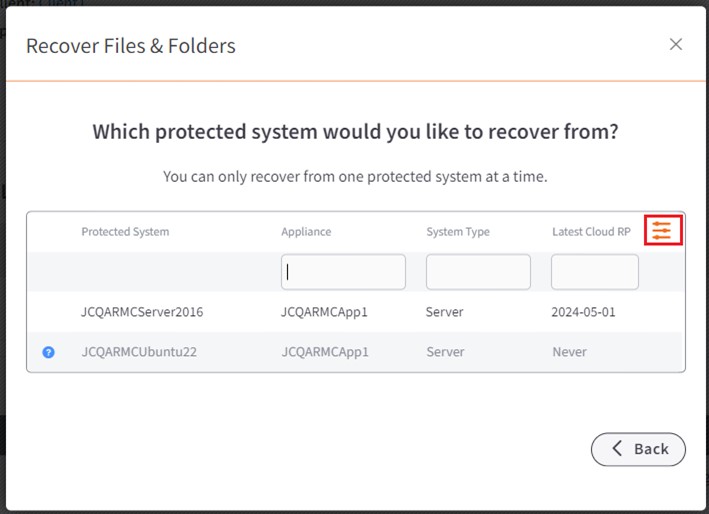
Note: If the list of available devices is very large, click the Filter gadget (to sort by appliance, system type or recovery point date.)
A3. If the selected protected system has an access password assigned, you will be prompted to enter the password.

A4. Next, select a snapshot to recover.
Dates with restore points available are highlighted in green.
A5. Click a date with available restore points from the calendar picker, then select the point in time from the Available Restore Points dropdown list.
A6. Click on the Recover button

Recover Manager will now export the selected recovery point for access via FTP.
The URL, username, and password will be displayed for accessing the files via FTP.
- For help with setting up and using an FTP client, click the link More about FTP clients to review our knowledgebase.
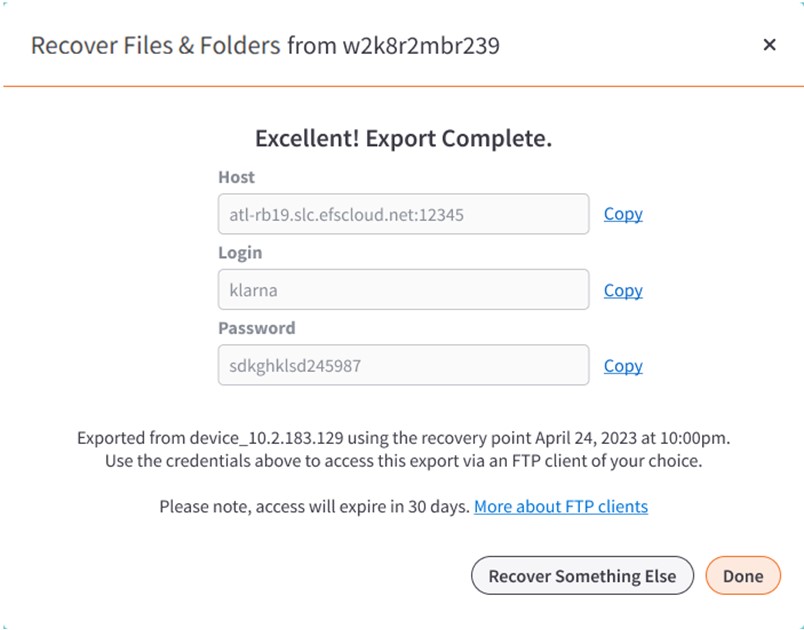
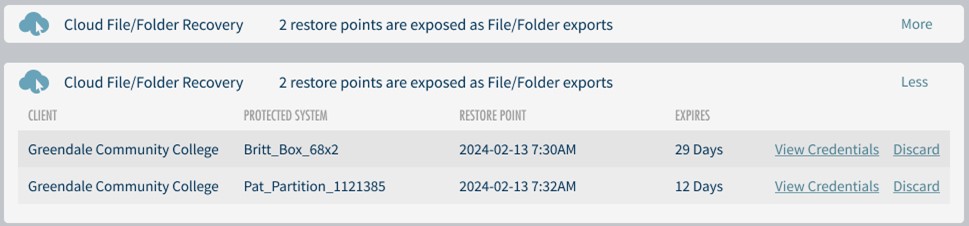
The exported recovery point will be available for 30 days by default.
You can review the download credentials and URL or discard the restore point from the Activities of Interest section of the Dashboard.

Choice B - Start a Virtual Office
B1. From the Recovery Wizard, click Start a Virtual Office:

|
For detailed instructions on starting and configuring a Virtual Office see: |

Choice C: Recover Virtual Disk images
C1. From the Recovery Wizard, select Export Virtual Disk.

C2. Next select the type of Virtual Disk format you want to download.

IMPORTANT: What will you use the virtual disk for?
The type of virtual disk you need depends on your intended use:
 VHD
VHD
- VHD disks are a legacy format and are supported by Microsoft Hyper-V.
- VHD disks are also supported by XenServer for import.
- VHD is the only format supported by Microsoft Azure. Typically, you will only want to download a VHD disk if you are performing a recovery to Microsoft Azure. (It's possible to use VHD with Hyper-V Generation 1 virtual machines, but this is not necessary and it is generally preferred to use VHDX format instead.)
Note: When you select VHD as the format, you will have several choices:

Limitations:
- VHD disks generally are limited to a maximum of 2TB
- VHD disks for use by Microsoft Azure can be up to 4TB but ONLY in the case where the disk is in GPT partition and EFI / Generation 2 BIOS mode.
- Microsoft Hyper-V CANNOT import and use any VHD disk larger than 2TB
- VHD disk CANNOT be used for Bare Metal Recovery

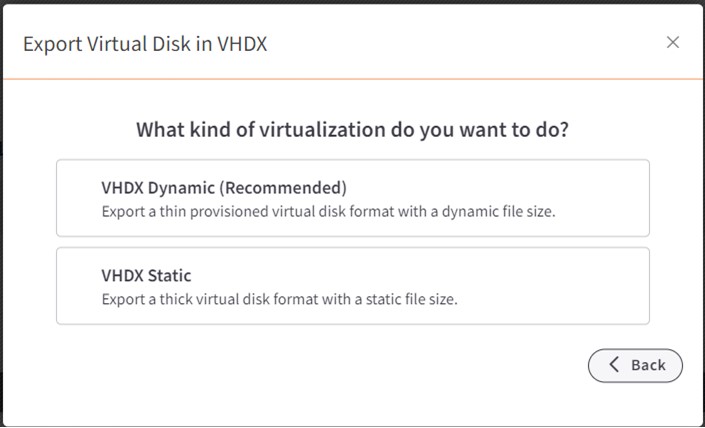
VHDX
VHDX disks are the modern format supported by Microsoft Hyper-V.
VHDX disks may be exported in either Static / Thick format or Dynamic / Thin format.
Typically, you would only use a Static / Thick format when exporting on an appliance when download speed is not a factor. Static formatted virtual disks provide slightly better performance when used for virtualization. Dynamic formatted virtual disks omit the empty / unused space from the disk volume, making them smaller to download and consume less space on the Hypervisor host when used for virtualization.
Limitations:
- Microsoft Azure does not support VHDX disks for import, only VHD disks
- VHDX disks cannot exceed 64TB in size
- VHDX disks are not supported by XenServer for import
Important Note: If you are downloading a virtual disk image to be used in Bare Metal Recovery of a protected system, you must chose either VMDK, VMDK Sparse, or VHDX formats. The recommended format for Bare Metal Recovery is VHDX in Dynamic format for best download speeds.

VMDK and VMDK Sparse
VMDK disks are the native format used by VMware products for virtualization.
Unlike VHDx and Microsoft Hyper-V, VMDK format selection is NOT optional. VMware ESXi hypervisor servers can ONLY import and use Static / Thick formatted VMDK disks. VMware Workstations and its derivatives (VMware Player, Fusion, etc.) can ONLY import and Dynamic / Thin formatted VMDK Sparse disks. Make sure you select the correct format for the desired use case.
VMDK and VMDK Sparse disks are both supported by XenServer for import.
Limitations:
- VMware ESX/ESXi CANNOT import VMDK Sparse disks
- VMware Workstation CANNOT import VMDK Sparse disks
- VMDK disks cannot exceed 62TB in size
Special note: The Static / Thick format VMDK disk actually consists of TWO files:
- a small text file <disk name>.vmdk that contains the disk configuration parameters, and
- a large binary file <disk name>_flat.vmdk that contains the actual RAW block data of the virtual disk.
Make sure you download BOTH files and place them in the same directory. The VMware file browser will display only ONE file ‘<disk name>’ when it detects both files together in the same location.

QCOW2 and RAW
QCOW2 and RAW formatted disks are the native virtual disk format used by QEMU and KVM hypervisor implementations on Linux.
- QCOW2 is inherently a Dynamic / Thin disk format
- RAW is inherently a Static / Thick disk format.
The type of disk that you need to download for recovery back to a QEMU / KVM based hypervisor is mostly determined by which hypervisor platform you are using and what disk types it supports for import. Check with your hypervisor documentation for more information.
Limitations:
- QCOW2 disks cannot exceed 8EB
- RAW disks cannot exceed 16EB
(Yes, that’s not a typo, QCOW2 and RAW disks support up to exabyte size virtual disks)

VDI
VDI formatted disks are the native virtual disk format used by VirtualBox.
VDI disks may be exported in either Static / Thick or Dynamic / Thin format. Typically, you would only use a Static / Thick format when exporting on an appliance and download speed is not a factor. Static formatted virtual disks provide slightly better performance when used for virtualization. Dynamic formatted virtual disks omit the empty / unused space from the disk volume, making them smaller to download and consume less space on the Hypervisor host when used for virtualization.
Limitations:
- VDI disks cannot exceed 2TB in size

Important Note: If you are downloading a virtual disk image to be used in Bare Metal Recovery of a protected system, you must chose either VMDK, VMDK Sparse, or VHDX formats. The recommended format for Bare Metal Recovery is VHDX in Dynamic format for best download speeds.

Last steps: Perform the export for access via FTP
Note: You have now selected your disk export format. If the format you have selected requires a choice between Static and Dynamic mode you will be prompted for this choice.
Now, select a protected system
Click the desired protected system to continue.
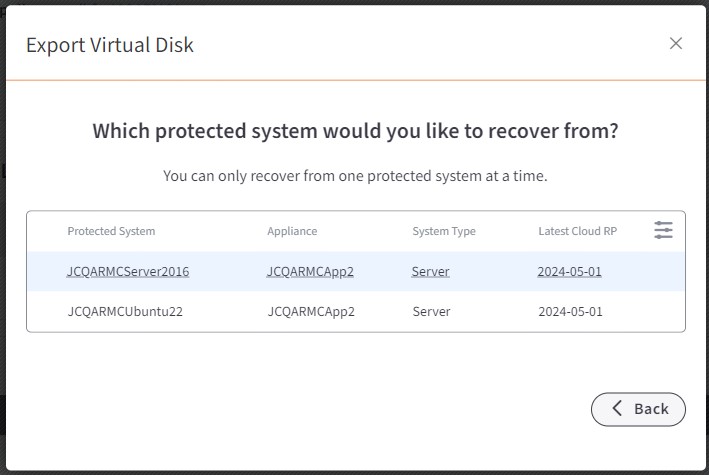
If the selected protected system has an access password assigned, you will be prompted to enter the password.

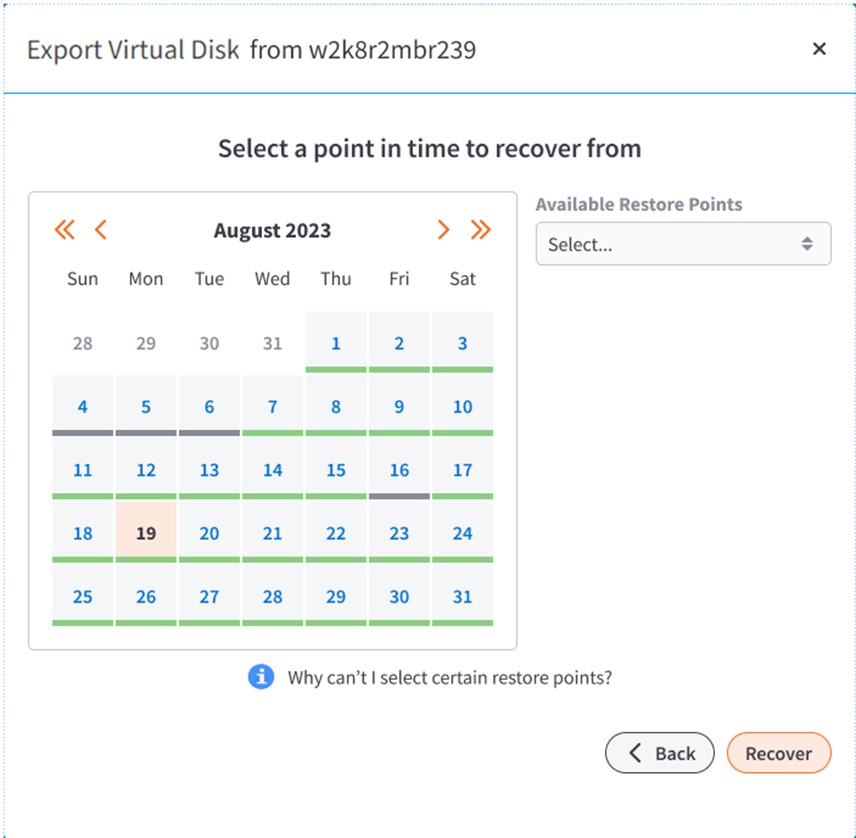
Next, select a snapshot from which to recover
- Dates with restore points available are highlighted in green.
- Click a date with available restore points from the calendar picker.
- Select the point in time from the Available Restore Points dropdown list.
Recover Manager will now export the selected recovery point for access via FTP.
- The URL, username, and password will be displayed for accessing the files via FTP.
- For help with setting up and using an FTP client, click the link ‘More about FTP clients’ to review our knowledgebase.
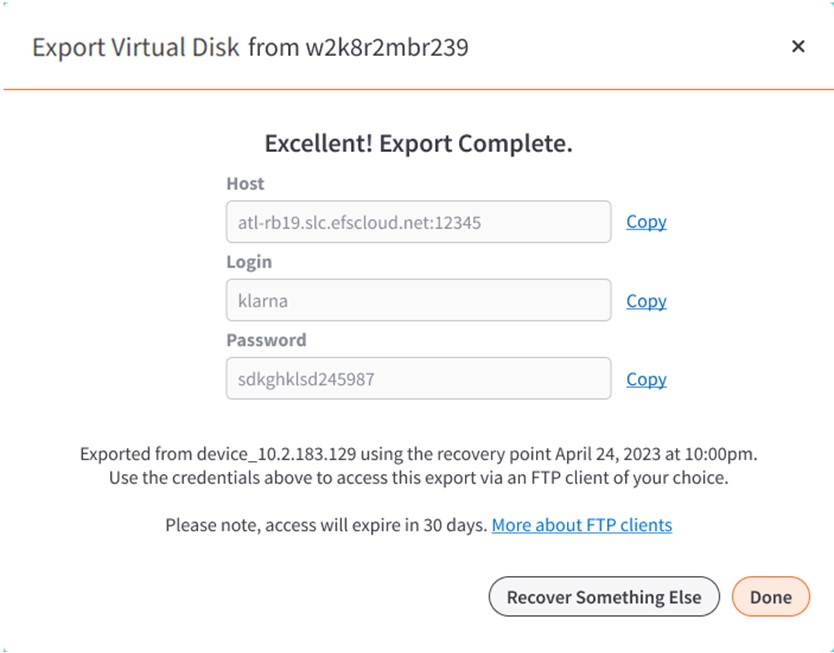
The exported recovery point will be available for 30 days by default.
You can review the download credentials and URL or discard the restore point from the Activities of Interest section of the Dashboard.

SUPPORT | 720-204-4500 | 800-352-0248
- Contact Axcient Support at https://partner.axcient.com/login or call 800-352-0248
- Have you tried our Support chat for quick questions?
- Free certification courses are available in the Axcient x360Portal under Training
- Subscribe to Axcient Status page for updates and scheduled maintenance
1794