x360Recover Manager has configuration settings, mainly alert thresholds, at every level. This article explains what settings are available on these main pages and what you can expect from them.
Looking for different settings in x360Recover Manager? Try the other articles in this section:
- Manage licenses in x360Recover Manager
- Integrate x360Recover with a PSA
- Reports in x360Recover Manager
Manage SSO
Axcient users are managed in the x360Portal. For more information on managing users, click here.
Ensure users have the right permission level and have access to x360Recover.
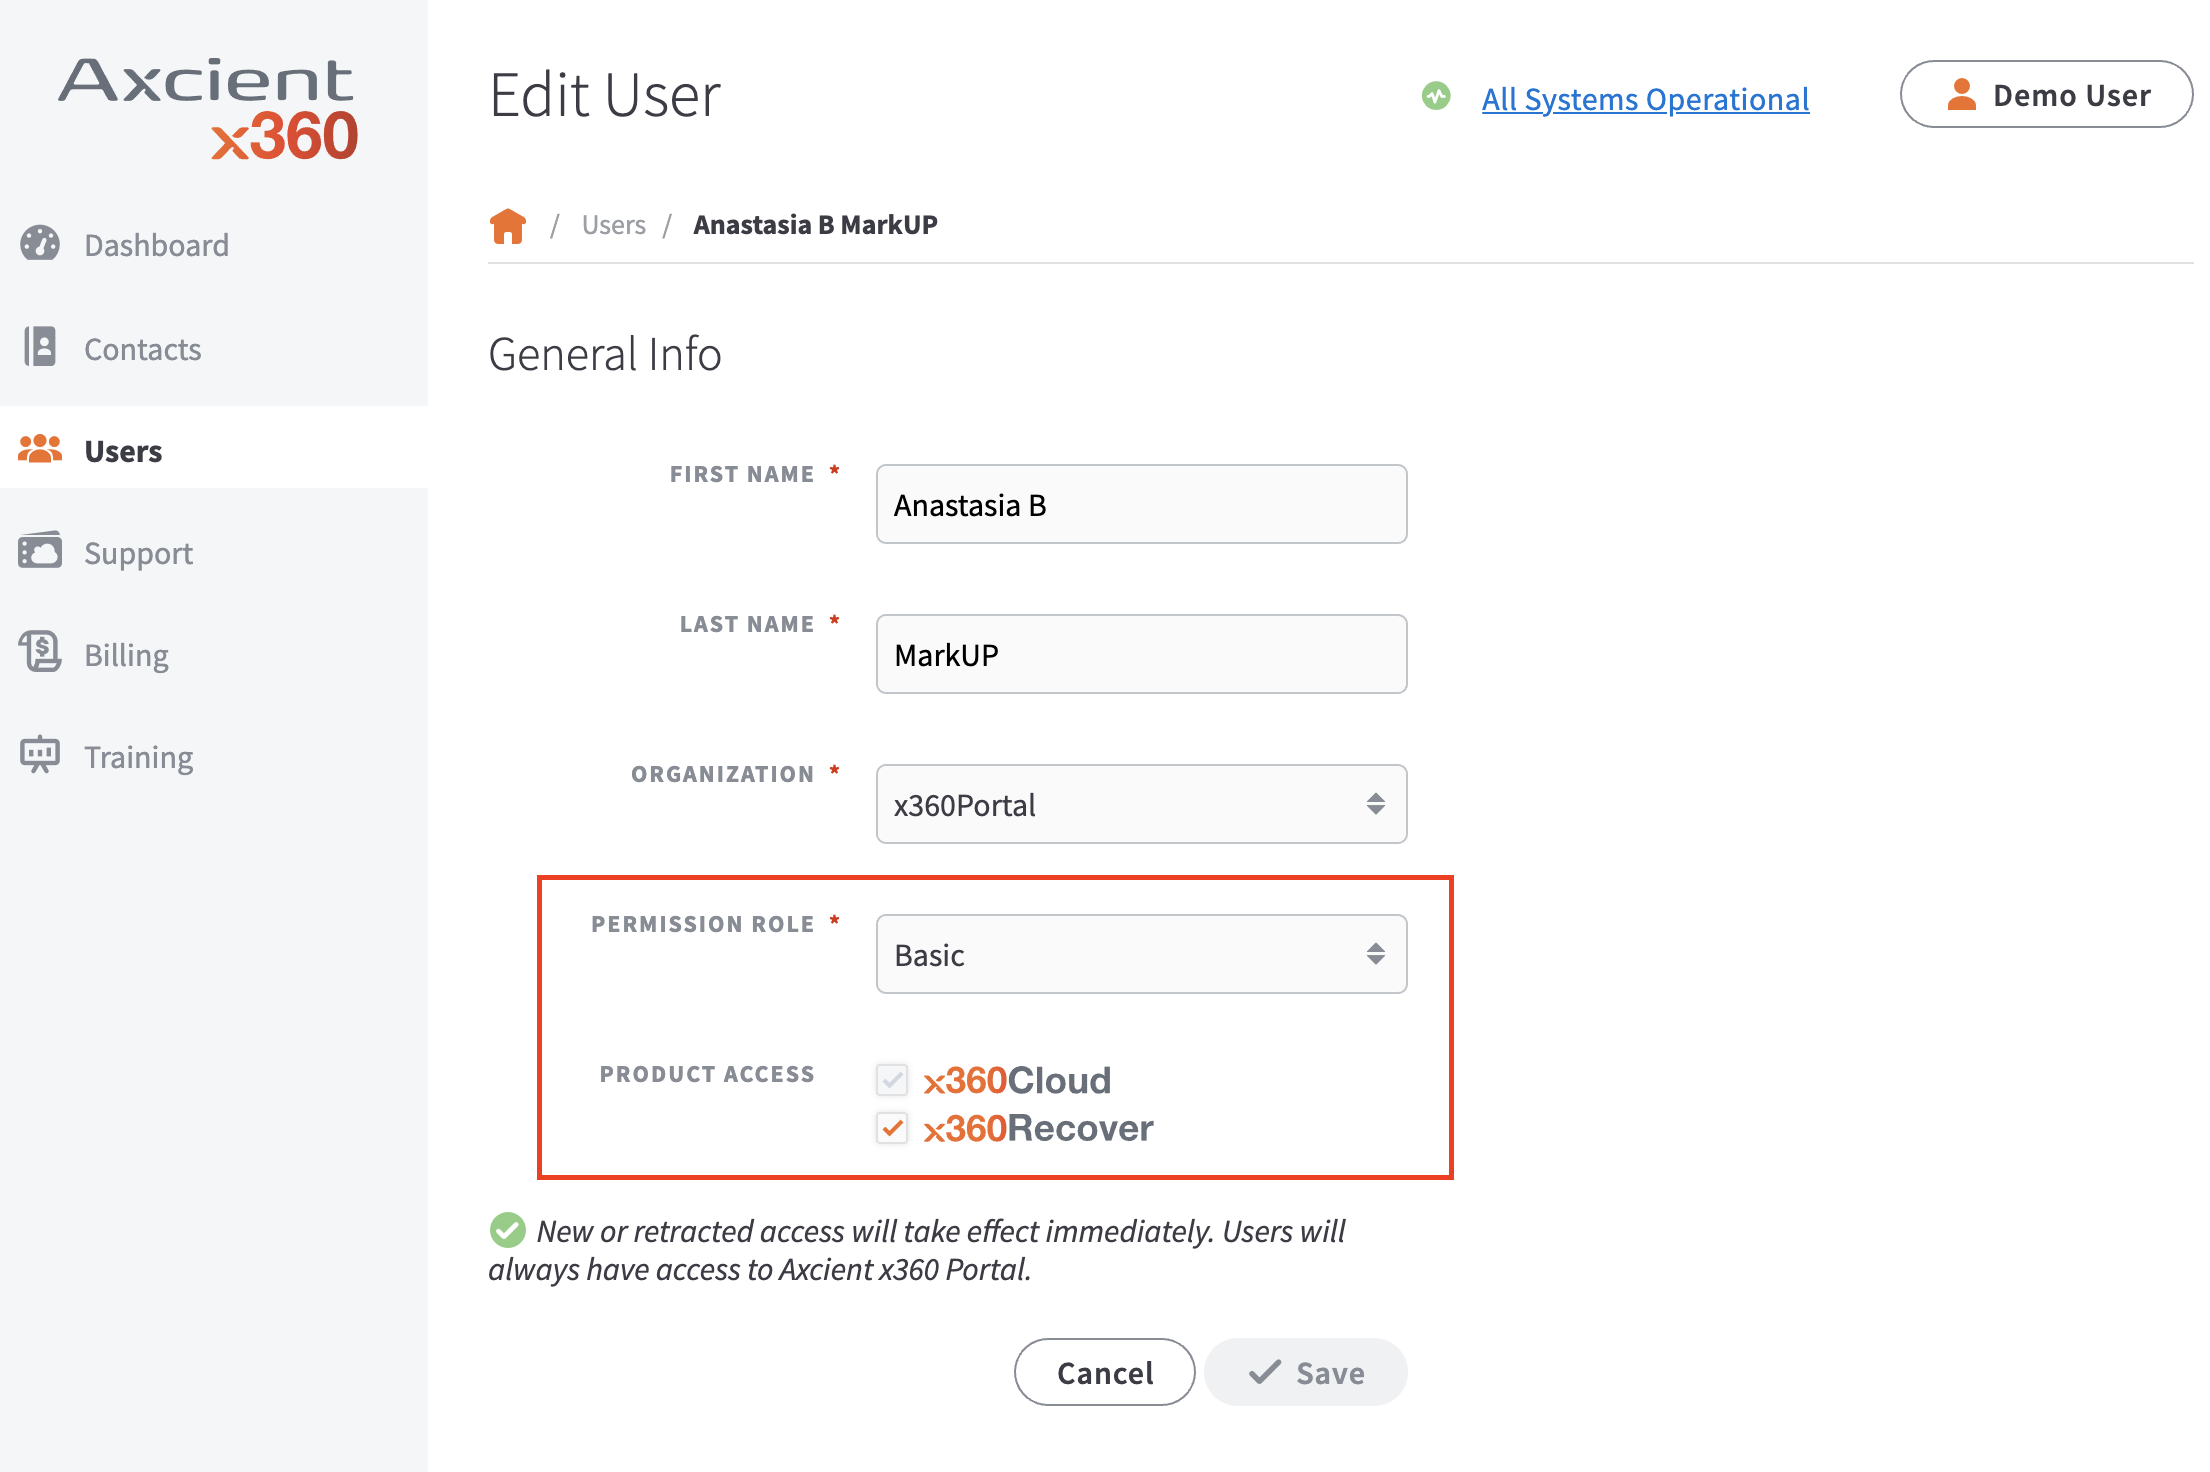
- Select the Basic permission role if you want the user to view all the information on the Dashboard, My Contacts, and Support tabs (including creating and commenting on tickets). A user with Basic permissions can also view and edit information related to his or her own account and email preferences. However, a user assigned to the Basic role cannot modify the information associated with the organization.
- Select the Accountant permission role if you want the user to have the same permissions as a Basic user, with the addition of having access to manage Billing.
- Select the Administrator permission role if you want the user to view and edit all information on the x360 Portal, including creating, editing, and deleting other users accounts. A user with Administrator permissions is also able to edit information related to the organization.
Enable SSO for appliances and vaults
NOTE: By default, SSO access is enabled for x360Recover Org Admins and Org Managers, and disabled for Org Read-only Users. Org Admins can enable SSO access for any of their Org-level accounts. Enabling SSO for users allows seamless access to all x360Recover Appliances and Vaults without requiring a secondary login at each device.
The following list explains each Org user type:
- Org Admin: An Organization Admin can monitor backups, configure SLA thresholds and PSA integration with Connectwise or Autotask, download or subscribe to BDR usage and summary reports, use the Axcient business continuity features - Virtual office and Runbooks - and manage users in their organization.
- Org Manager: An Organization manager can monitor backups, configure SLA thresholds and PSA integration with Connectwise or Autotask, download or subscribe to BDR usage and summary reports, and use the Axcient business continuity features, Virtual office and Runbooks
- Org Read-only: An Organization manager can monitor backups and download or subscribe to BDR usage and summary reports
To enable SSO access for org read only users:
- Click on the Users tab.
- Select the user account in which you wish to enable SSO.
- Click edit.
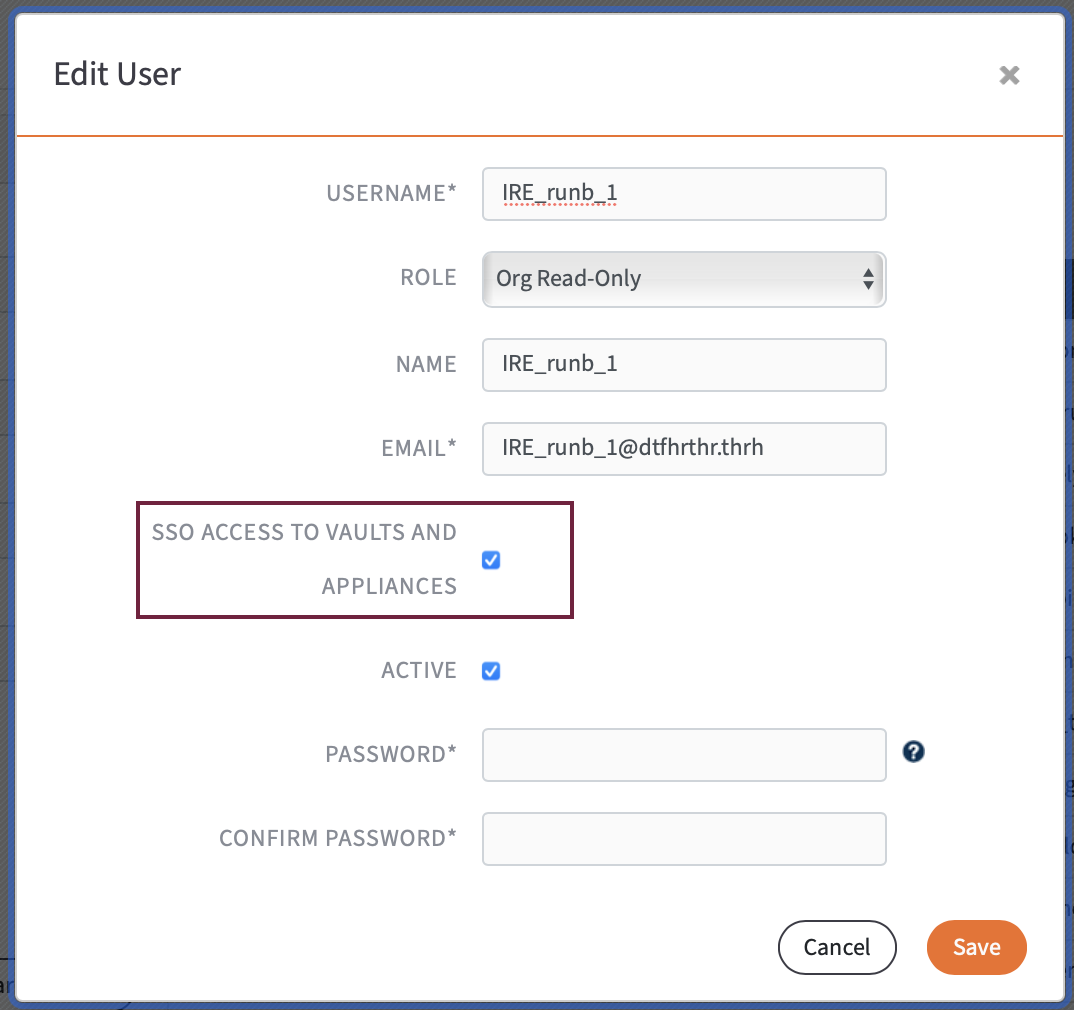
- In the edit user dialog box, click the checkbox to the right of SSO ACCESS TO VAULTS AND APPLIANCES to enable SSO
- Click Save to complete.
Log into appliances and vaults using SSO
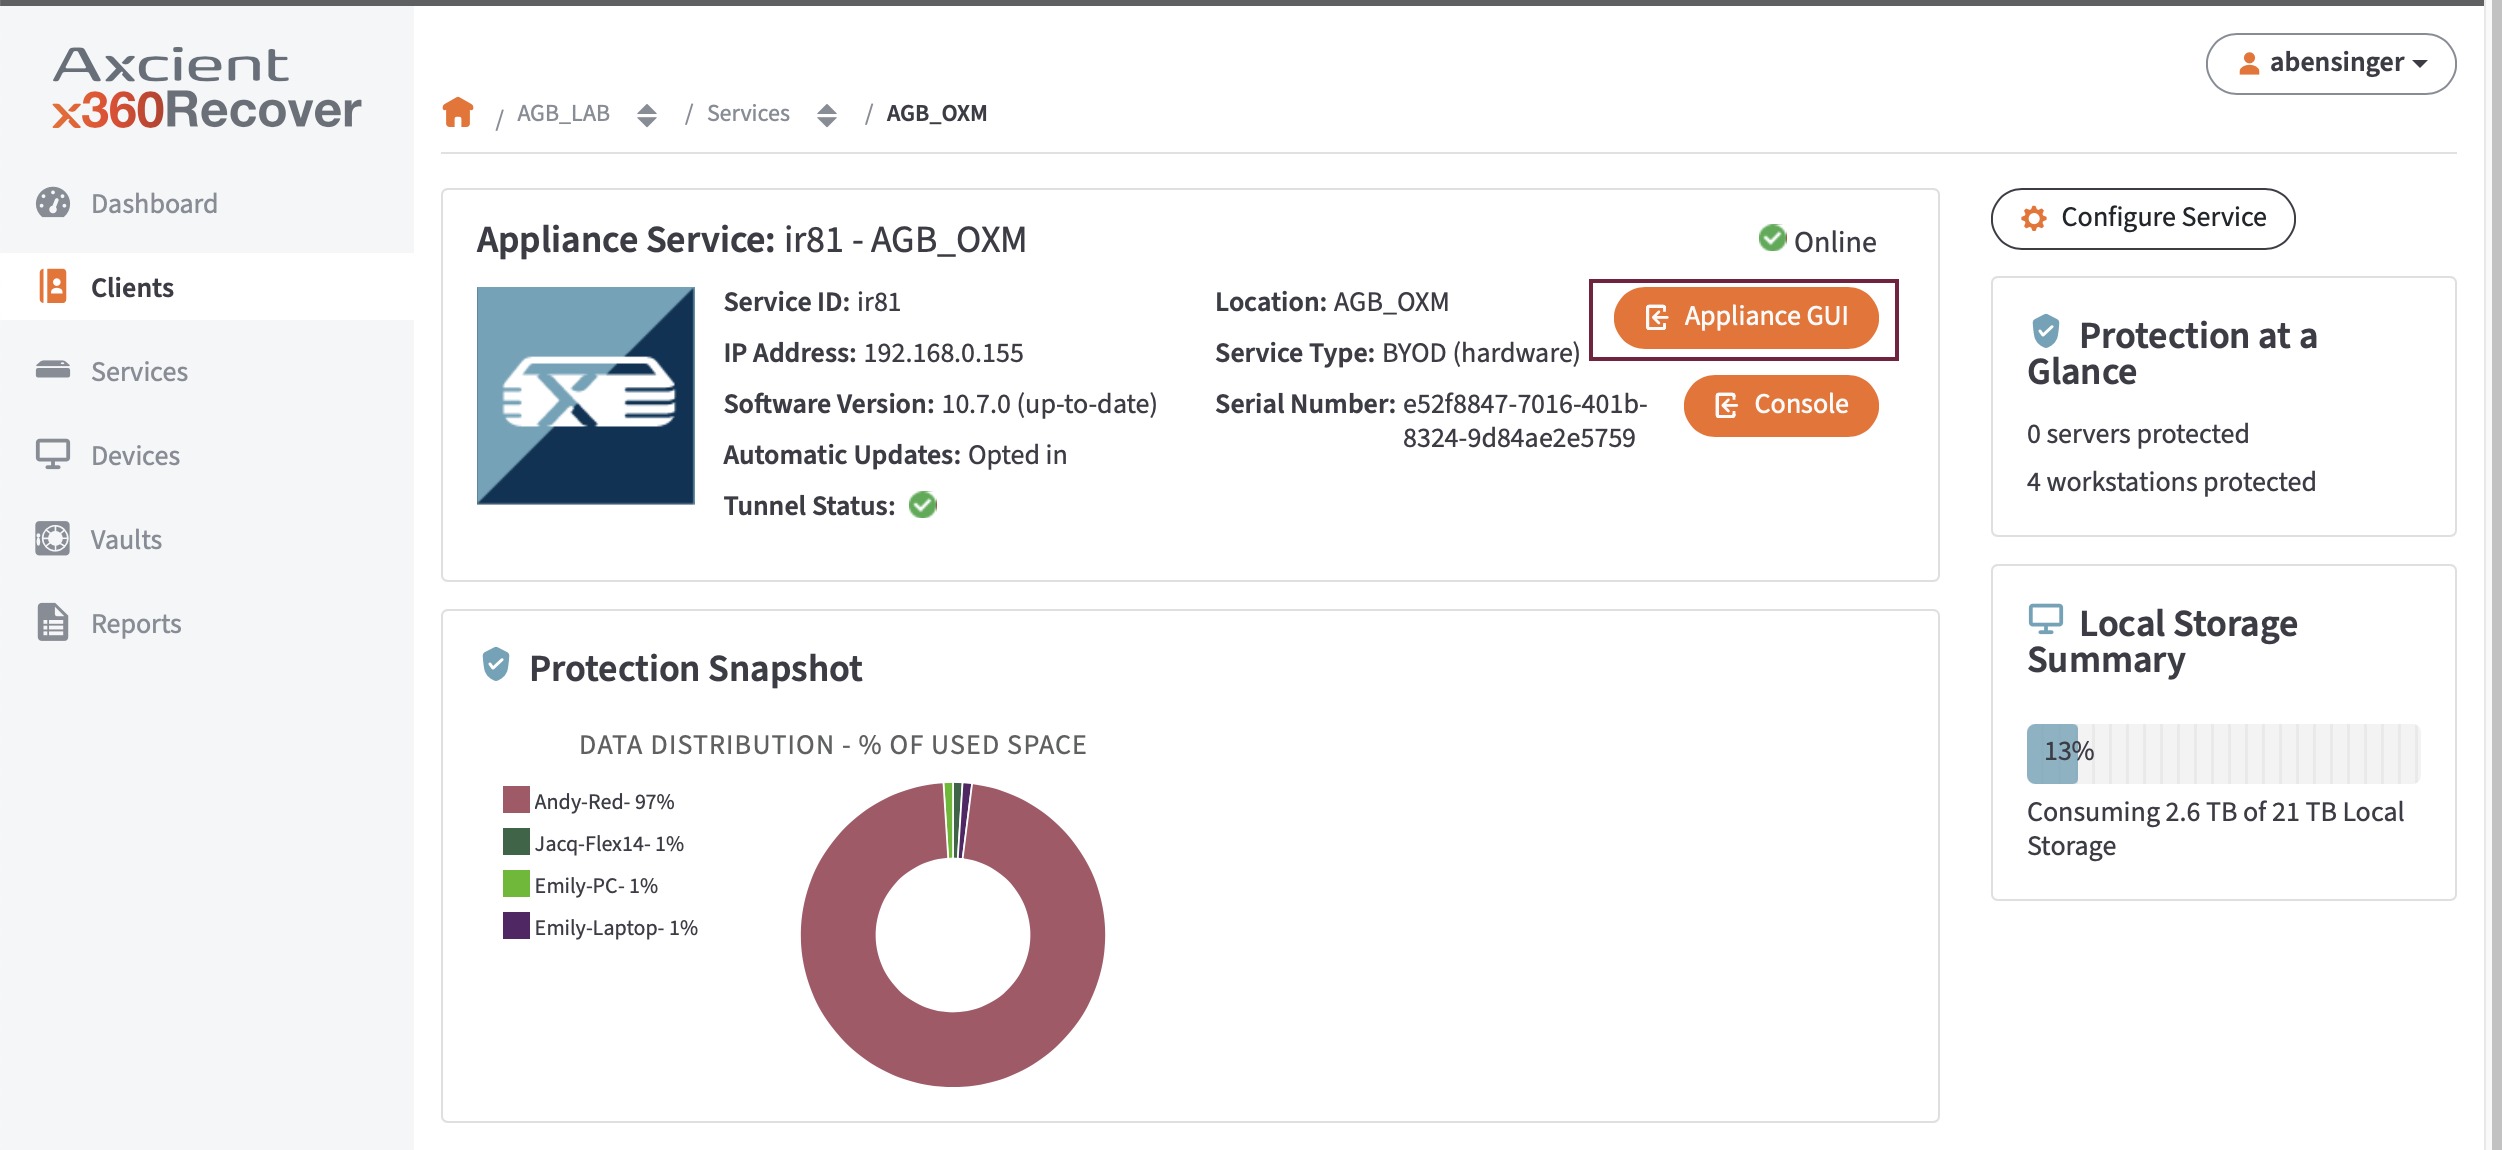
To access an appliance, navigate to the Services page and expand a row. Click the Appliance GUI button. If SSO is enabled, you will automatically be logged in without needing to use another set of credentials.
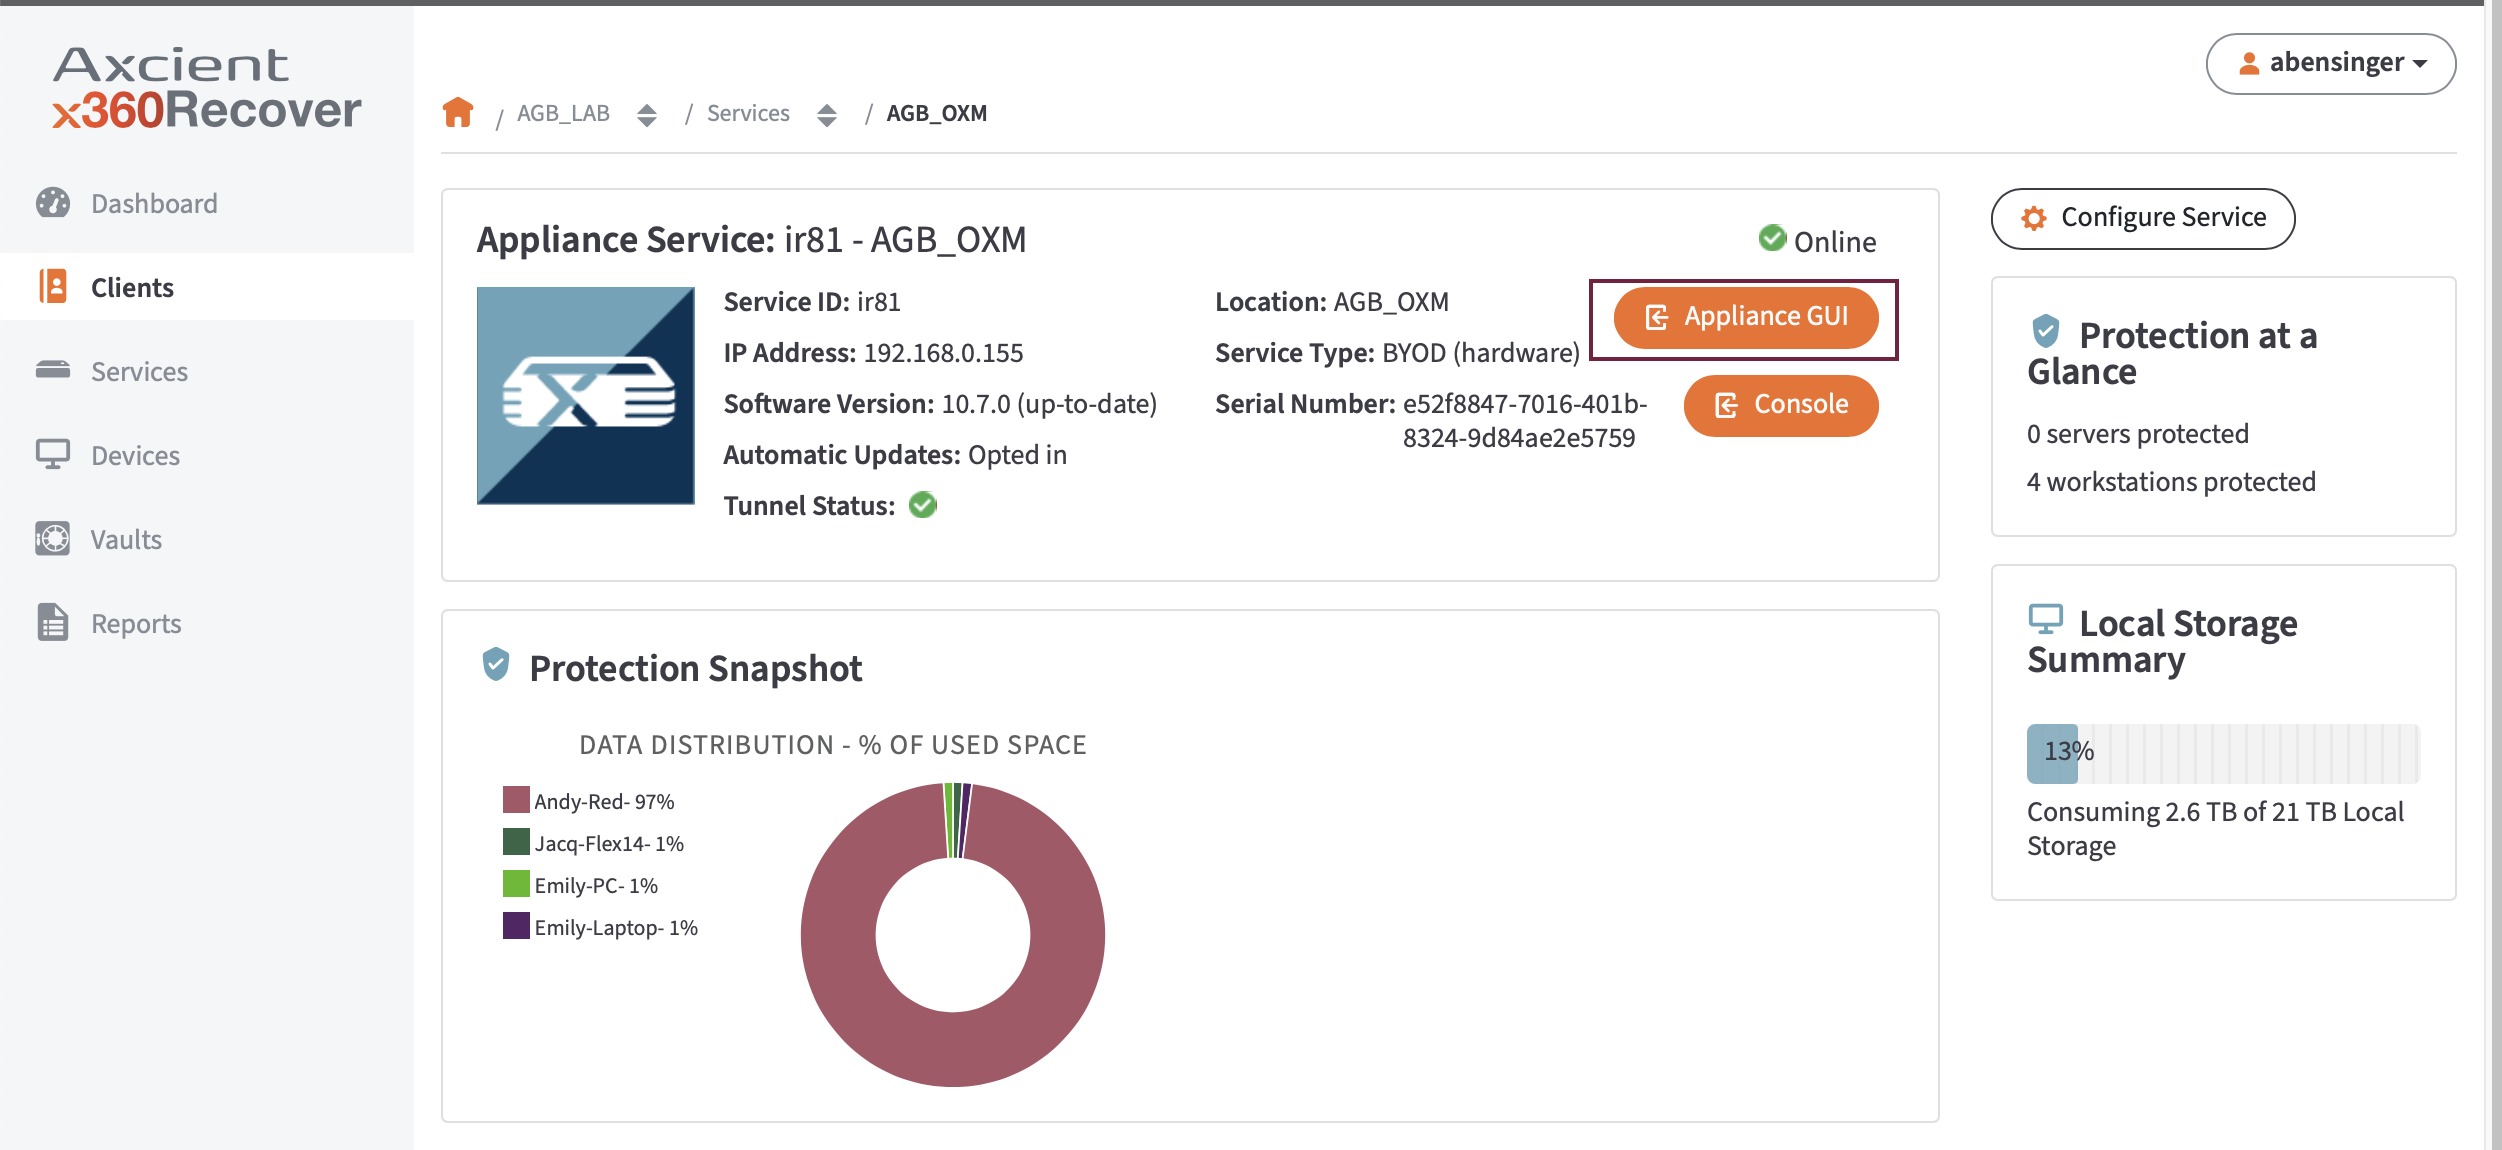
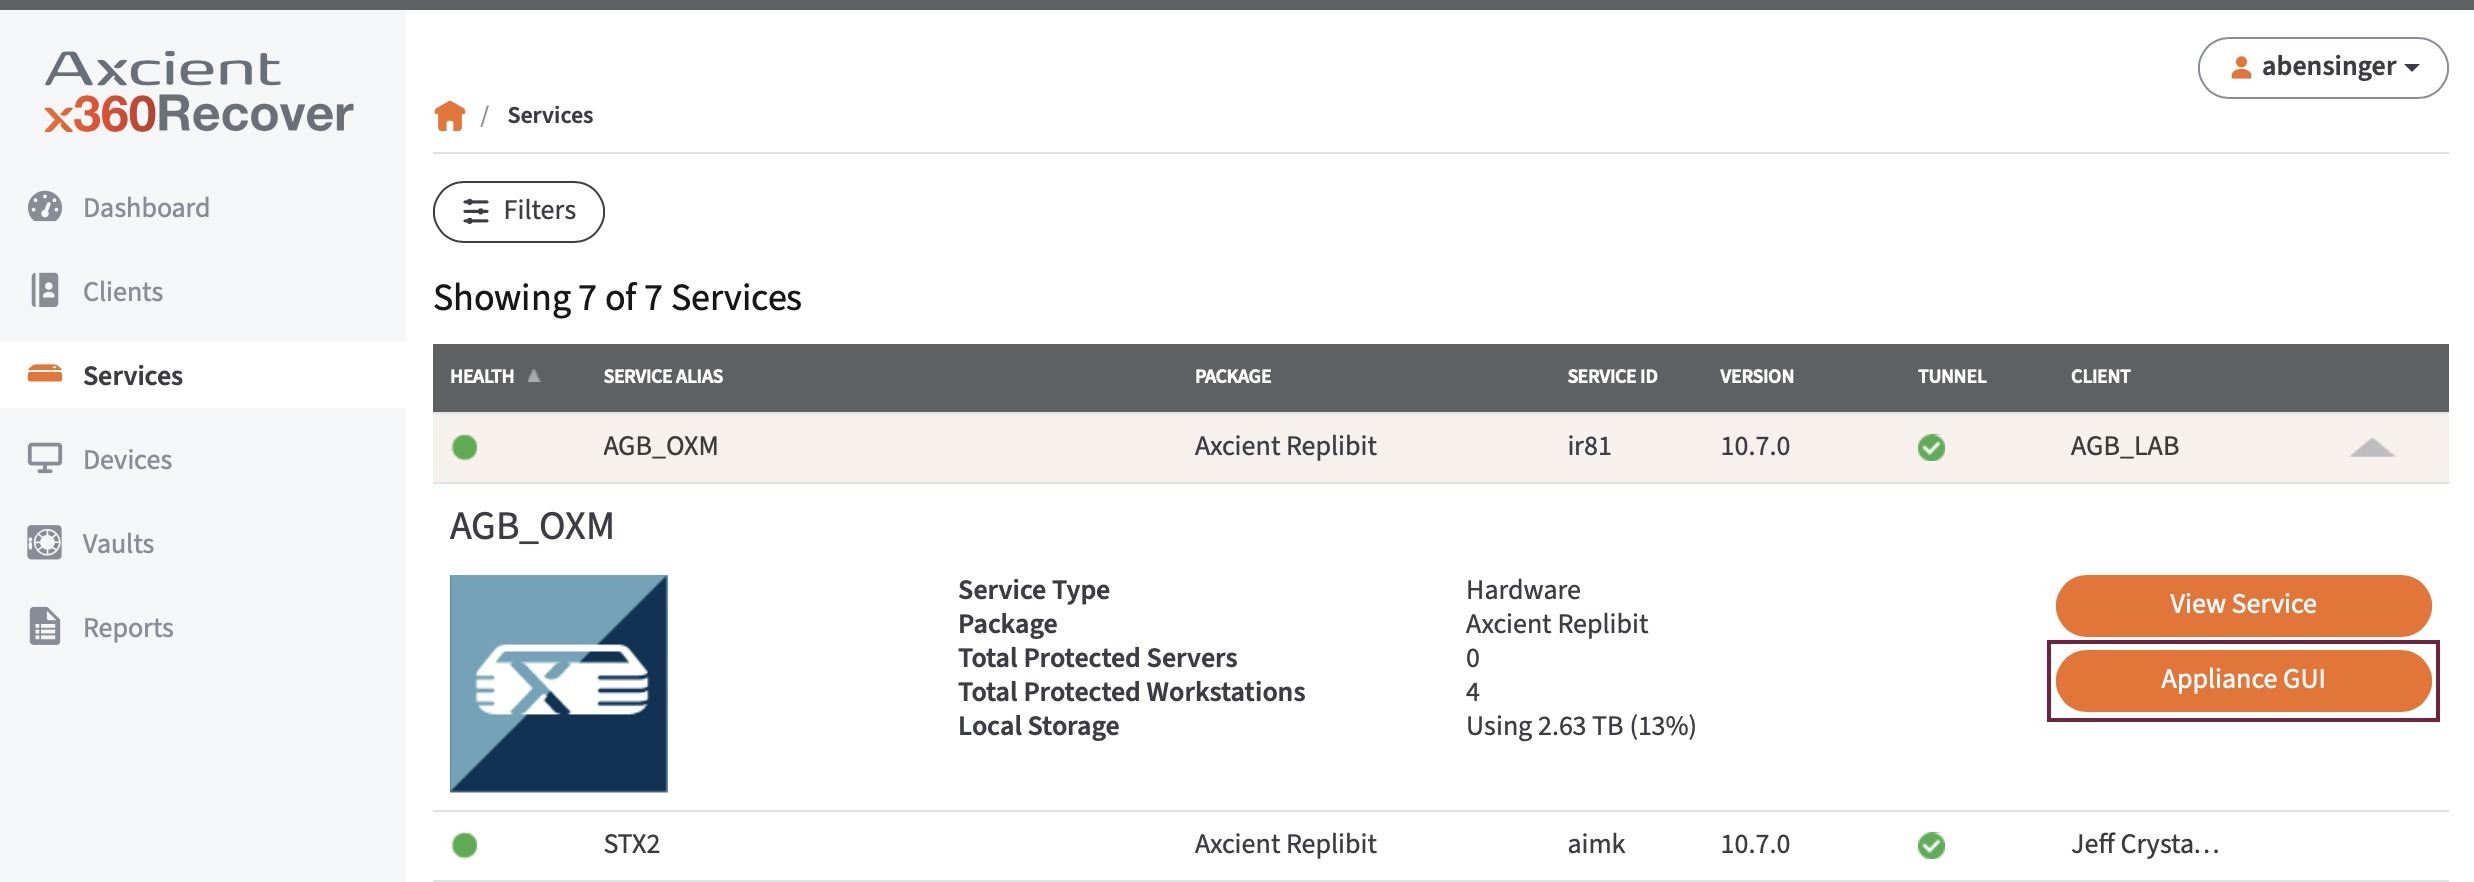
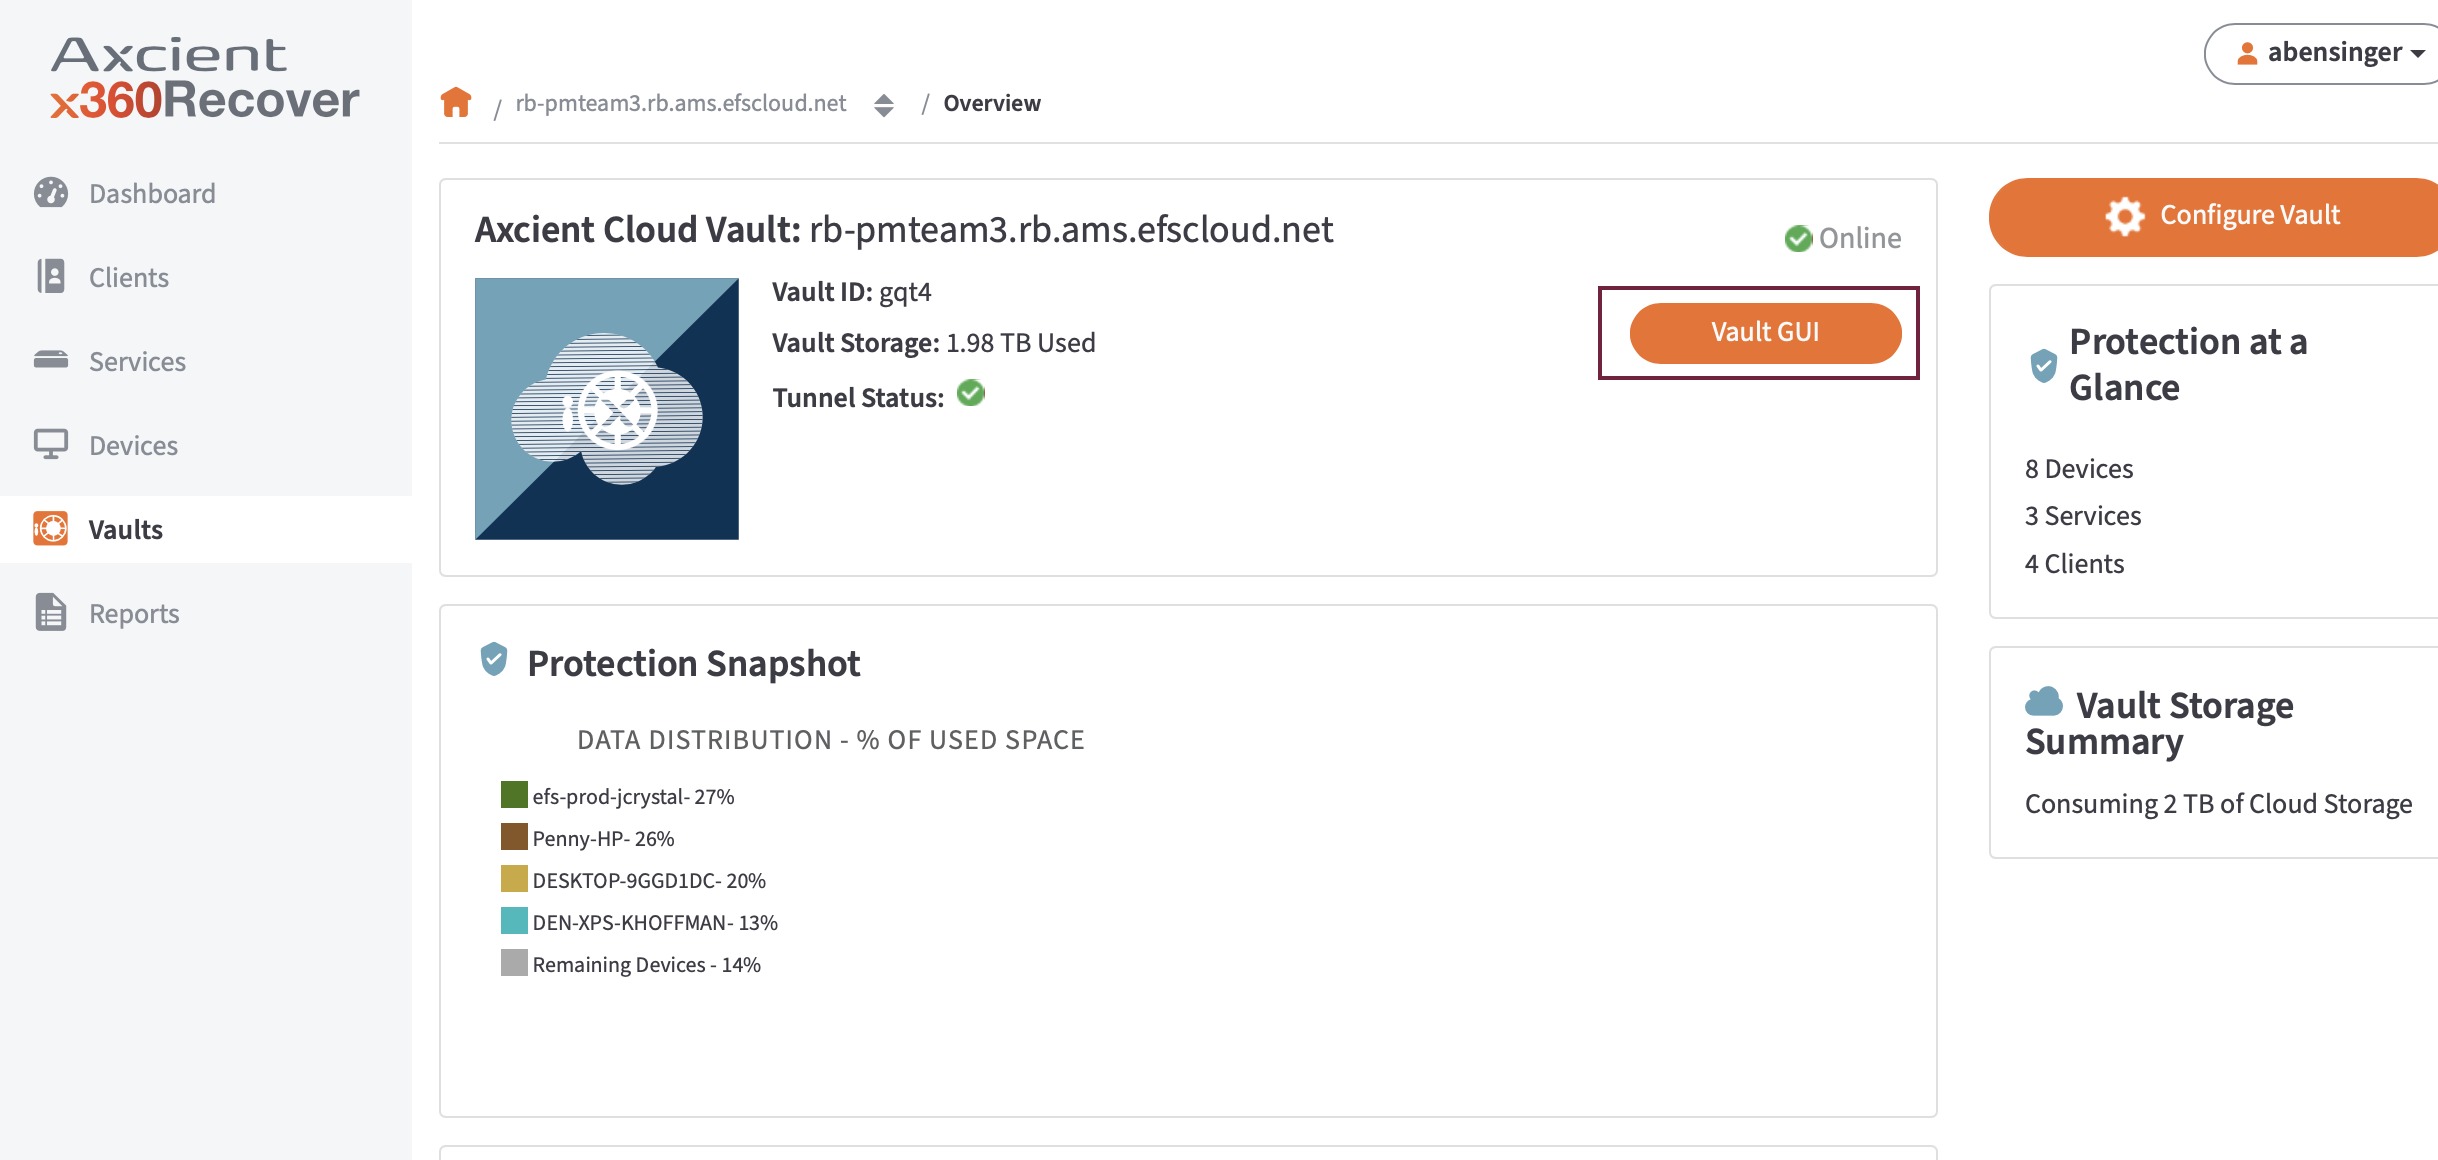
Similarly, you can log into a vault from the Vaults tab or an individual Vault Details page by clicking the Vault GUI button.
MFA Lockdown Mode
x360Recover now supports a lockdown mode, which enforces multi-factor authentication for all devices (starting with x360Recover release 10.10.0).
- Lockdown mode disables local logins (and local user access) to appliances and vaults.
- Users are required to (a) log in to x360Recover Manager, either directly or via single sign-on from the x360 Portal, and then must (b) connect to the appliance or vault from the cloud.
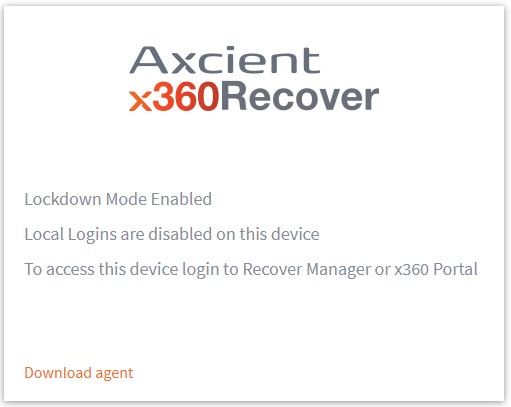
- When lockdown mode is enabled, the local login console is disabled and hidden.
A message directing users to log in via the cloud appears:
Enable Lockdown Mode on an appliance
Lockdown mode is disabled by default.
To enable lockdown mode on an appliance, log in to x360Recover Manager.
1. Navigate to the desired Client page.
2. On the Client page, select the desired Service (Appliance).
3. Click Configure Service.
4. From the appliance configuration help box, click Edit. 
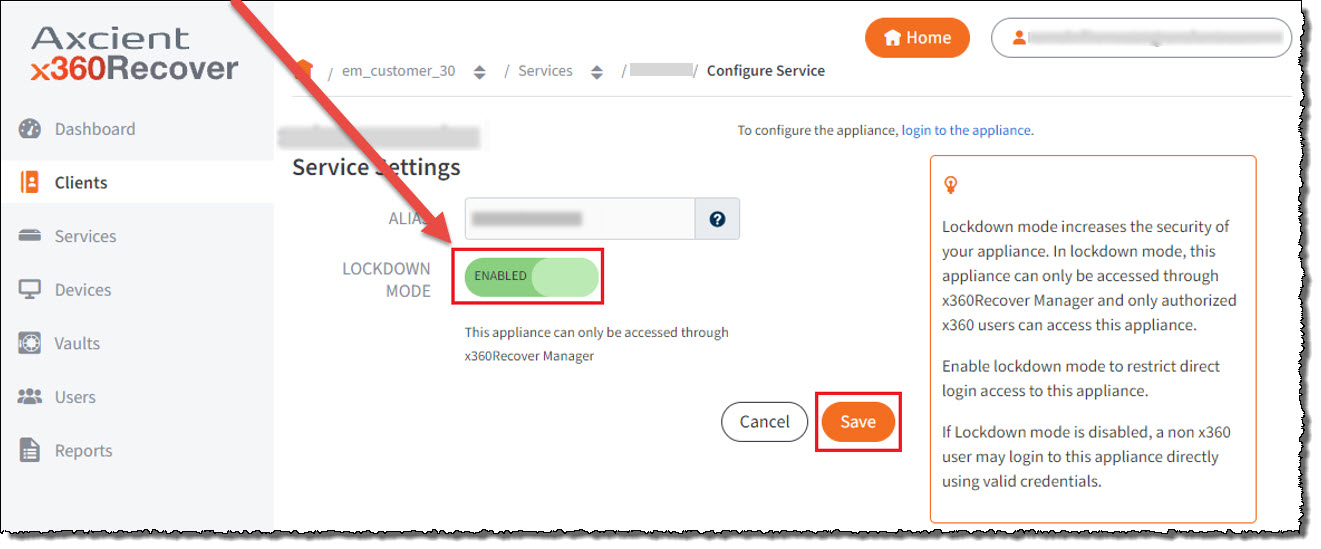
5. Click the toggle to enable (or disable) lockdown mode and then click Save.
- Changes to lockdown mode will be communicated to the appliance immediately.
Enable Lockdown Mode on a vault
To enable lockdown mode on a vault, log in to x360Recover Manager.
1. Navigate to the vault Details page.
2. Click Configure Vault. 3. From the vault configuration help box, click Edit.
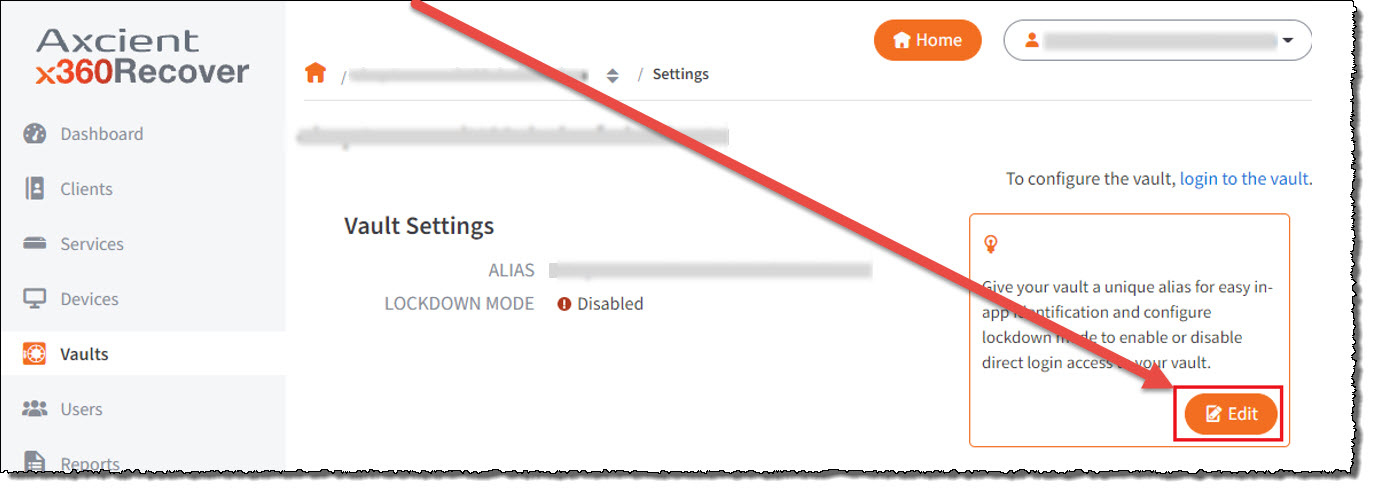 4. Click the toggle to enable (or disable) lockdown mode and then click Save.
Changes to lockdown mode will be communicated to the vault immediately.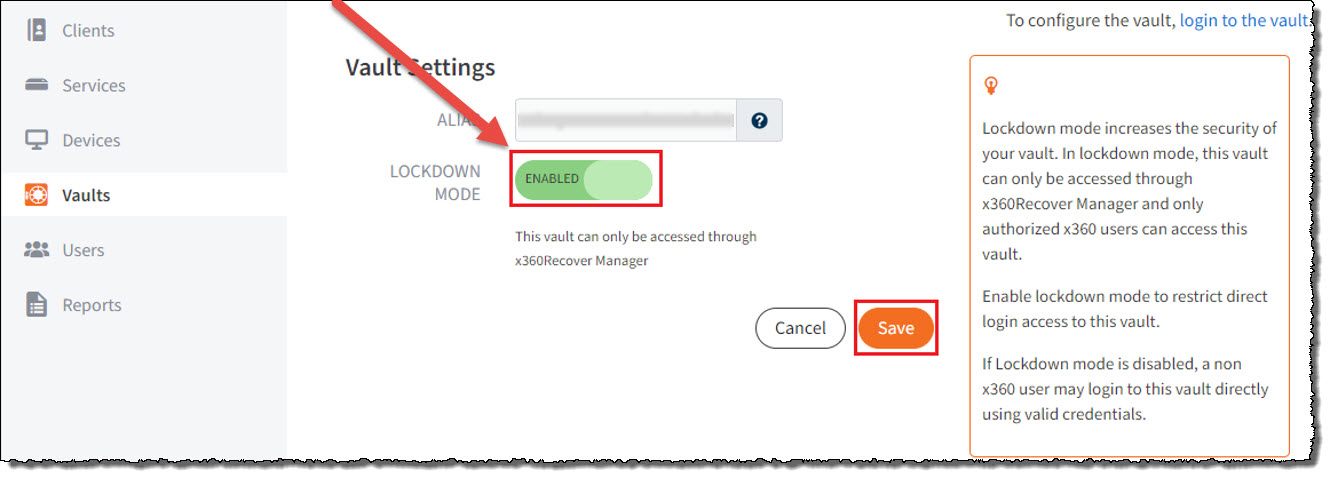
Virtual Machine (VM) console access
- In release 10.10.0, access from the appliance UI to the VNC console of a running virtual machine is not yet implemented. (Cloud access to the VNC console, directly from the appliance UI, is targeted for release 10.12.0 in December 2021.)
However, from within x360Recover Manager, you can access the console of a virtual machine running on an appliance or self-hosted vault.
This VM console access is available in two places:
Access to Running VM Console #1
1. Log in to x360Recover Manager, either directly or via single sign-on from the x360 Portal.
2. Navigate to the Client page for the client you wish to connect.
3. Under the Account At a Glance pane:
- Find Virtualizations
- Then find Local VMs

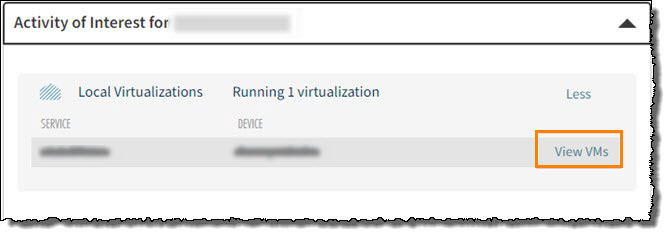
- Expand Activities of Interest
- On the line titled Local Virtualizations, move to the right side and click More:

- Click View VMs
Access to Running VM Console #2
1. Log in to x360Recover Manager, either directly or via single sign-on from the x360 Portal.
2. Navigate to the Devices page.
3. Select the Local VMs tab.  This will display appliances with running virtual machines.
4. Click the row of the desired running device to expand its details.
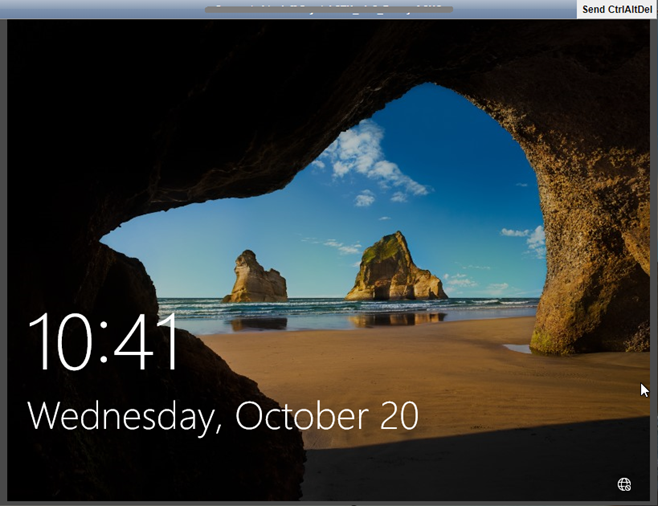
5. Click Login to access the running virtual machine console via VNC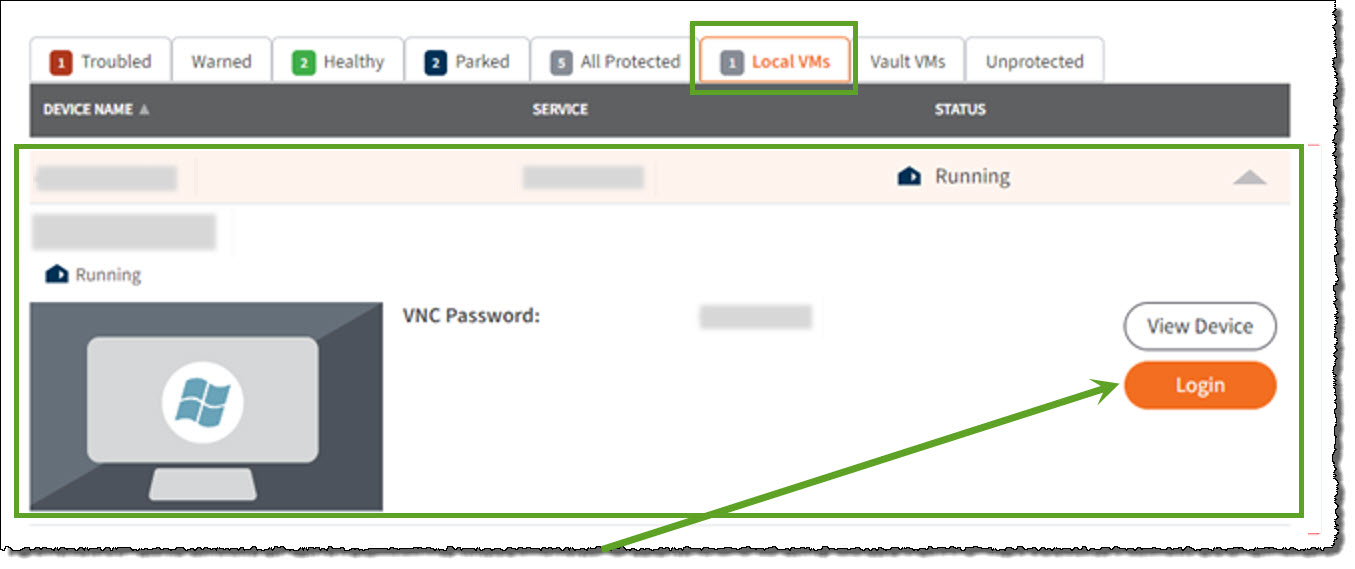 6. VNC will then open in a new window.
Organization settings
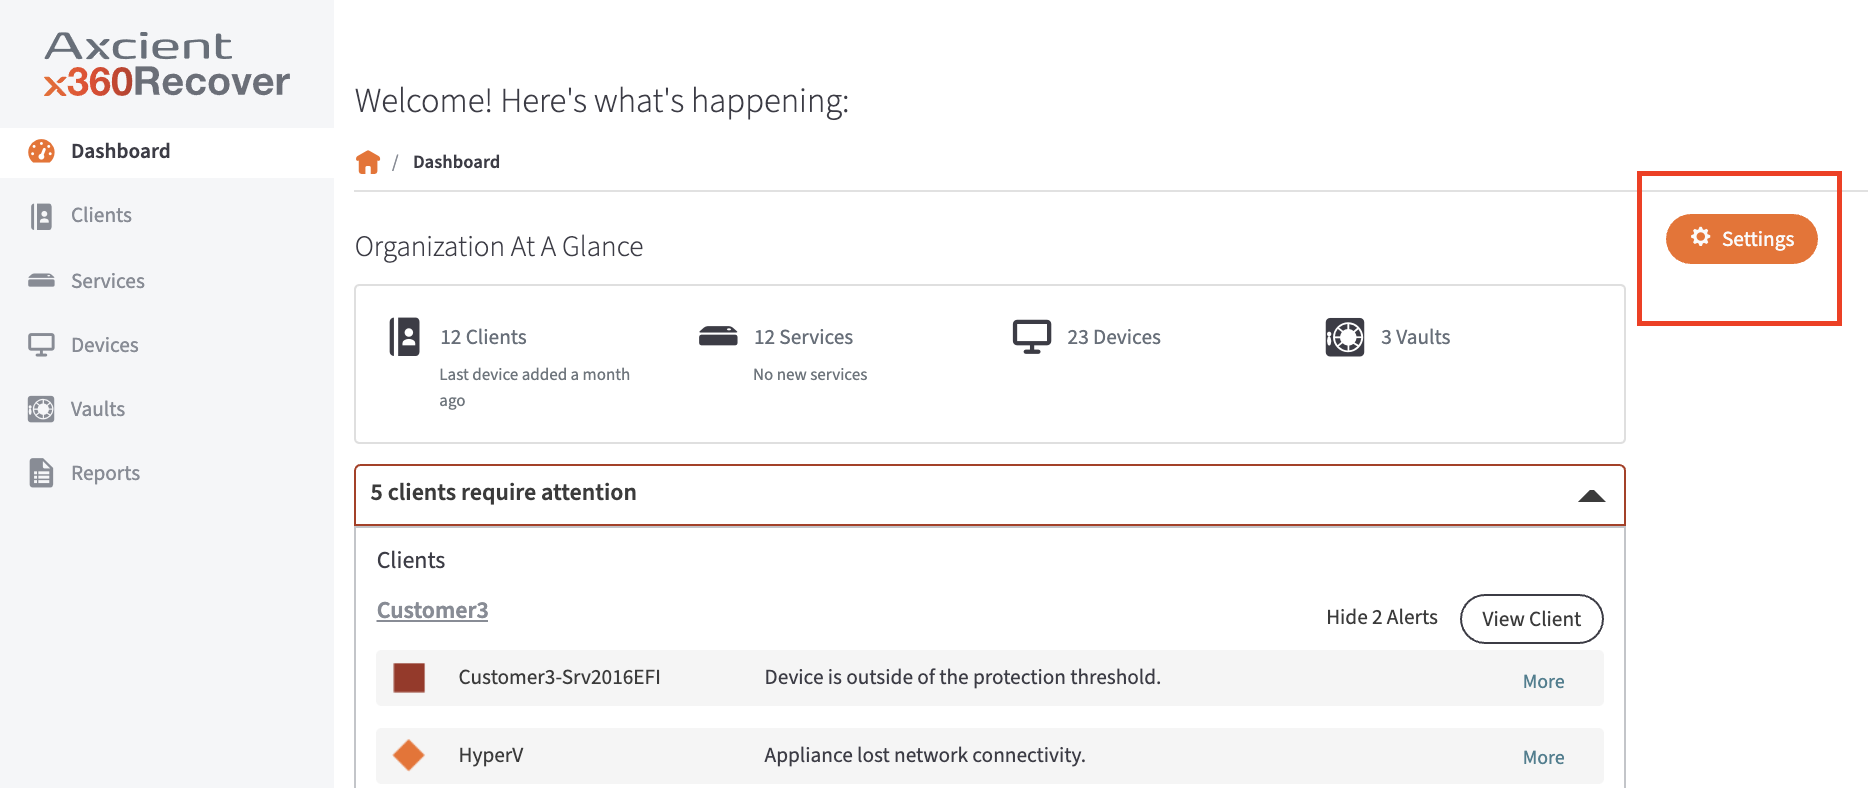
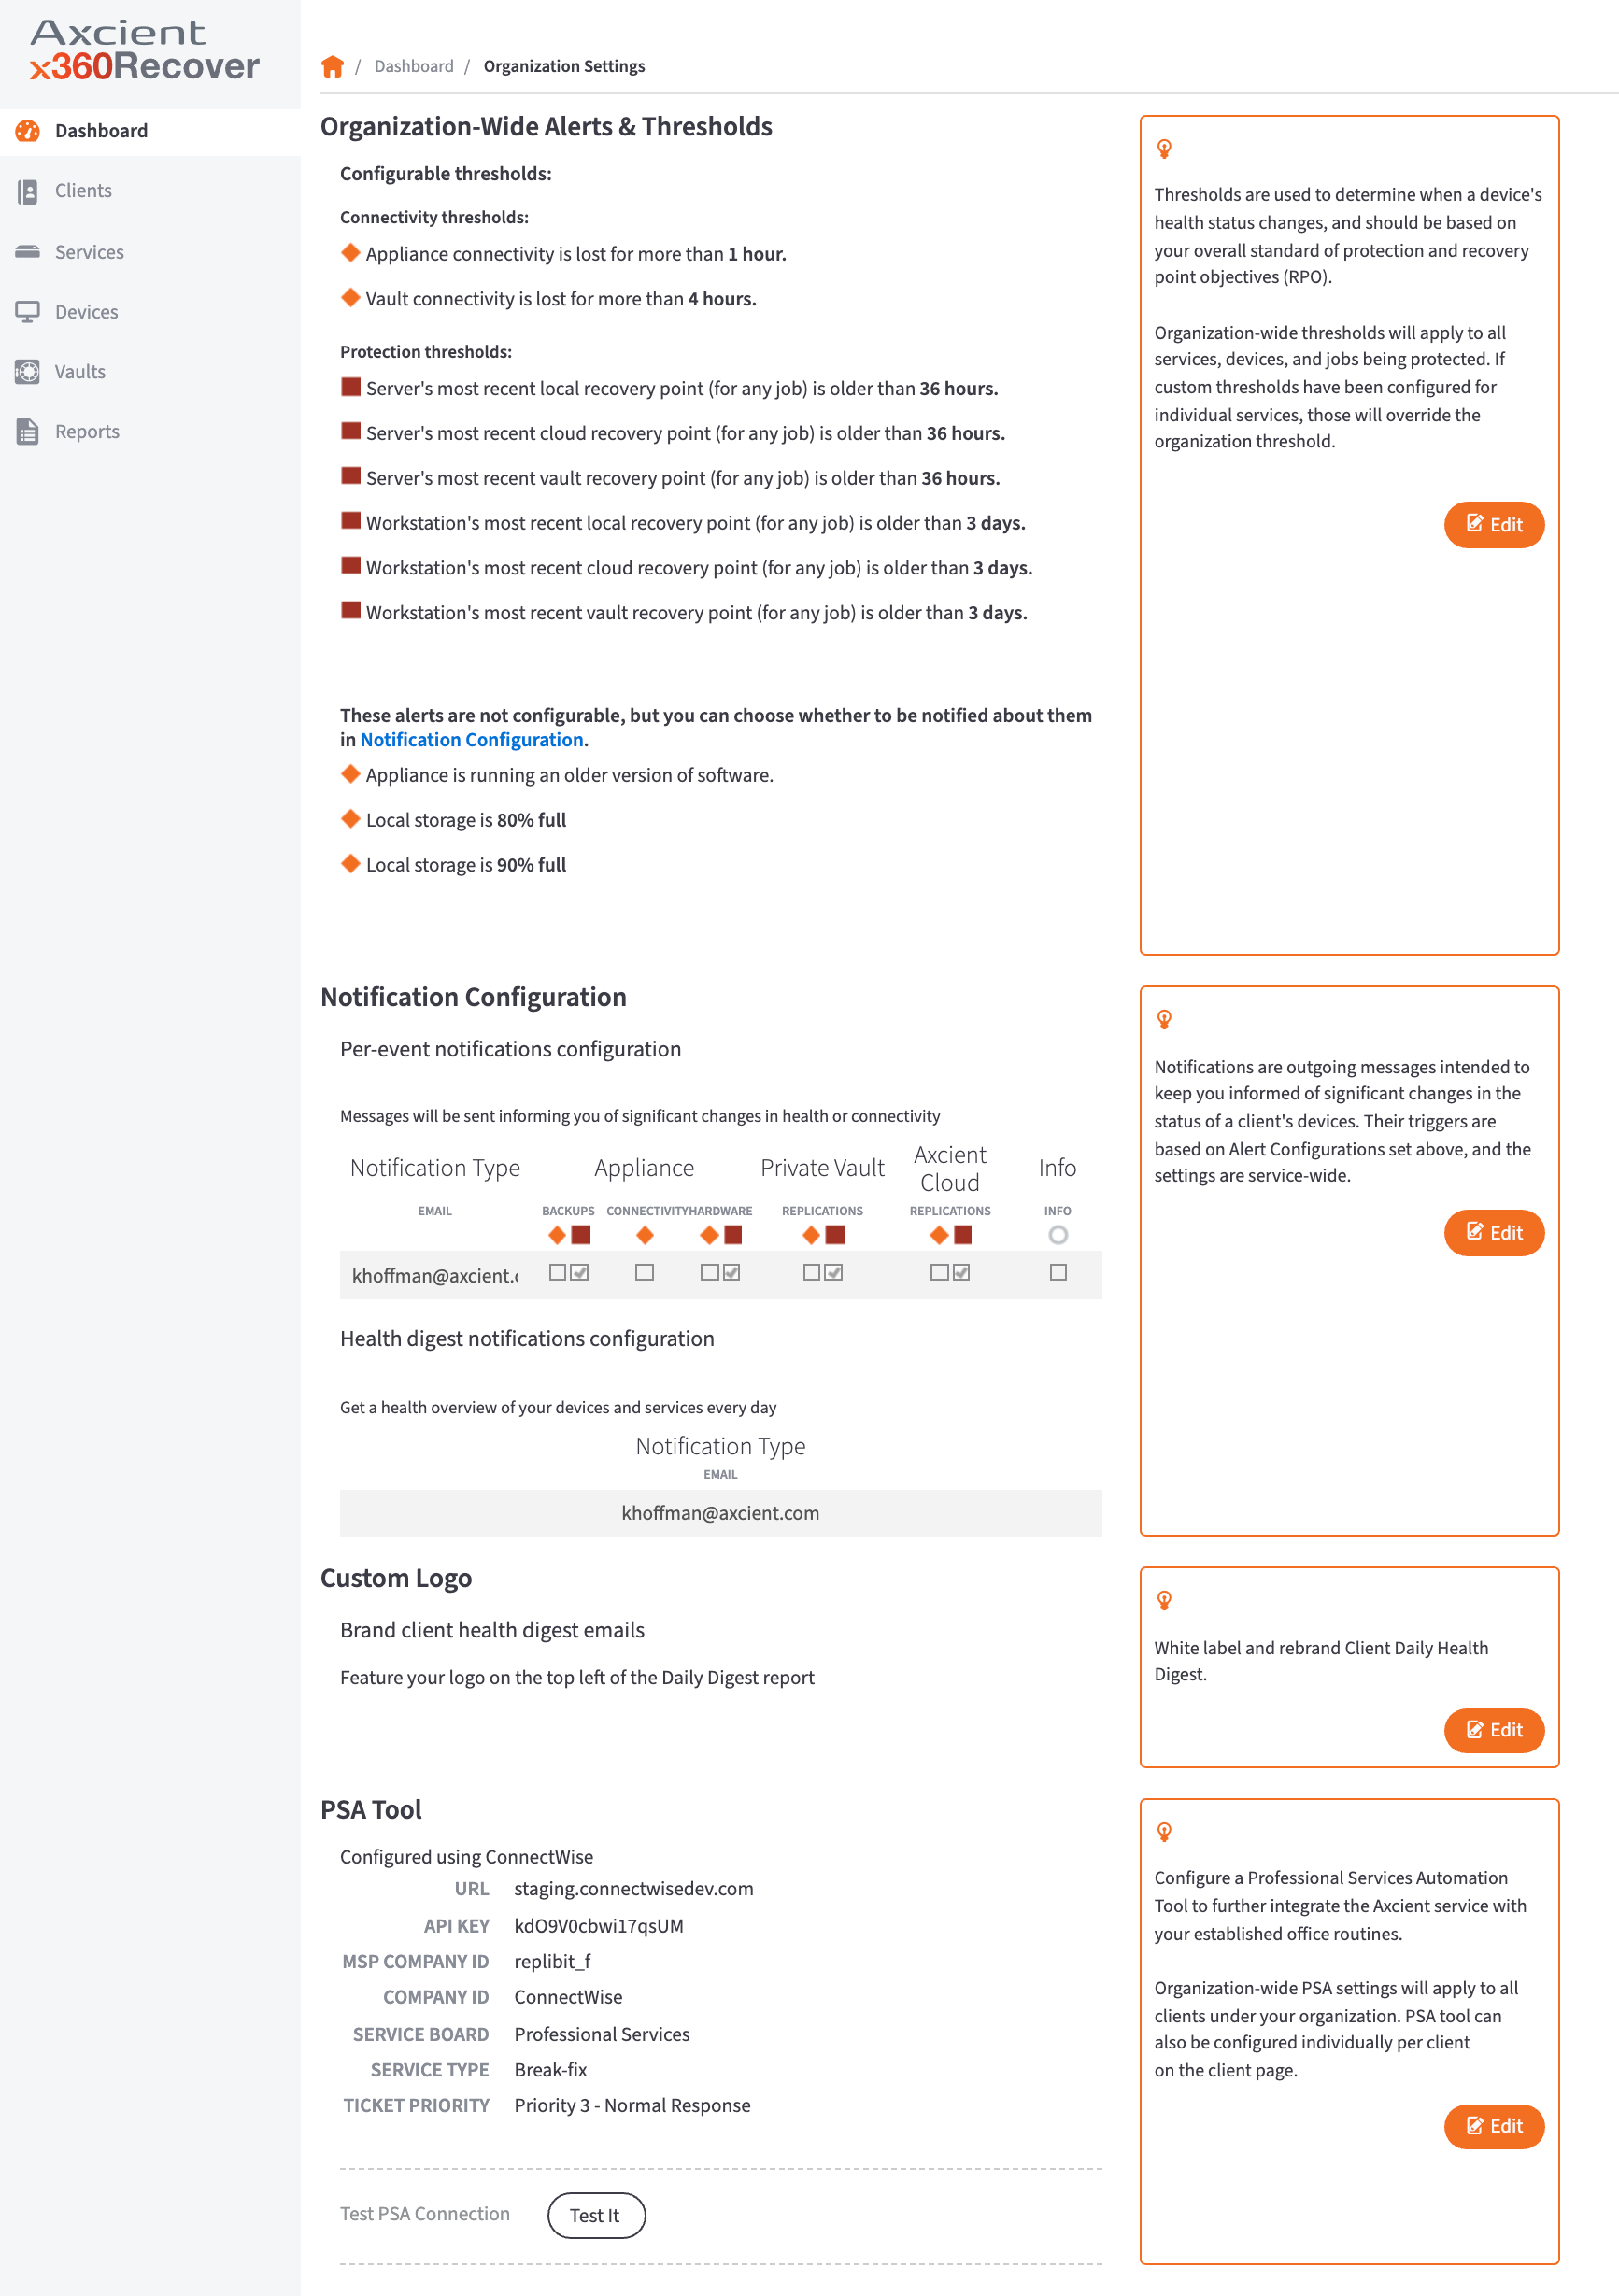
From the Dashboard page, configure settings such as alert thresholds, event notifications, and PSA integrations to apply to all of your organization's clients. Many of these settings can be overridden for individual clients, services (appliances), vaults, and/or devices (protected systems). You can also upload a logo to display in place of the Axcient logo on Daily Health Digest email reports.
For information on how to integrate your organization or client with a PSA, visit: Integrate x360Recover Manager with a PSA.
Client settings
Client notifications are outgoing messages intended to keep you informed of significant changes in the status of a client's devices. Triggers are based on Alert Configurations.
To configure client notifications:
1. In the Axcient RMC, click the Clients tab. 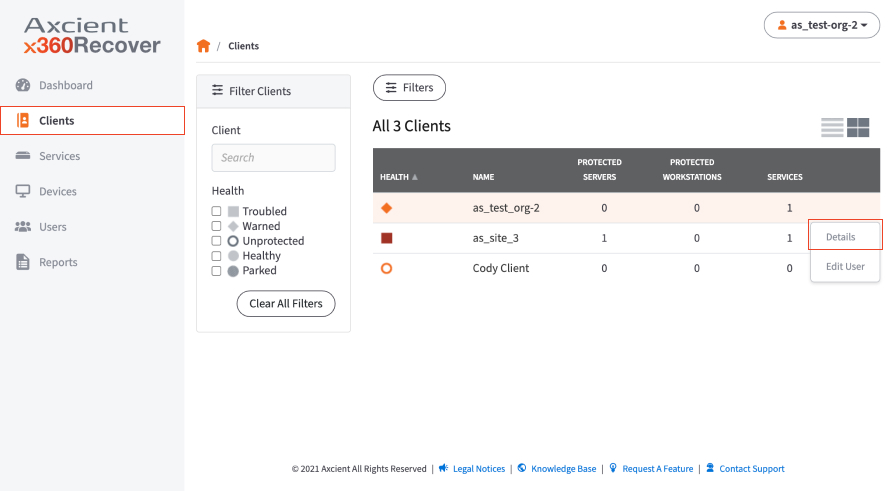
2. In the Clients page, find the appropriate client and click the Details button.
3. In the Client Details page, click the Settings link.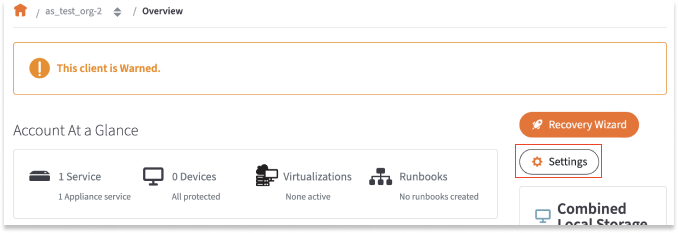
4. In the Notification Configuration section, click the Edit button.
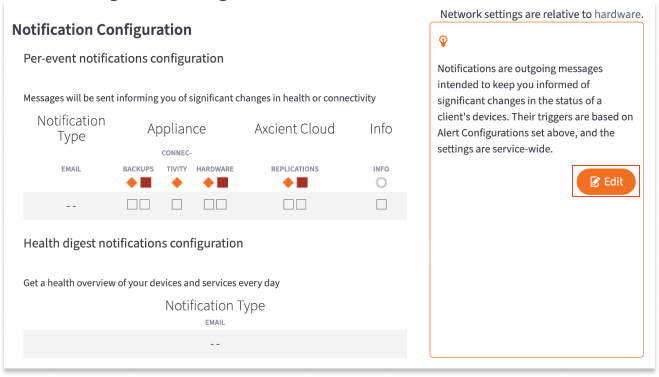
5. In the Per-event notifications configuration section, enter an email address where notifications should be delivered. This email address will receive a notification when significant changes in health or connectivity occur.
6. In the Health digest notifications configuration section, enter an email address where notifications should be delivered. This email address will receive a health overview of devices and services each day.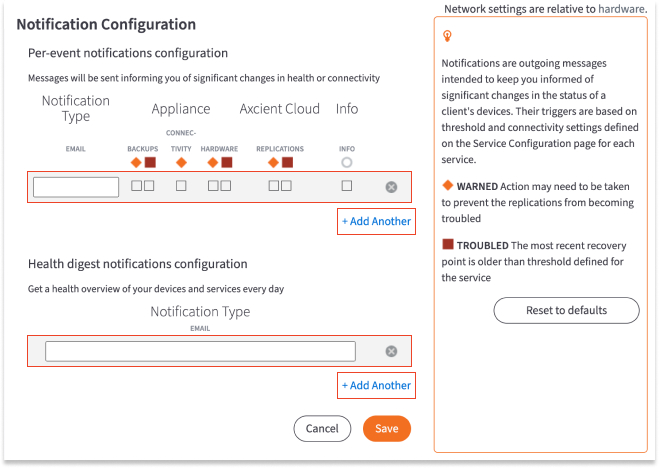
Optionally, click the Add Another link to add additional email addresses.
7. Click the Save button when you are finished.
Service settings
You can configure service settings for each client you support. For example, you can define the protection threshold under a specific Axcient service.
To update service settings:
1. In the Axcient RMC, click the Services tab.
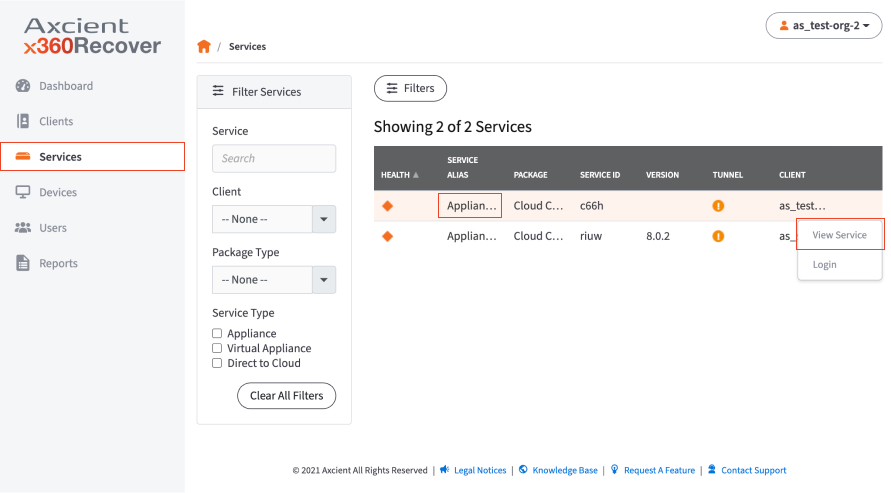
2. In the Services page, find the appropriate client and click the Service Alias or the the View Service drop-down button.
3. In the Service Details page, click the Configure Service button.

4. In the Service Wide Alerts & Thresholds section, click the Edit button.
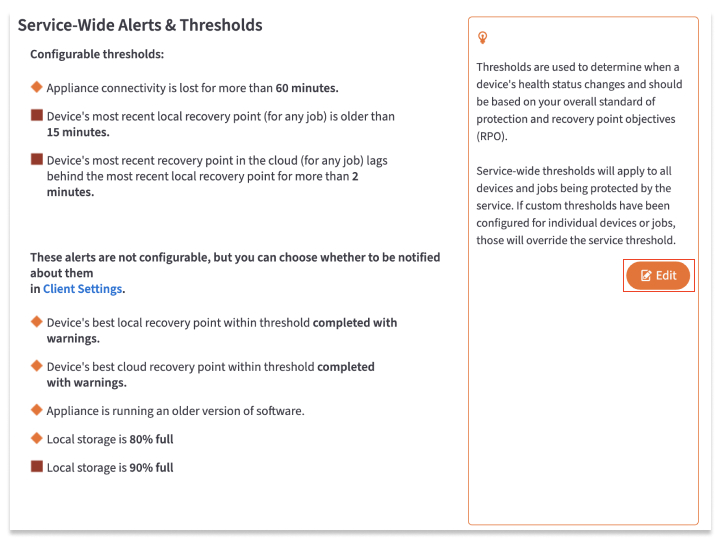
The Service Wide Alerts & Thresholds section allows you to define the protection threshold under the specific Axcient Service.
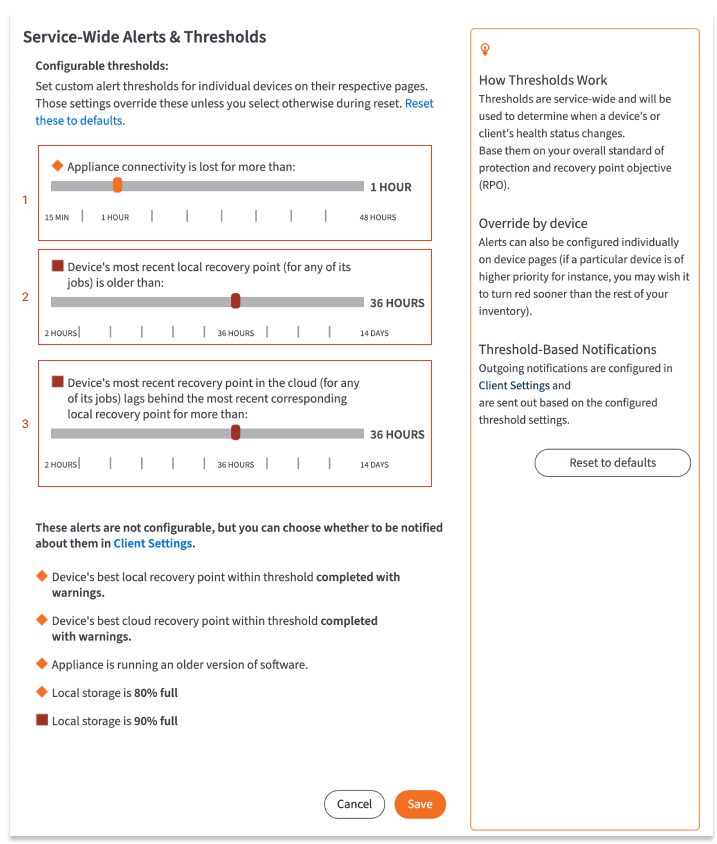
You can configure:
- The Appliance connectivity loss alert slider allows you to configure how long a device can lose connectivity before receiving an alert.
- The Device's most recent local recovery point alert slider allows you to configure an alert for when a device's most recent local recovery point is older than the specified period time.
- The Device's most recent recovery point lag slider allows you to configure an alert for when a device's most recent Private Cloud recovery point is older than the specified period of time.
Click the Save button when you are finished.
NOTE: In addition to configuring the alerts listed above, you can also view RMC storage usage alerts. RMC storage alerts are not configurable.
A Warning alert will be automatically generated when disk storage space on the appliance is 80% full and a Troubled alert will be generated when disk storage space on the appliance becomes 90% full.
Device settings
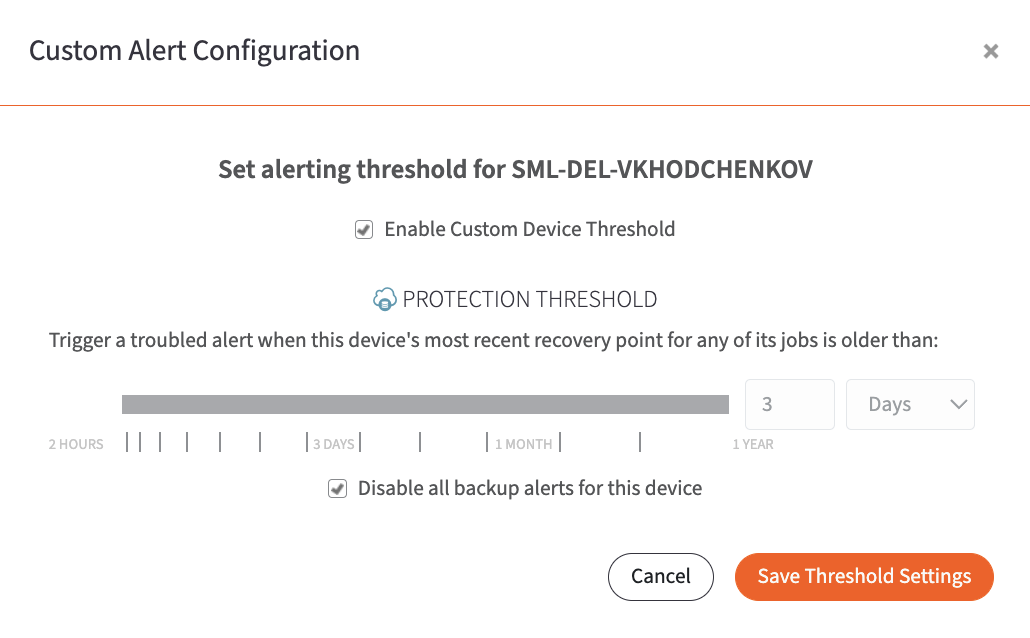
You have the option to override client or service alert thresholds at the device level.
Check Enable Custom Device Threshold and define the recovery point threshold for alerts, or disable all alerts.
Vault settings
You have the ability to configure vault settings from within the RMC. For example, as a best practice, we recommend setting up vault-wide alerts and threshold settings. When you configure these settings, you select when a vault's health status changes.
To configure vault settings:
1. In the Axcient RMC, click the Vaults tab. The Vaults page displays.
2. In the Vaults page, find the vault you want to manage and click the appropriate Vault Name.
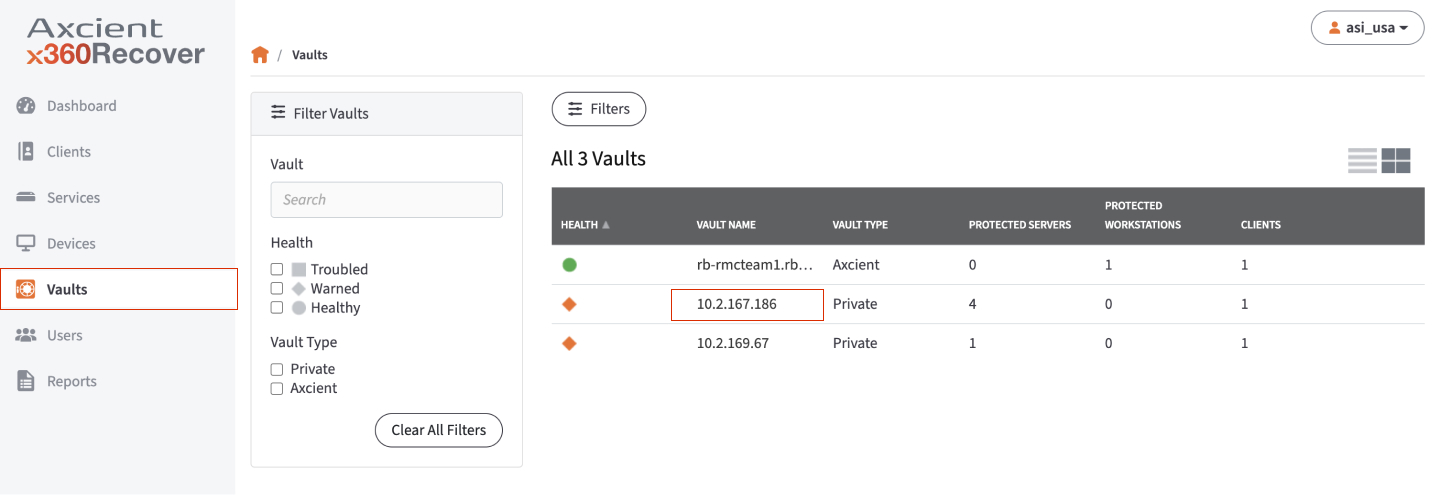
The Vault Details page displays.
3. In the Vault Details page, click the Configure Vault button. The Vault Settings page displays.
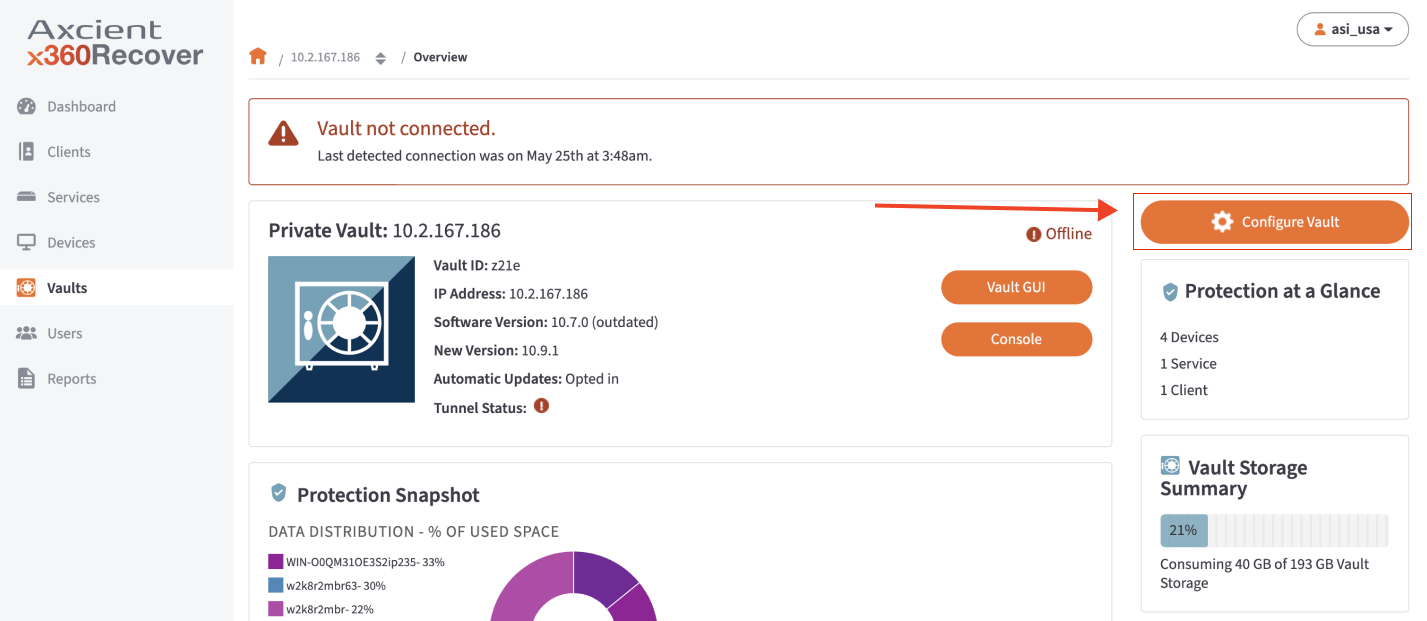
4. In the Vault Settings page, find the Vault-Wide Alerts & Thresholds section and click the Edit button.
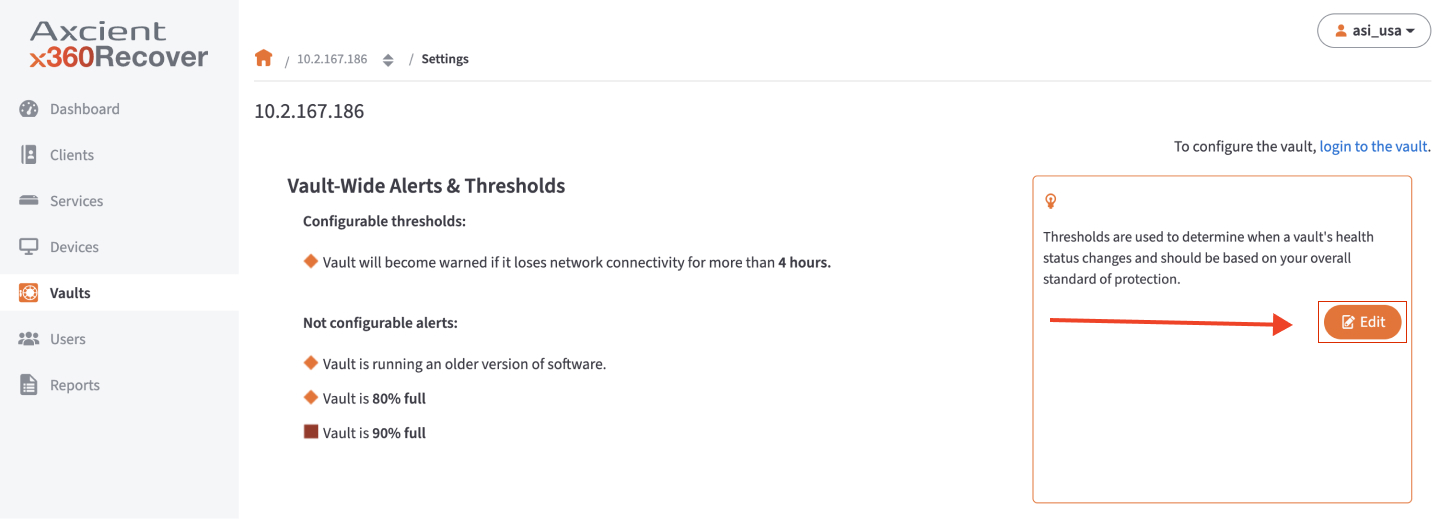
5. Click the slider tool and adjust when a vault's health status changes.
The vault will be listed as warned if it loses network connectivity for the selected number of hours.
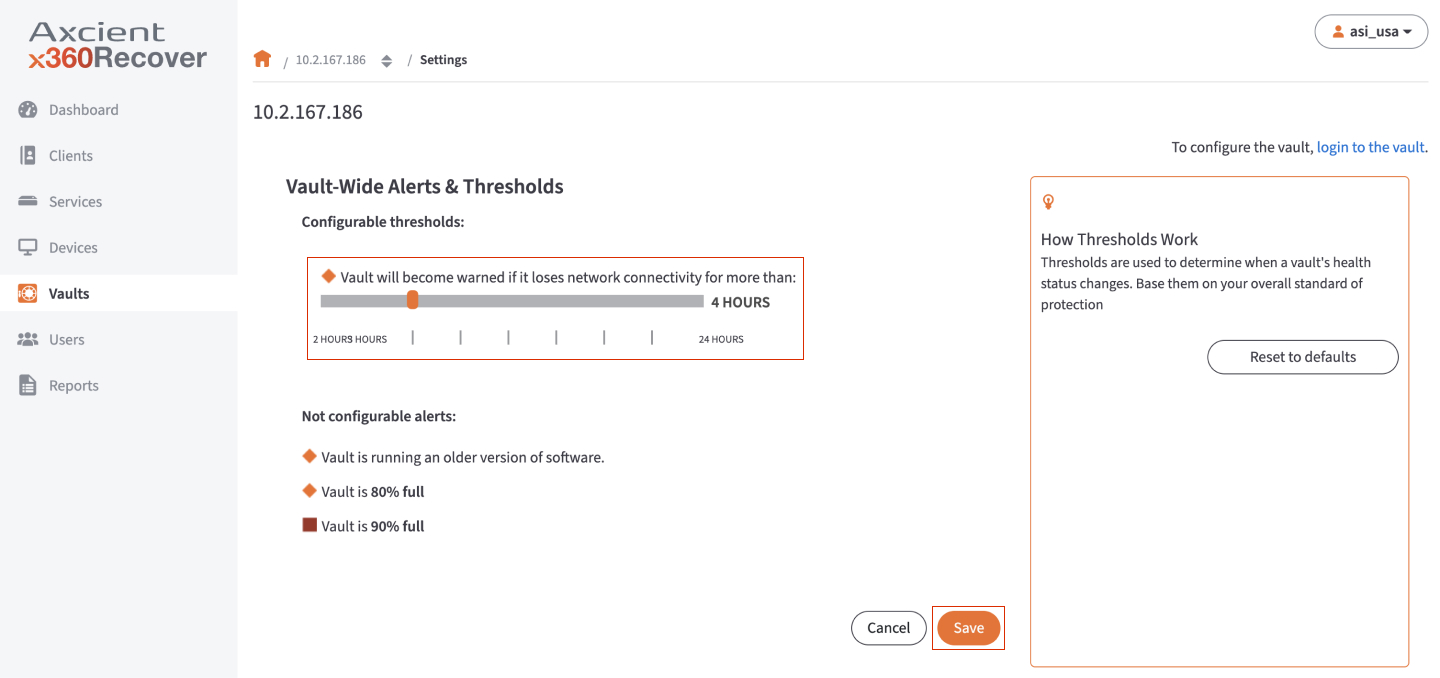
6. Click the Save button when you are finished.
