
|
Our x360Recover Bare Metal Restore Wizard offers several options for performing different types of recovery, depending on where your data is located: |
Perform bare metal restore from a virtual disk image
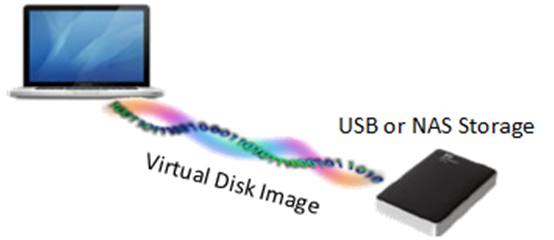
An alternative method of recovering your protected system involves using an exported virtual disk image. You can use bare metal recovery to restore your target system, directly from that image. This is useful when you do not have a local cache configured for your Direct-to-Cloud (D2C) system, or in other situations where you may have already exported your protected system to a virtual disk image.
PREREQUISITE: We recommend that you remove existing partitions on the destination disk before performing BMR: [Click to learn more]
Before beginning a bare metal restore, we recommend that you first inspect the destination disk and remove any existing partitions. This will ensure that you have a successful recovery.
STEP 1. After booting the x360Recover BMR ISO, run GParted from the desktop.
STEP 2. Select each disk you intend to overwrite with the recovery from the top right dropdown menu.
NOTE: You must remove any locked partitions (such as LVM groups or swap partitions) because the system will block these locked partitions from being overwritten:
- To delete locked LVM partitions, first select the partition and click Partition -> Deactivate
- To delete locked swap partitions, first select the partition and click Partition -> SwapOff
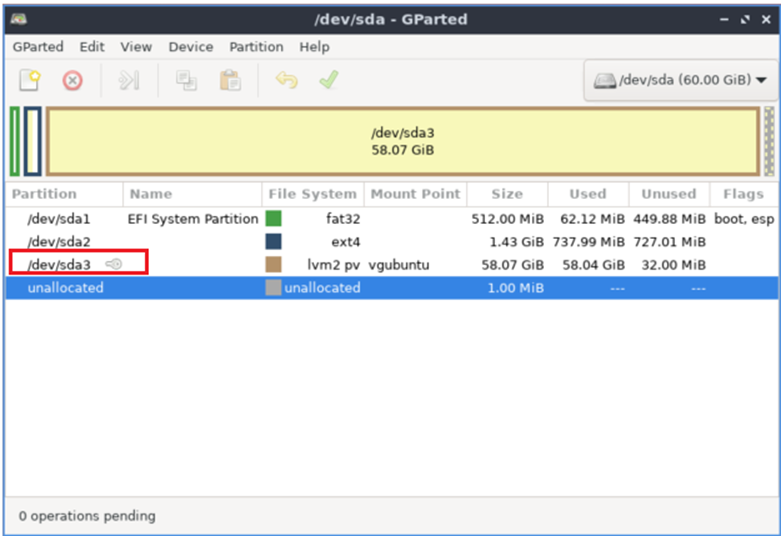
STEP 3. To remove the chosen partitions, select each partition, one at a time, and click the red-circle-x icon on the toolbar.
Then, after all desired partitions are removed, click the green check icon to save these changes.
STEP 4. Once the selected destination disk(s) have been cleared, open the Recovery Wizard,and proceed with the bare metal restore operation
DeleteHow to perform BMR from a virtual disk image
When you perform bare metal restore operations from a virtual disk image, the supported virtual disk image types include:
- VMDK (Workstation)
- VMDK (ESXi)
- VHDX
Please note that you may NOT use VHD format disks for bare metal recovery.
IMPORTANT If you plan to use Incremental Recovery with this disk image DO NOT select 'Apply P2V Changes' when exporting the disk
Step 5. Accept the End User License Agreement

Step 6. Choose a Login method
You may select to use local Appliance or Vault user credentials, or x360Portal Cloud User credentials (recommended)

Step 6a. If you select x360Portal credentials, complete the Web user login with MFA

Enter the Username and click Next

Enter the Password and click Next

Enter your MFA Authentication Code and click Next
STEP 7. From the main bare metal recovery (BMR) wizard menu, select Recover from Virtual Disk Image(s) and then click Next to continue.

STEP 8. Connect your drive or map your network share
Note: If you wish to perform Incremental Recovery, select Start an Incremental Bare Metal Restore Recovery here.
See Perform BMR using Incremental Recovery
Special Note: If you select Start an Incremental Bare Metal Restore Recovery you will be guided through several pages to login, specify an appliance or vault, select a protected system and specify a snapshot. This snapshot MUST MATCH the virtual disk image being used for Recovery.
Step 8a. If your virtual disk image is on a USB drive, ensure that the USB device is connected to this recovery system and click Next to continue.

Step 8b. If your virtual disk image is on a Windows server or NAS device, map the network share by providing the user credentials and UNC path. Then click Next to continue.

Step 8c. If your virtual disk image is on a Linux server or SAN using NFS shares, map the network share by providing the network path to the share and click Next to continue.
Note: Be sure to enable permissions for this machine to access the NFS export on the Linux server or SAN.

STEP 9. Select the desired virtual disk image file and map it to a local drive by clicking Add.
You can add as many disk maps as you require to recover all protected system volumes.
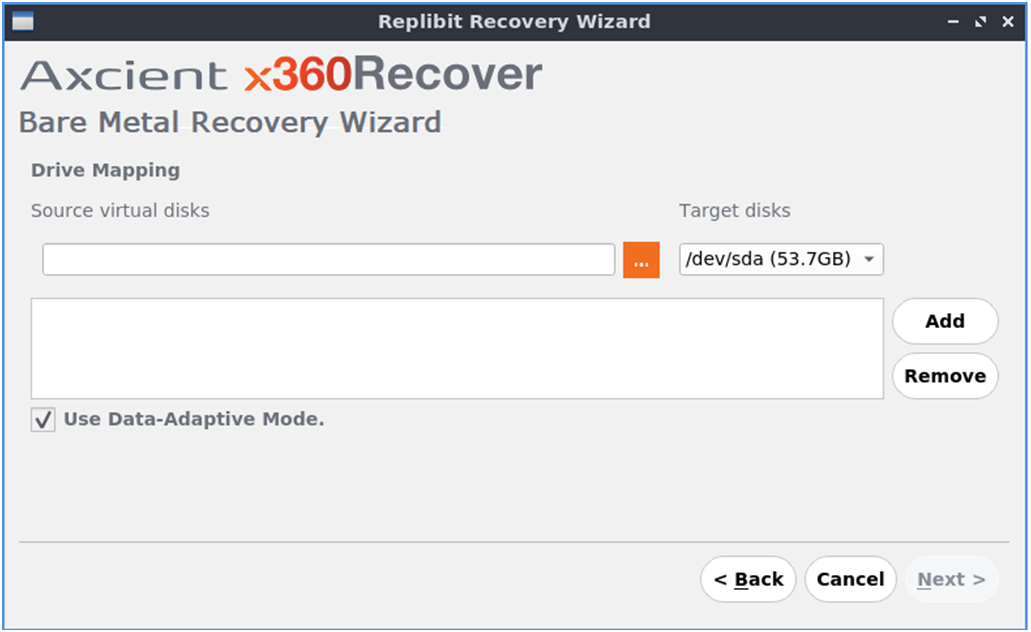
Virtual disk images located on a network share:
/media/axcient/VirtualDisks
Virtual disk images located on an attached USB drive:
/media/axcient/<USB Volume name>
STEP 9a. Use the browse tool to select the virtual disk image file.
Map to local drives
|
Linux uses a different disk nomenclature than Windows:
The Linux <device> is typically a 3-leter acronym:
Examples of Linux devices:
Partitions on the Linux device are then designated with a number. For example, the first partition on the first disk might be /dev/sda1
Some third-party RAID controllers (notably HP) may use a different device naming scheme.
Example: The first partition on the first disk would be /dev/cciss1-p0 For purposes of drive mapping in these instructions, we will specify full disks. For example, we might map the original Windows Disk0 to the local disk /dev/sda.
Linux may enumerate disks in a different order than Windows, especially if multiple storage controllers are present on the system. Typically, you should examine the size of the local disk to ensure you are matching protected system disks to the correct local disk for recovery. |
Data Adaptive Mode vs Failsafe Mode
What are the available recovery modes and which should I choose?
Data Adaptive Mode is the default (recommended) recovery mode. Recovery is performed partition by partition, using filesystem-specific cloning tools. Blank spaces will be skipped for efficiency and only in-use disk blocks will be copied.
Failsafe Mode is triggered if you de-select the default Data Adaptive Mode. Failsafe mode performs a raw disk dump of the entire drive in one pass. Failsafe mode may be slower than Data Adaptive Mode if substantial segments of the drive are empty, as these empty spaces will be copied and not skipped.
When would I choose Failsafe Mode?
- If your protected system contains Windows dynamic disks, or you experience unrecoverable errors trying to use Data Adaptive Mode, you should select Failsafe mode for the recovery instead.
- Depending on your data configuration, Failsafe Mode might be faster.
Note: You can choose to use Failsafe mode for only for the specific disks that meet these criteria. If your system has multiple disks, you can use Data Adaptive Mode for some and Failsafe mode for others where necessary.
Data adaptive mode
|
Failsafe mode
|
Step 10. Once you have completed your drive mapping selections, click Next to continue.
The recovery progress window will be displayed.
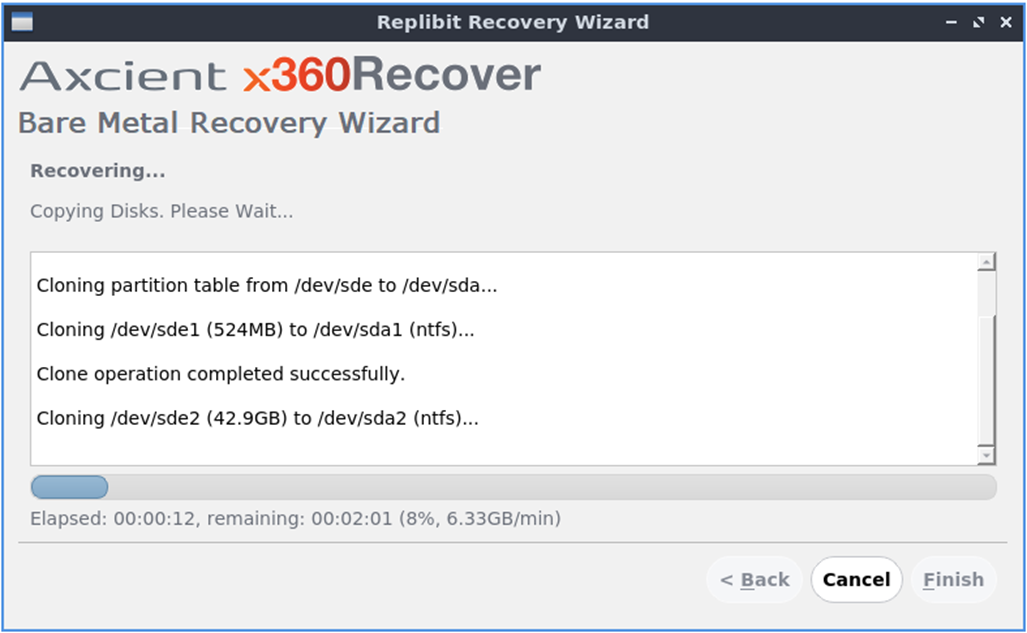
Recovery progress will continue to be displayed as each disk and volume is processed.
Progress, elapsed time, and estimated completion is displayed for each disk and/or volume being processed.
Once the recovery is completed, click Finish to close the wizard.
Note: If you selected Start an Incremental Bare Metal Restore Recovery, Incremental Recovery mode will begin instead
See Perform BMR using Incremental Recovery
ADDITIONAL RESOURES: x360Recover bare metal restore (BMR)
- Bare Metal Restore Guide - 2022
- Perform BMR from an appliance
- Perform BMR from a vault with a local cache
- Perform BMR from a vault without a local cache
- Perform BMR from a virtual disk image
- Perform BMR using Incremental Recovery
SUPPORT | 720-204-4500 | 800-352-0248
- Contact Axcient Support at https://partner.axcient.com/login or call 800-352-0248
- Free certification courses are available in the Axcient x360Portal under Training
- Subscribe to the Axcient Status page for a list of status updates and scheduled maintenance
1202 | 1225 | 1269 | 1540