
Overview of File Server Enablement
File Server Enablement allows you to cloud-enable any folder on a machine and map it to a Team Share or a user account.
In addition to local paths, you can specify a network share, a UNC path, or a NAS device, as a source for File Server Enablement.
This feature replaces the need for mapped drives (network drives), so that end users no longer need to be on-site or require the use of a VPN connection to access files and folders.
- With File Server Enablement, you can maintain an existing file structure while providing remote access to its contents. As an added benefit, File Server Enablement can provide a file-level backup of your file server.
- When File Server Enablement is enabled for an organization, end users can access, read, and update content through the web or through their preferred device. By providing anytime, anywhere access to business assets, File Server Enablement can increase employee and organizational productivity.
Best practices
- NOTE: The system does not support the syncing of live databases. For more information, please reference Why can't I sync a live database in x360Sync?
TIP: When registering to a user account on a server, we recommend that you create a service account. A service account should not be subscribed to Team Shares, should be set to use fixed space quota of .01GB, and should be configured using a predetermined naming system (such as First Name: File Server; Last Name: LDAP).
TIP: You might decide to create one service account in the master organization, and register all [x360Sync] File Server Enablement (FSE) allows administrators to map a folder structure on a file server to a Team Share or a user account in the cloud. With File Server Enablement, administrators can keep the existing file structure on a server while allowing remote access to its contents. File Server Enablement can also be used to completely replace the file server, if desired. Optionally, administrators can specify a UNC path as a source for File Server Enablement.">File Server Enablement and other server desktop clients to this one service account. Alternatively, you can create one service account for each organization. Both options will allow for the same functionality and meet established best practices.
TIP: If you are using File Server Enablement to map a network drive, we recommend that you first run a throughput and IOPs test.
TIP: We recommend that you create an alert so that you are notified when a File Server Enablement machine is unreachable. This alert allows you to proactively monitor the state of a file server that is syncing to the cloud, ensuring that synced content is always available in its mapped location. Configure FSE Alerts
TIP: We recommend setting up no more than 15-20 FSE-enabled shares on a single Client instance. If you need to set up more shares, it’s better to assign them to additional Clients running on other machines. Otherwise, upload queues might become too long and synchronization times will increase, reducing the overall performance.
How to set up File Server Enablement
1. Log in to the server that you want to cloud-enable, and download and install.
For instructions on downloading and installing, please reference the x360Sync End User Guide.
a. On the server, ensure that the SYSTEM user has full permissions to the folder and all of its subfolders and files.
b. Alternatively, if agent_service.exe*32 is being run by a user name other than SYSTEM, ensure that this user has full permissions.
2. When the installation process is finished, you will be asked to register to a user account. When registering to a user account on a server, we recommend that you create a service account. A service account should not be subscribed to Team Shares, should be set to use fixed space quota of .01GB, and should be configured using a predetermined naming system (such as First Name: File Server; Last Name: LDAP).
3. Open a web browser and navigate to the administrative web portal. Log in to the administrative web portal.
4. In the administrative web portal, click the Machines tab. The Machines page displays, showing a list of all machines in the selected organization.
5. Find the File Server Enablement machine, and click the Enable Mapping link to set up File Server Enablement.  A message will display, indicating that the machine has been enabled as a file server.
Additionally, a new Map Folders link will display, allowing you to map the machine to a Team Share or a user account.
6. Click the Map Folders link. The File Server Enablement screen displays.
How to map folders
(Mac only) Enable full disk access before mapping folders
Warning: In order for backups and file server enablement to function properly with Mac machines, full disk access must be enabled. For instructions, please refer to Enable full disk access on Mac.
Map folders
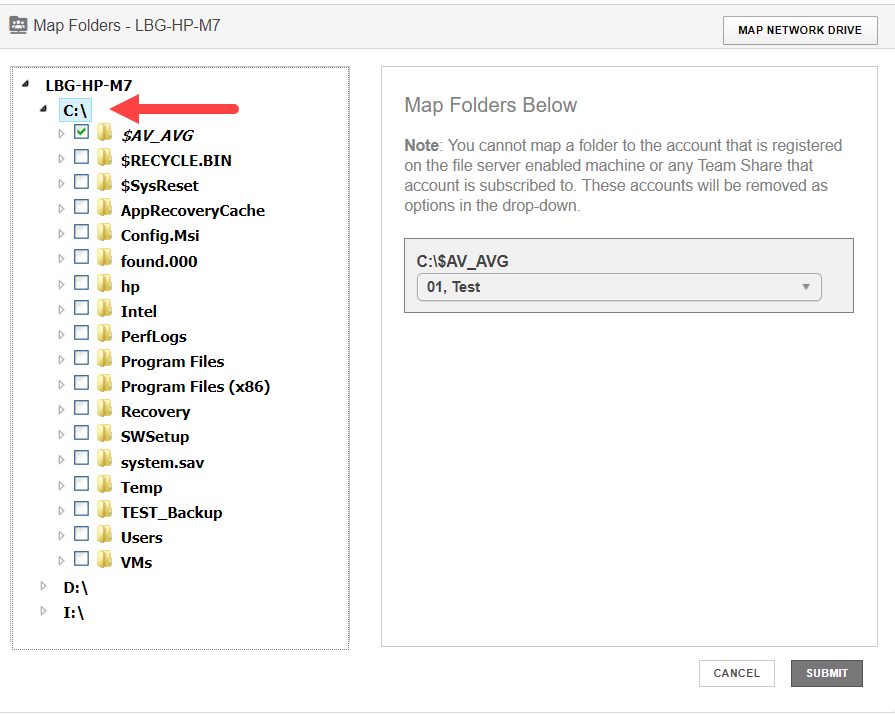
In the File Server Enablement screen, click to expand the machine name, and then select the folder or folders that you want to map.
Please note that when selecting a parent folder, the mapping will include all of the parent's subfolders.
Alternatively, to use a UNC path as a source for File Server Enablement, click to expand and highlight a machine name, and then click the Map Network Drive button.
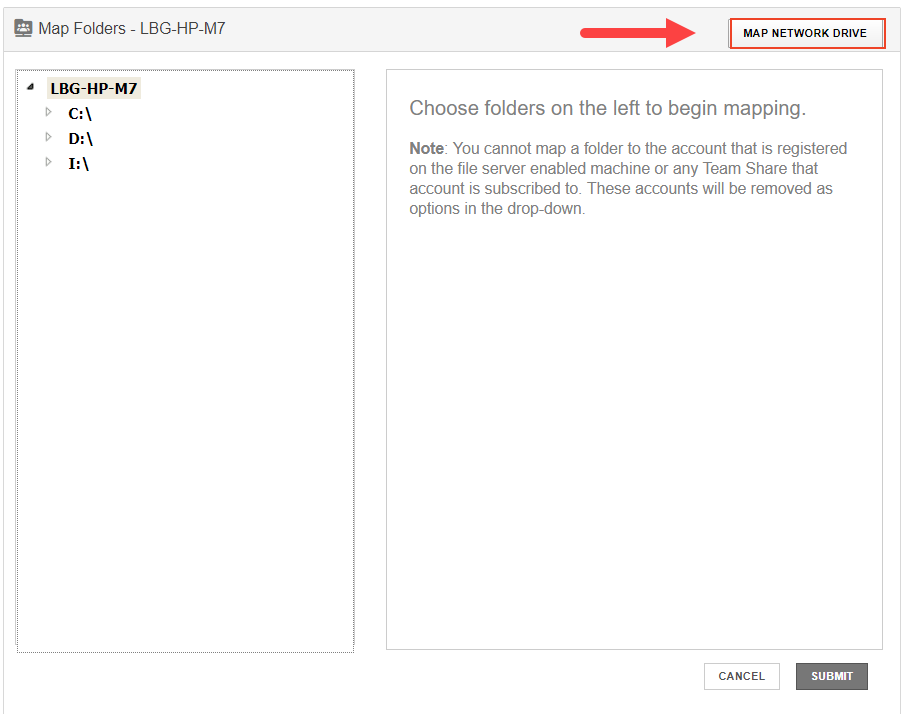
The Map Network Drive pop-up window displays.
In the Map Network Drive pop-up window, enter information about the network drive.
- In the Network Path field, enter the UNC path.
- In the Username field, enter the username of the user with access to the UNC path (not the username of the service account). If you encounter problems when entering credentials into the Username field, please try various formats. For example, you might be able to authenticate using one of the following formats:
- Username
- Machine name\username
- Domain\username (if the UNC path is located on a domain server)
- In the Password field, enter the password of the user with access to the UNC path.
- Click the Submit button when you are finished.

After you select the items you want to map, use the Map Folders Below section of the screen to map the selected folder to a user or Team Share.
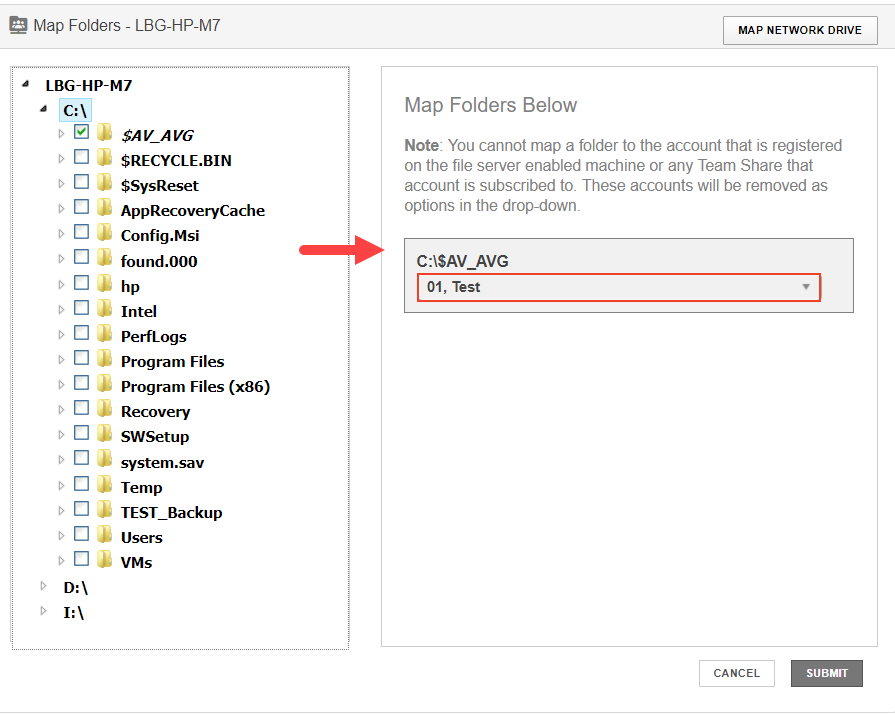
9. Click the Submit button when you are finished. If an update is made to a file or folder, this update will display in both locations.
How to disable mapping
You can disable mapping between the file server and the Team Share or user account.
When you do this, the already-mapped files and folders will remain in both locations, but will no longer remain linked.
You might decide to disable mapping if you simply want to move or copy data to a Team Share or a user account.
1. In the Machines tab, find the already-mapped File Server Enablement machine and click the Map Filers link. The File Server Enablement screen displays.
2. Click the Delete button to remove the mapping.  The files will remain in both locations, but will no longer be linked.
How to add a domain user login
If you need ANY service on Windows to be able to work with ANY networking locations on UNC paths (like \\server\bla-bla\location), then this service should have a domain user login, with the user account having access to this exact location.
NOTE: By default, our client service is installed with the SYSTEM account, which has NO networking access. Thus, for FSE to work with UNC paths, it's mandatory to reconfigure the client service (agent_service or agent_service_vfs) to run under the domain user account with proper access.
All modern Windows permissions to the network resources (literally any of them) work like that:
- SYSTEM - no go
- LOCAL SERVICE - no go
- INTERACTIVE SERVICE - no go
- NETWORKING SERVICE - depends on the service profile
- Local users - no go
- Domain users - goSo
To make things work with the combination of UNC paths and mapped drives, users should
- Go into Service
- Find our client service
- In the "Properties" on the "Log in" tab, switch from system account to real user
- Select the domain user with proper credentials and enter the password.
SUPPORT | 720-204-4500 | 800-352-0248
- Contact Axcient Support at https://partner.axcient.com/login or call 800-352-0248
- Free certification courses are available in the Axcient x360Portal under Training
- Subscribe to the Axcient Status page for updates and scheduled maintenance
1402