
Overview
In addition to local paths, you can specify a network share, a UNC path, or a NAS device as a source for File Server Enablement. When using these sources, you are able specify storage locations that require authentication over a network.
The ability to specify these storage locations as a source for File Server Enablement allows you to increase the amount of data being shared and revised across your system.
Note: When you specify a network path as a source for File Server Enablement, the content on the network path will not support the Auto Lock Word/Excel feature.
Use Cases
You can configure File Server Enablement in many different ways, depending on the needs of the organization:
1. Full Migration
You can map a folder structure to the cloud and then unlink this connection after the data has finished syncing. When you do this, you provide users with anytime-access to their cloud content without requiring an on-site or VPN connection.
2. Hybrid Approach
When you configure File Server Enablement, you can choose to maintain the connection between the original file server and the cloud, allowing access to the file server for on-site employees, and providing remote access for employees who travel or work outside of the office. When files are updated in one location, these changes will be reflected in the other location.
3. File-Level Backup
As an added benefit, File Server Enablement can provide a file-level backup of your file server. By automatically syncing the file server to the cloud, you never have to worry about lost data.
4. Initial Seeding
If you need to migrate data from a server or NAS device, you can temporarily configure File Server Enablement as a way to move data from a local source into the cloud.
Best Practices
Best Practice: We recommend that you create an alert so that you are notified when a File Server Enablement machine is unreachable. This alert allows you to proactively monitor the state of a file server that is syncing to the cloud, ensuring that synced content is always available in its mapped location.
Best Practice: If you need to reorganize organizations and suborganizations after File Server Enablement is mapped to a Team Share, please contact Axcient Support for help. File Server Enablement mappings might break when moving the location of a Team Share.
Best Practice: When registering the desktop client to a user account on a server, it is recommended that you create a service account. A service account should not be subscribed to the Team Share to which you want to map, should be set to use fixed space quota of .01GB, and should be configured using a predetermined naming system (such as First Name: File Server; Last Name: LDAP).
Instructions
- Log into the server that you want to cloud-enable, and download the desktop client installation file from the Downloadspage in the web portal.
- On the server, ensure that the SYSTEM user has full permissions to the folder and all of its subfolders and files.
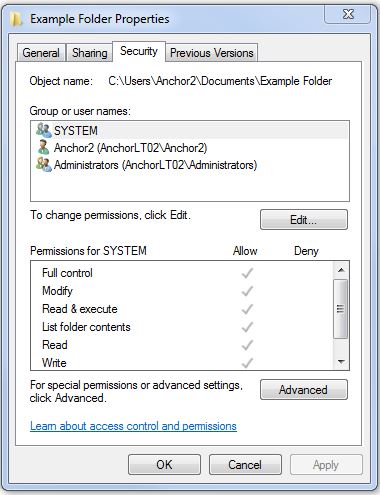
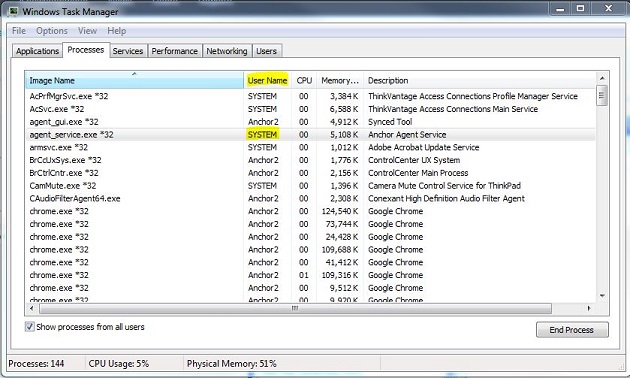
- Alternatively, if agent_service.exe*32 is being run by a user name other than SYSTEM, ensure that this user has full permissions.
- On the server, ensure that the SYSTEM user has full permissions to the folder and all of its subfolders and files.
- Click the installation file to launch the Setup Wizard, and follow the instructions to complete the installation process.
- After the Setup Wizard completes, the Registration Wizard will automatically launch, asking you to register the desktop client to a user account. We recommend utilizing a service account when registering the desktop client.
- When the desktop client is installed and registered, open a web browser and navigate to the administrative web portal. Log into the administrative web portal.
- In the administrative web portal, click the Machines tab. The Machines page displays, showing a list of all machines in the selected organization.

- Find the File Server Enablement machine, and click the Enable Mapping link to set up File Server Enablement.
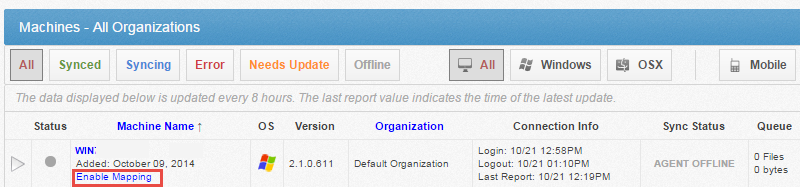
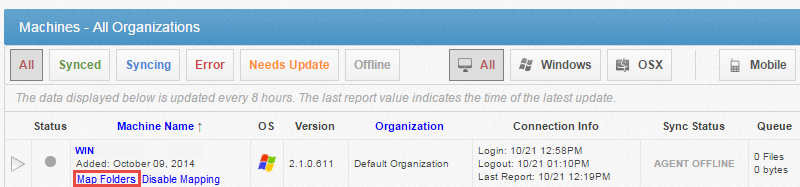
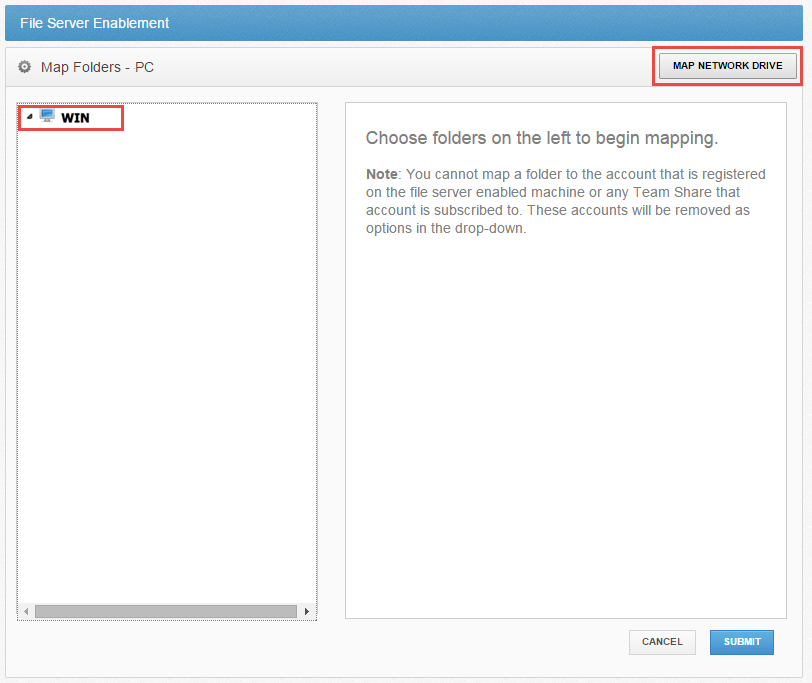
A message will display, indicating that the machine has been enabled as a file server. Additionally, a new Map Folders link will display, allowing you to map the machine to a team share or a user account. - Click the Map Folders link.
The File Server Enablement screen displays. - In the Server Enablement screen, click to highlight the machine name, and then click the Map Network Drive button.
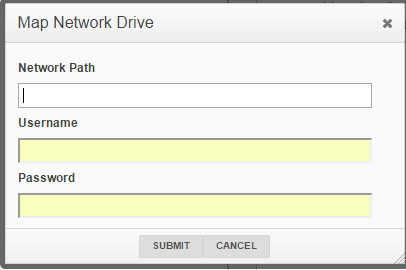
A Map Network Drive pop-up window displays. - In the Map Network Drivepop-up window, enter information about the UNC path.
- Username;
- Machine name\username; or
- Domain\username (if the UNC path is located on a domain server).
- In the Network Path field, enter the UNC path.
- In the Username field, enter the username of the user with access to the UNC path (not the username of the service account).
IMPORTANT! If you encounter problems when entering credentials into the Username field, please try various formats. For example, you might be able to successfully authenticate using one of the following formats: - In the Password field, enter the password of the user with access to the UNC path.
- Click the Submit button when you are finished.
- After you configure the UNC path, use the Map Folders Below section of the screen to map the selected folder to a user account or team share.
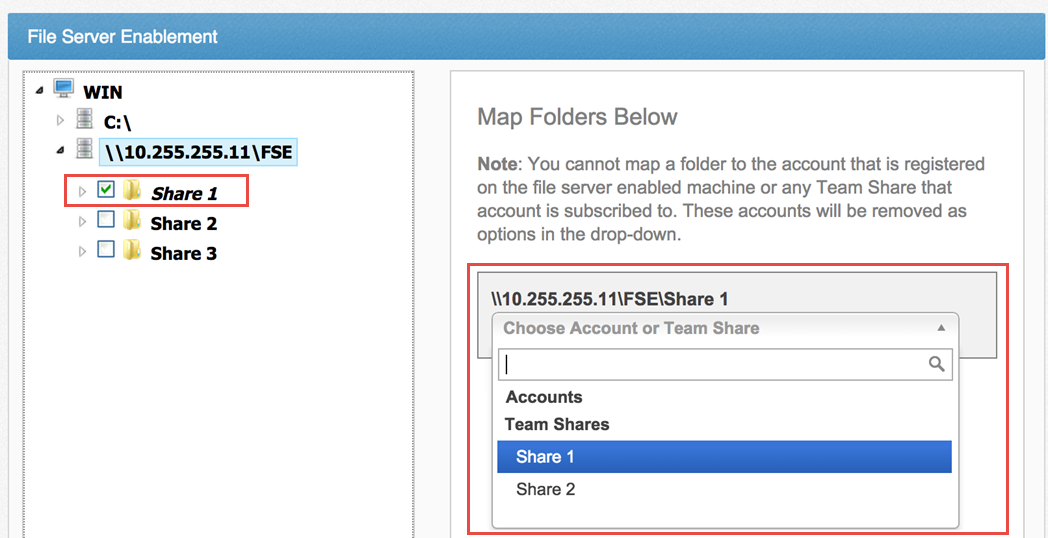
- Click the Submit button when you are finished. The UNC path is now mapped to the selected user account or team share.