
Overview
x360Recover Manager now leverages two of the most popular Professional Services Automation (PSA) platforms - ConnectWise and AutoTask - to provide seamless automation, easy access and clear visibility of all backups.
As a x360Recover and Direct-To-Cloud (D2C) partner, you can now use x360Recover Manager to configure integration with supported PSA tools - and start monitoring in minutes.
This article gives a general overview of how to create an manage an x360Recover Manager integration with either of these PSA platforms.
ADVANCED TOPICS:
- For detailed instructions on integrating ConnectWise with x360Recover Manager
- For details instructions on integrating Autotask with x360Recover Manager
Do I integrate in x360Recover Manager or in the vault/appliance?
If you'd like to integrate one account at the organization or client level (for either AutoTask or ConnectWise), you want to integrate in x360Recover Manager. If you apply PSA settings to your organization, you have the option to override those settings at the individual client level. Details are covered in this article.
If you prefer a unique ConnectWise integration and/or alert settings at the vault or appliance level, integrate within the specific vault or appliance. Please note AutoTask integration is not available at this time. Instructions are in this article: Manage vault and appliance alerts.
Please be aware the following are available in vault/appliances, but not the x360Recover Manager:
- alerts when a drive fails on an appliance
- bootVM screenshots (available in an x360Recover Manager alert, but not the alert itself)
| Tasks to integrate with ConnectWise |
If you choose to integrate x360Recover Manager with the ConnectWise PSA, alerts that originate in x360Recover will be pushed to ConnectWise, allowing you to manage and monitor all events from one location.
IMPORTANT: To complete x360Recover Manager integration with the ConnectWise PSA tool, you will first need to collect information related to the ConnectWise account being used.
That means before you start the x360Recover Manager integration, you will need to complete the following tasks:
ConnectWise TASK# 1. Configure security permission requirements
ConnectWise REST API user accounts require certain security privileges in order to establish connection with ConnectWise and publish/ manage PSA tickets.
|
ConnectWise requirements: API user accounts should have Inquire permissions for
|
|
**API user accounts must also:
|
How to set ConnectWise security permission requirements
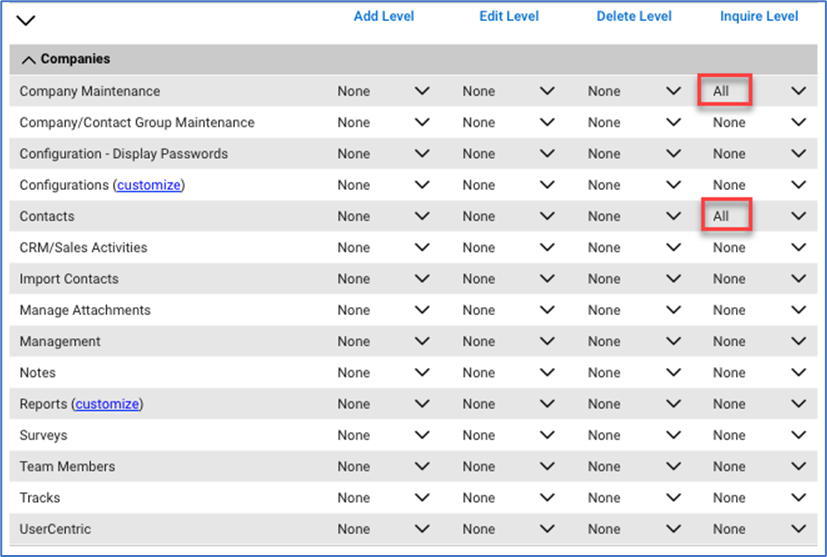
Navigate to Security Roles/ Security Modules on the ConnectWise webpage and update the following security permissions highlighted in the below screenshots:
a. Company Maintenance requires Inquire permissions
b. Contacts requires Inquire permissions
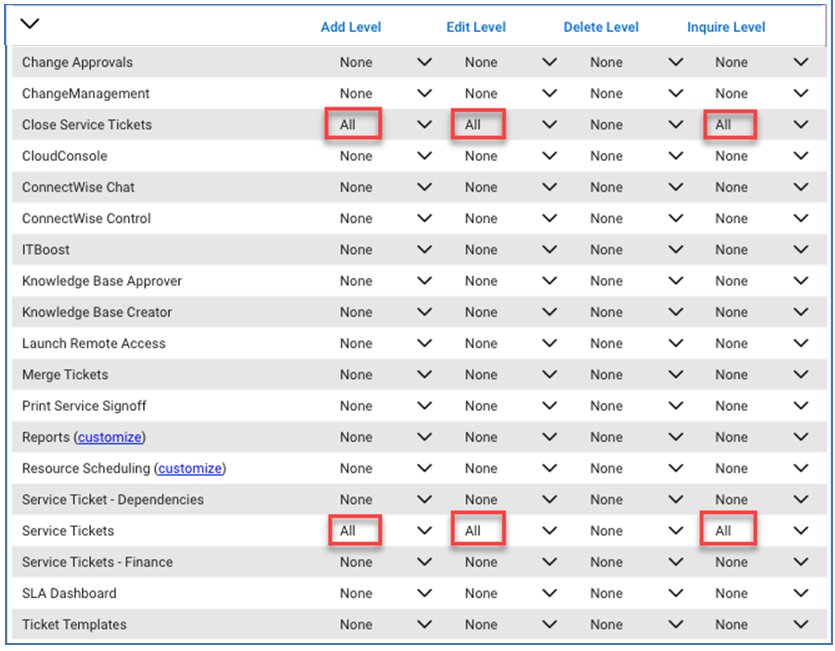
c. Close Service Tickets require Add, Edit and Inquire permissions.
d. Service Tickets require Add, Edit and Inquire permissions
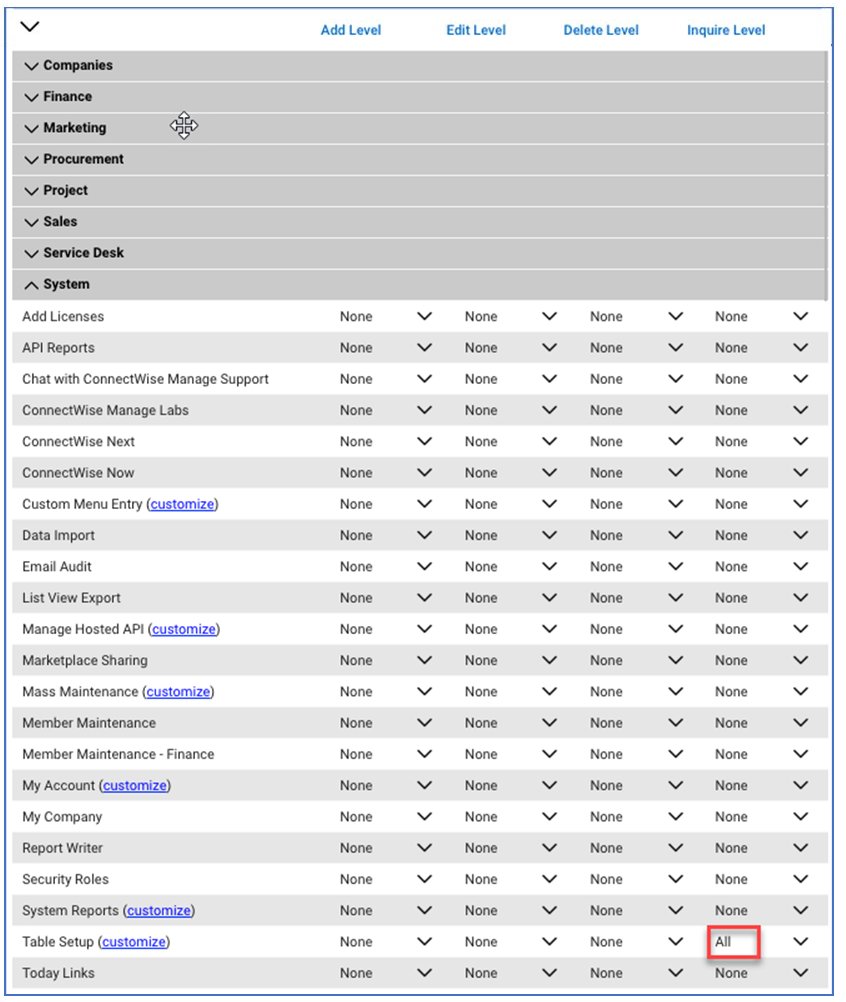
e. Table Setup requires Inquire permissions
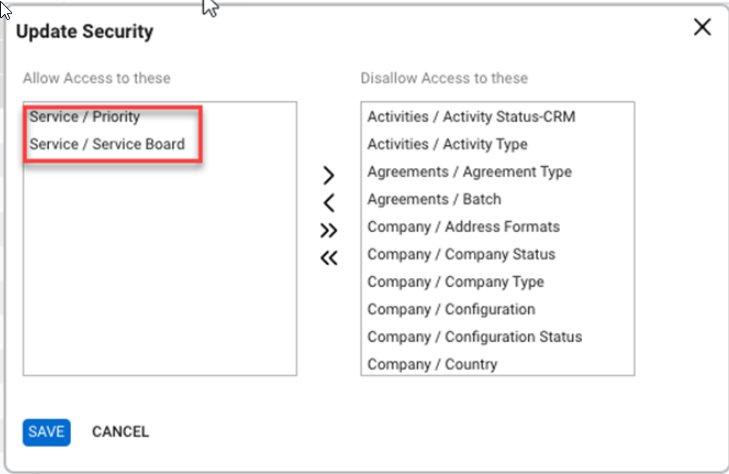
You must also allow access to Service/Priority and Service/Service Board:
ConnectWise TASK# 2. Obtain information needed for integration
Gather the following information from ConnectWise to configure the integration to your preferences.:
API information from ConnectWise
You can obtain API information within the ConnectWise service. For the purposes of integrating ConnectWise with BRC, you will need to create a new API key.
- Log in to ConnectWise and open the System menu.
- In the System menu, click the Members link.
- In the Members page, click the API Members tab and then click the plus iconto create a new API Member.
- In the Member ID field, enter Axcient.
- In the Role ID field, ensure the role is configured with Add, Update, and Close tickets.
- Click the Save button but do not close the window. After you click the Save button, you will be given access to the API Keys tab.
- Click the API Keys tab and then click the plus icon to create a new API key.
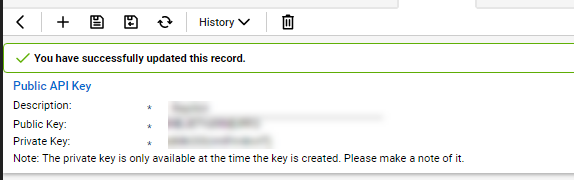
- In the Description field, type x360Recover BDR.
- Click the Save button but do not close the window.
- Record the public key and private key before you close the window. You will not be able to view the private key again after this window is closed.
The image below details the location of the public key and private key fields (API Secret).
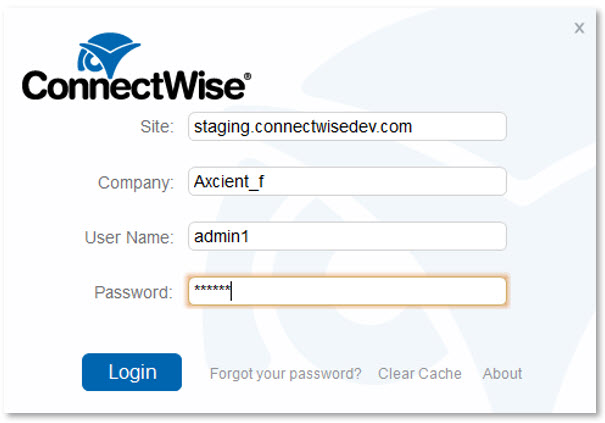
Obtain ConnectWise Login Information
The ConnectWise login information is created when first setting up the ConnectWise service. For the purposes of integrating ConnectWise with BRC, you will need to enter the login information used to connect to ConnectWise into the appropriate fields.
Client information from ConnectWise
To obtain the client information required to integrate with ConnectWise, you will first need to create a new company account for the target client site.
To obtain the required client company information:
- Log in to ConnectWise.
- On the left-hand navigation menu, expand the Companies tab and select the Companies option.
- In the Company Search page, enter the name of the target company.
- When found, select the target company.
- Record the following company information:
- Company address, which corresponds to the Address Line 1 and 2, City, State and Zip fields in the Axcient Web App.
- Territory field, which corresponds to the Location field in the Axcient Web App.
- Company ID field, which corresponds to the ID Number in the Axcient Web App.

Service type and subtype information from ConnectWise
The Service Type and subtype are determined by the ConnectWise login account. This ConnectWise account is associated with a specific Service Board, which must be configured as needed by the administrating user. (For more information regarding Service Boards, please refer to ConnectWise support.)
- In the ConnectWise left-hand navigation menu, select System and then select Setup Tables.
- In the Table column, enter the Service Board in the search field and press the Enter key.
- On the Service Board List page, click on the appropriate Service Board.
- To find the Service type, click the Types tab and enter one of the listed values in the Service Type field of the ConnectWise configuration page.
- To find the Service subtype, click the Subtypes tab and enter one of the listed values in the Service Subtype field in the ConnectWise configuration page.

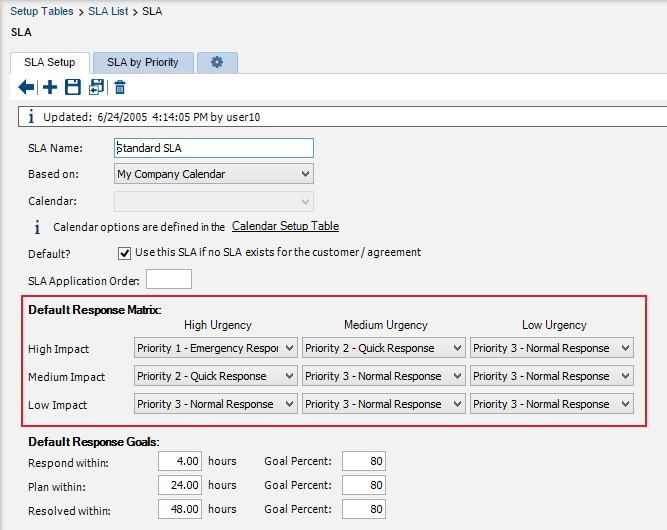
Priority information from ConnectWise
The service priority is determined by the ConnectWise login user. This ConnectWise account is associated with a specific Service Board, which must be configured as needed by the administrating user. (For more information regarding Service Boards, please reference ConnectWise support.)
To obtain priority values:
- On the ConnectWise left-hand navigation menu, select System and then select Setup Tables.
- In the Table column, enter SLA in the search field and press the Enter key. Click the SLA option when it displays.
- On the SLA List page, select the appropriate SLA option.
- Enter one of the listed values in the Priority field in the ConnectWise configuration page.
ConnectWise TASK# 3 Configure Manager settings based on user level
You can configure PSA settings in the x360Recover Manager in two ways:
- Integrate PSA for all clients at the global organization level
- Customize individual client settings
3a. How to implement ConnectWise for all clients globally (for an organization)
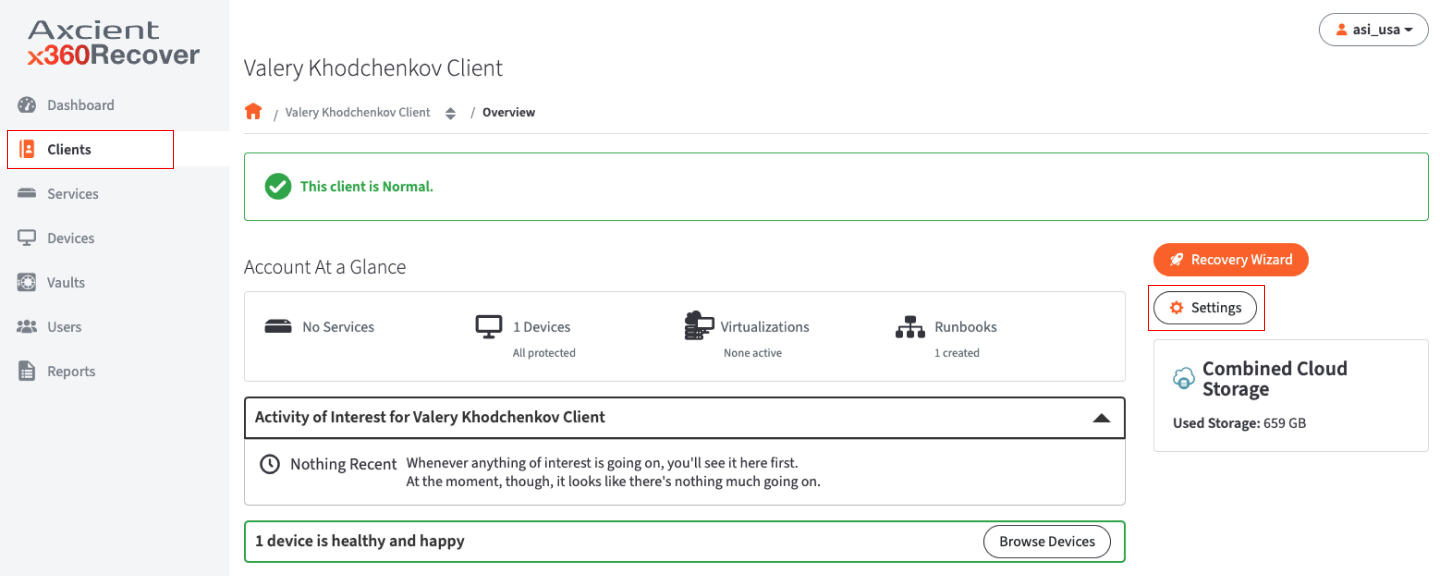
1. On the Dashboard, click the Settings button.
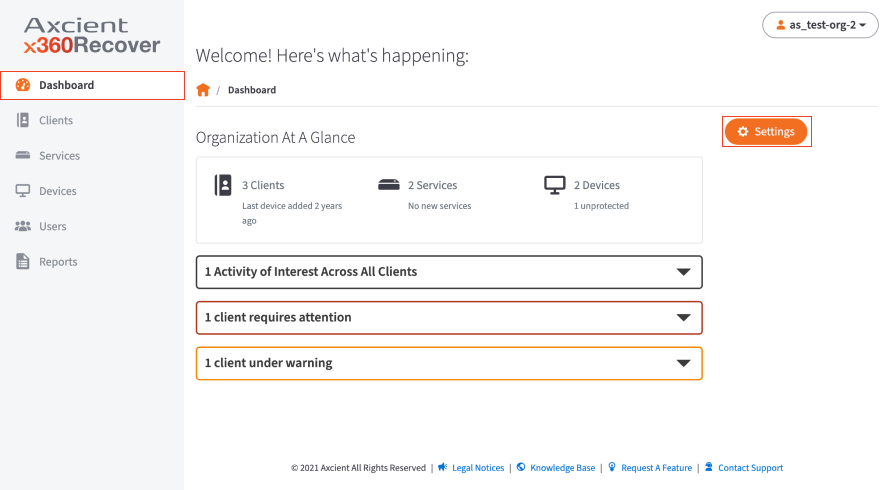
2. In the Organization Settings page, scroll down to locate the PSA Tool section, then click the Edit button.

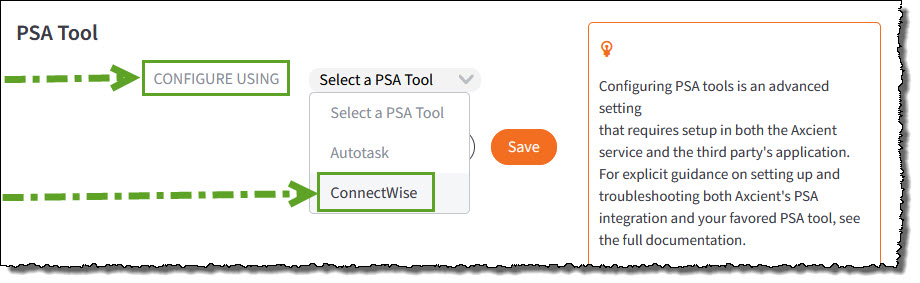
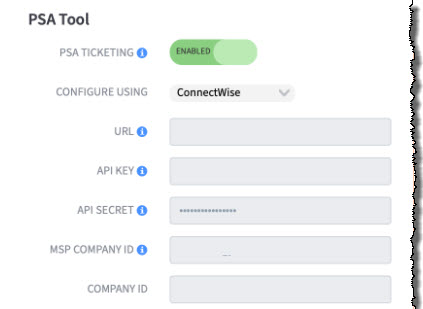
3. Click the Configure Using drop-down menu to select your preferred PSA tool. For this example, select ConnectWise.

The page expands to display configuration settings.
|
In the URL field, enter the URL address for ConnectWise. Format this URL as follows: Correct: connectwise.comIncorrect: www.connectwise.com Incorrect: http://connectwise.com In the API Key field, enter the public API key generated in ConnectWise. In the API Secret field, enter the private API key generated in ConnectWise. In MSP Company ID, enter the company name. In the Company ID field, enter the ID of the company. |

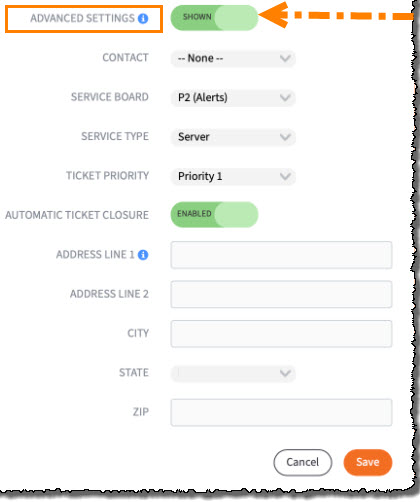
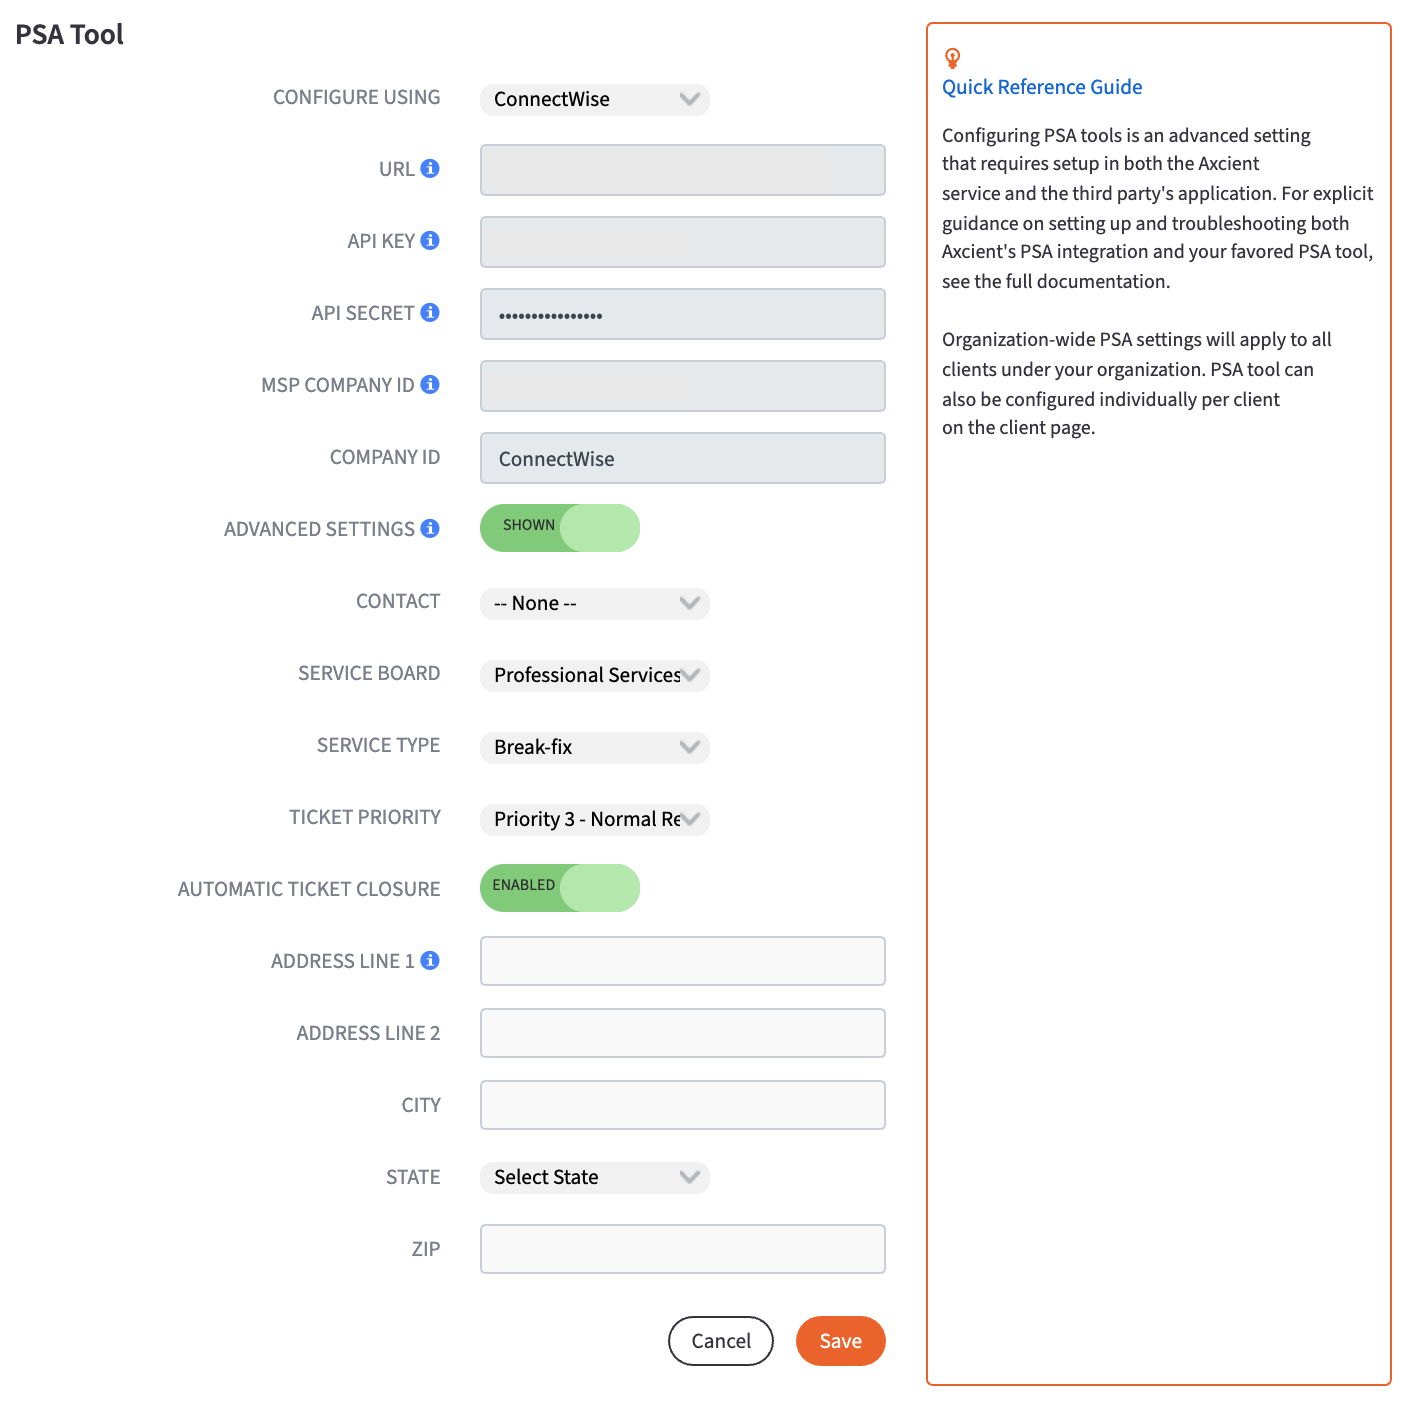
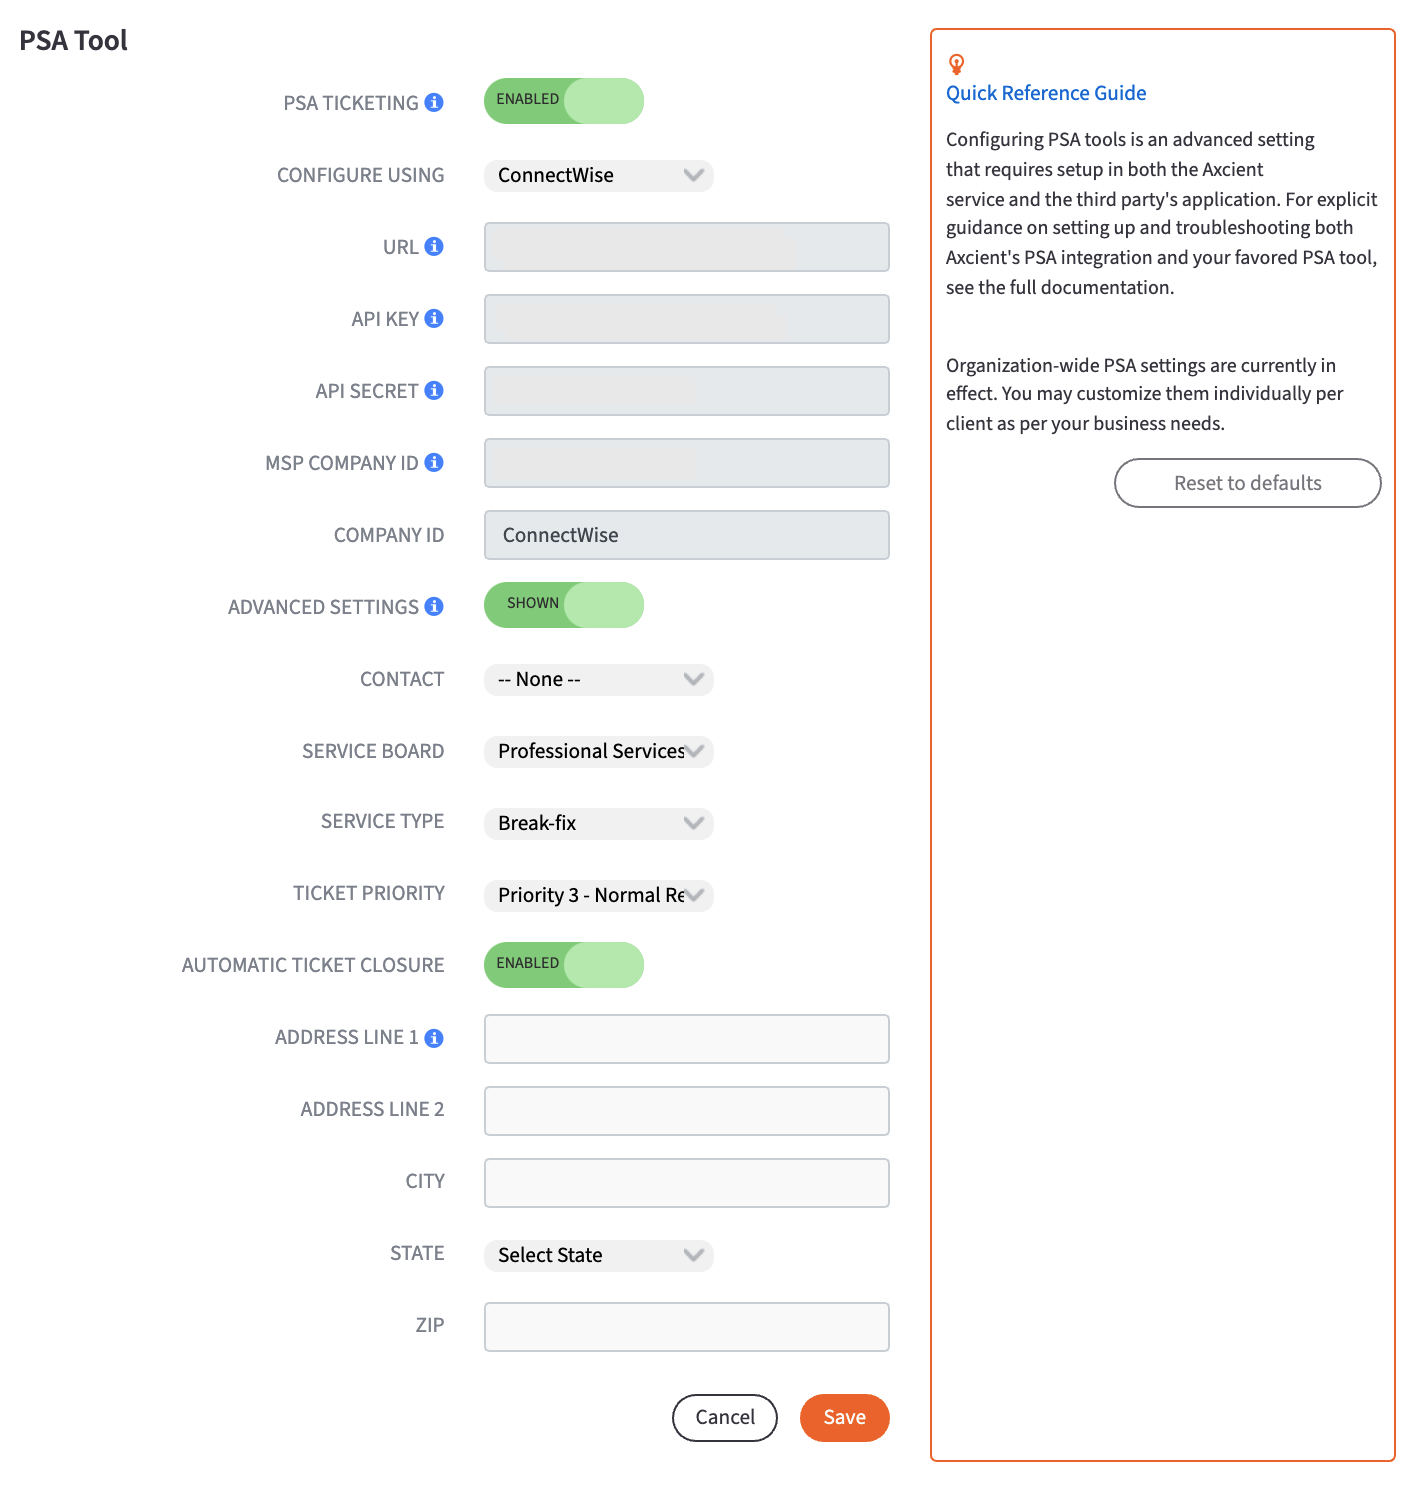
Optionally, to configure global (organization-wide) advanced settings, enable the Advanced Settings toggle and configure all appropriate fields described below:
|
In the Contact drop-down, select the contact person. In the Service Board drop-down, select the service board to which tickets must be sent. In the Service Type drop-down, select the type of service action to take. In the Ticket Priority field, enter the priority level of tickets that originate from BRC. Enable or disable Automatic Ticket Closure as per the business requirement In the Address Line 1 and Address Line 2 field, enter the client company address. In the City field, enter the client company city. In the State drop-down, select the client company state. In the Zip field, enter the client company ZIP code. |

4. Click Save when you are finished.
Delete3b. How to implement ConnectWise for individual clients
1. Click the Clients tab on the lefthand navigation and click the client's Name or the Details dropdown from the arrow.
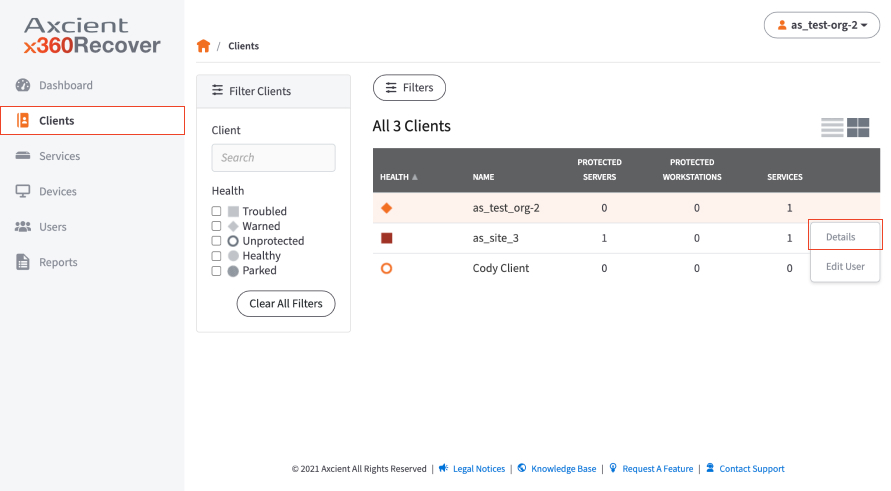
2. In the Client Details page, click the Settings button.
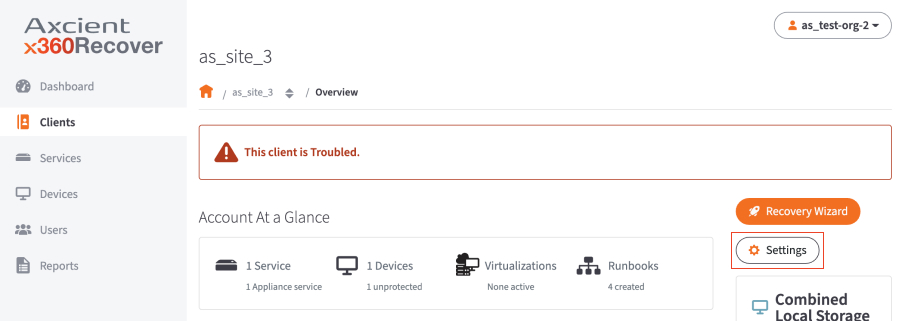
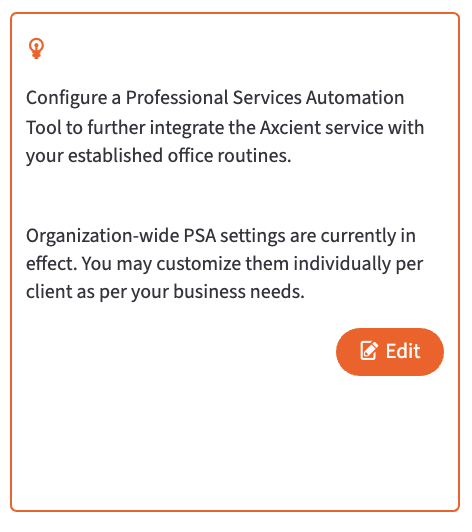
3. In the Client Settings page, scroll down to locate the PSA Tool section, then click the Edit button.
Note
PSA integration can be temporarily disabled for individual clients in the Client Settings page.
4. Click the Configure Using drop-down menu to select your preferred PSA tool. For this example, select ConnectWise.
The page expands to display configuration settings.
|
In the URL field, enter the URL address for ConnectWise. Format this URL as follows: In the API Key field, enter the public API key generated in ConnectWise. In the API Secret field, enter the private API key generated in ConnectWise. In MSP Company ID, enter the company name. In the Company ID field, enter the ID of the company. |
Optionally, to configure advanced settings, enable the Advanced Settings toggle and configure all appropriate fields described below:
|
In the Contact drop-down, select the contact person. In the Service Board drop-down, select the service board to which tickets must be sent. In the Service Type drop-down, select the type of service action to take. In the Ticket Priority field, enter the priority level of tickets that originate from BRC. Enable or disable Automatic Ticket Closure as per the business requirement In the Address Line 1 and Address Line 2 field, enter the client company address. In the City field, enter the client company city. In the State drop-down, select the client company state. In the Zip field, enter the client company ZIP code. |
5. Click Save when you are finished.
DeleteNotes on changing from global levels to individual levels:
- Even after you have implemented PSA settings at the organization level, you can always customize PSA settings for individual clients.
- If needed, you can reset from an individual level to an organization configuration by clicking the Reset to defaults button on the right navigation.
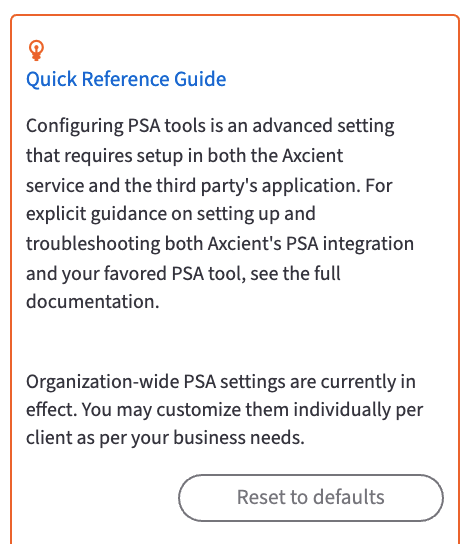
| Tasks to integrate with Autotask |
If you choose to integrate x360Recover Manager with the Autotask PSA, alerts that originate in x360Recover will be pushed to Autotask, allowing you to manage and monitor all events from one location.
IMPORTANT: To complete x360Recover Manager integration with the Autotask PSA tool, you will first need to collect information related to the Autotask account being used.
That means before you start the x360Recover Manager integration, you will need to complete the following stepss:
Autotask STEP# 1 Obtain information needed for integration
Enable API role in Autotask
The administering Autotask resource account, used to integrate with your Axcient product, must be configured as an API user. You can either create a new resource account or update an existing resource account. In this example, we will create a new resource account.
To configure a new resource account:
- Hover your mouse on the Autotask icon to activate the main navigation menu.
- Point to the Admin tab and select Resources (Users).
- Click the New button to create a new resource user.
- Click the General tab and enter basic account information.
- In the First Name field, enter a first name of the resource.
- In the Last Name field, enter a last name of the resource.
- Click the Security tab and create login credentials.
- In the Security Level field, select API User (System).
- In the API Tracking Identifier field, select the Integration Vendor option and then select Axcient from the drop-down menu.
- Using the main navigation menu, point to Admin and select Features & Settings.
- Click to expand the Resources/Users accordion menu and select the Protected Data Permissions link.
- Find the resource account and ensure the View Protected Data checkbox is selected.
- Click the Save button when you are finished.
Locate Account ID in Autotask
The Account ID is found in the Account Details page of the appropriate account.
To obtain the Account ID:
- On the top navigational menu, point to the My… tab and click Accounts under the CRM section.
- Use the Search field to find the account.
- Click the account or right-click the account and select View Account.
- The Account ID is located in the left-hand section.
Locate Queue ID in Autotask
The Queue ID is found in the Queue Details page of the appropriate Service Desk Queue, located in the Features and Settings section.
To obtain the Queue ID:
- On the top navigational menu, point to the My… tab and click Accounts under the CRM section.
- Use the Search field to find the account.
- Click the account or right-click the account and select View Account.
- The Queue ID is located in the left-hand section.
Autotask STEP# 2 Configure Manager settings based on user level
You can configure PSA settings in the x360Recover Manager in two ways:
- Integrate PSA for all clients at the global organization level
- Customize individual client settings
2a. How to implement AutoTask for all clients globally (for an organization)
1. On the x360Recover Dashboard, under Organization At A Glance, click on Settings.
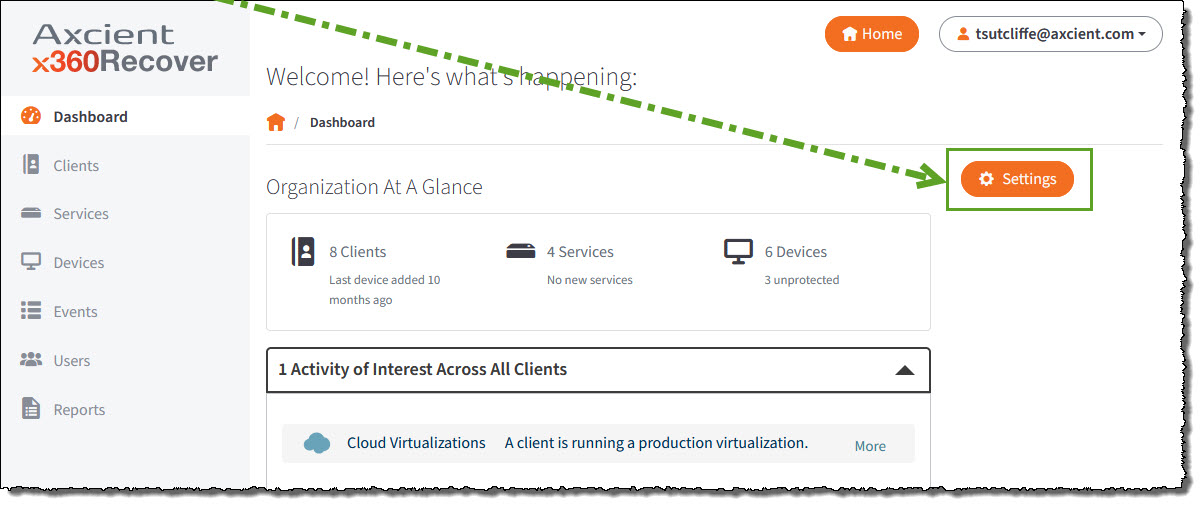
2. When the Organization Settings page opens, scroll down to locate the PSA Tool section and click on the Edit button in the right-hand navigation panel:

3. When the editing page opens, go to the PSA Tool section.
Locate the Configure using... dropdown menu and select Autotask from the available choices:
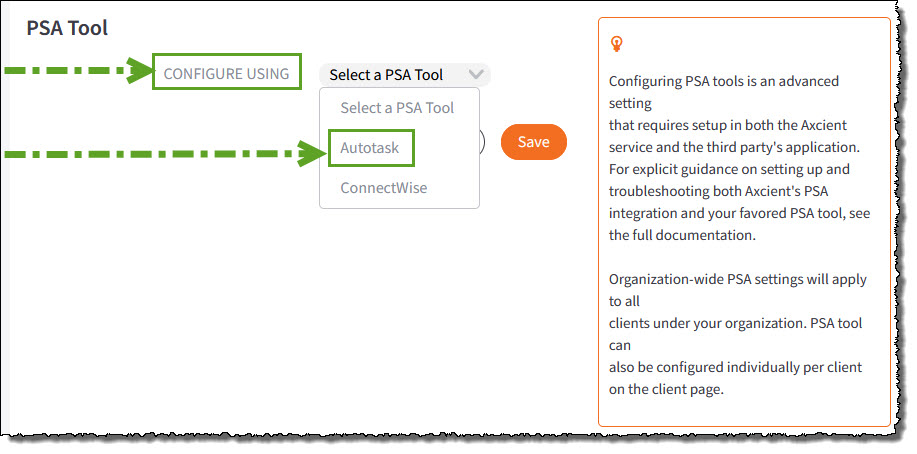
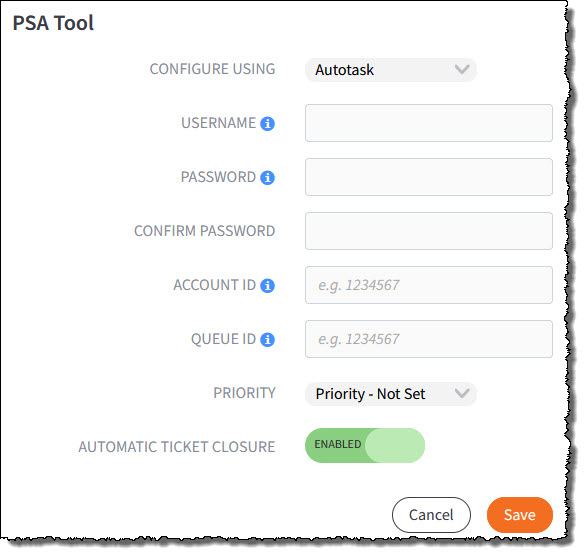
4. The editing page expands to display the PSA Tool configuration settings for Autotask:
|
|

5. Click Save when you are finished.
Delete2b. How to implement AutoTask for individual clients
1. Click the Clients tab on the lefthand navigation and click the client's Name or the Details dropdown from the arrow.
2. In the Client Details page, click the Settings button.
3. In the Client Settings page, scroll down to locate the PSA Tool section, then click the Edit button.
Note: PSA integration can be temporarily disabled for individual clients in the Client Settings page.
4. Click the Configure Using drop-down menu to select your preferred PSA tool. For this example, select AutoTask.

5. The editing page expands to display the PSA Tool configuration settings for Autotask:
|
|
6. Click Save when you are finished.
DeleteNotes on changing from global levels to individual levels:
- Even after you have implemented PSA settings at the organization level, you can always customize PSA settings for individual clients.
- If needed, you can reset from an individual level to an organization configuration by clicking the Reset to defaults button on the right navigation.
| How to manage an organization-wide PSA |
If you configure organization-level PSA default settings on the x360Recover Manager organization settings page, these defaults will be automatically applied to all clients in the organization unless client-level PSA settings are already in effect.
(You always have an option to customize the PSA settings for individual clients as required from the client settings page.)
To view an existing PSA integration:
1. From the x360Recover Manager dashboard, click the Settings button.

2. To test the existing connection, scroll to the PSA Tool section, and click the Test It button.
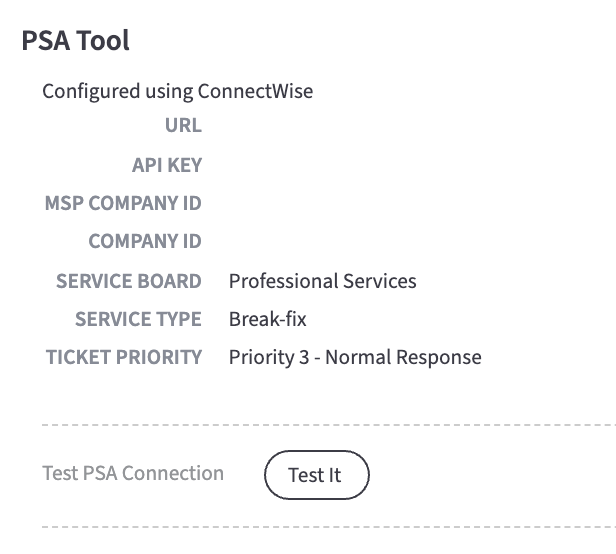
A testing icon will spin while the connection is being tested, and a Connection Succeeded confirmation message will appear if the test is successful.
3. To edit the settings, click the Edit button next to the PSA Tool section.
4. Edit information for that PSA instance and click Save when completed.
 A confirmation message will appear when the configuration has been successfully saved.
NOTE: When Advance Settings is enabled, the PSA ConnectWise settings will become disabled. This happens because Advance Settings obtains values from the ConnectWise side. Changing the main settings can break the logic and cause issues for the user when saving.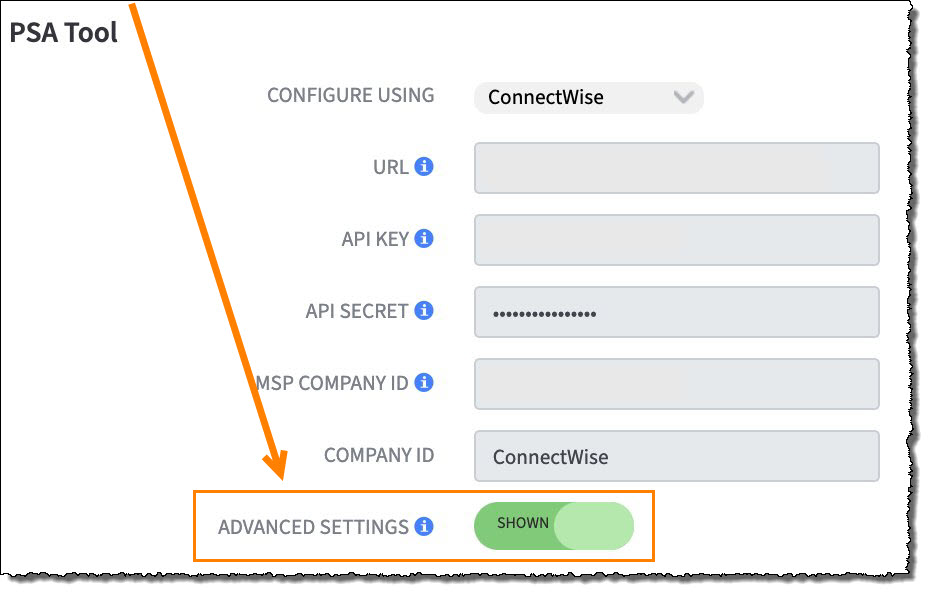
|
| How to customize a PSA for one, individual client |
To customize an existing PSA integration for a client:
1. Navigate to a client's Client Details page. Click the Settings button.
2. Click Edit in the PSA Tools section.
In this view, you can edit credentials for the PSA integration, as well as:
- Enable/ disable PSA ticketing for the client
- Set priorities and automatic ticket closure
- Reset to organization defaults by clicking on Reset to defaults button on the right-hand side
Note: Organization-level PSA configuration is optional and you can always customize PSA for individual clients, even after you have configured organization-wide PSA.
| Troubleshooting |
Scenario: Troubleshooting unwanted PSA tickets
Appliance and vault devices use an Exchange server email account to deliver alert messages to a third party ticketing system (Like Autotask or ConnectWise.)
Certain alerts (Like Agent Disconnect/Connect messages) are creating unwanted tickets in your PSA.
Solution:
Use Exchange Transport Rules to filter unwanted messages before they are delivered to your ticketing service.
How To:
- Log in to your Exchange 2007 or newer server and run Exchange Management Console. (Exchange 2013 open a web browser and connect to the Exchange EMC)
- Expand Organization Configuration and select Hub Transport
- Select the Transport Rules tab
- Create a new rule
- Give the rule a name and enter a description in the comments field, then click Next
- Select From People and choose your x360Recover email account
- Select When the Subject Field Contains Specific Words and enter the desired phrases
(For example, for agent connect/disconnect events enter 2 lines 'Connection:' and 'connection restored') - Click Next to move on to the Actions list
- Choose Delete the Message Without Notifying Anyone and click Next
- Click Next again and then Finished to complete the rule
Create as many filters as you like to eliminate any other undesired notifications from creating tickets.
Delete