
Bare metal restore is most often used with hardware devices but the process can be applied to virtual machines, as well.
If your protected system is a Direct-to-Cloud (D2C) endpoint, and you have not deployed a local cache for this protected system, the bare metal restore wizard can recover directly from the vault.
|
|
Our x360Recover Bare Metal Restore Wizard offers several options for performing different types of recovery, depending on where your data is located: |
Perform bare metal restore from a Vault directly
Recovery of a Protected System directly from a Vault without a Local Cache is possible. Leveraging the same Disaster Recovery Access Layer used by Local Cache, and accelerated via multi-threaded parallel read-ahead over the Internet, data can be streamed directly from the Vault.

PREREQUISITE: We recommend that you remove existing partitions on the destination disk before performing BMR: [Click to learn more]
Before beginning a bare metal restore, we recommend that you first inspect the destination disk and remove any existing partitions. This will ensure that you have a successful recovery.
STEP 1. After booting the x360Recover BMR ISO, run GParted from the desktop.
STEP 2. Select each disk you intend to overwrite with the recovery from the top right dropdown menu.
NOTE: You must remove any locked partitions (such as LVM groups or swap partitions) because the system will block these locked partitions from being overwritten:
- To delete locked LVM partitions, first select the partition and click Partition -> Deactivate
- To delete locked swap partitions, first select the partition and click Partition -> SwapOff
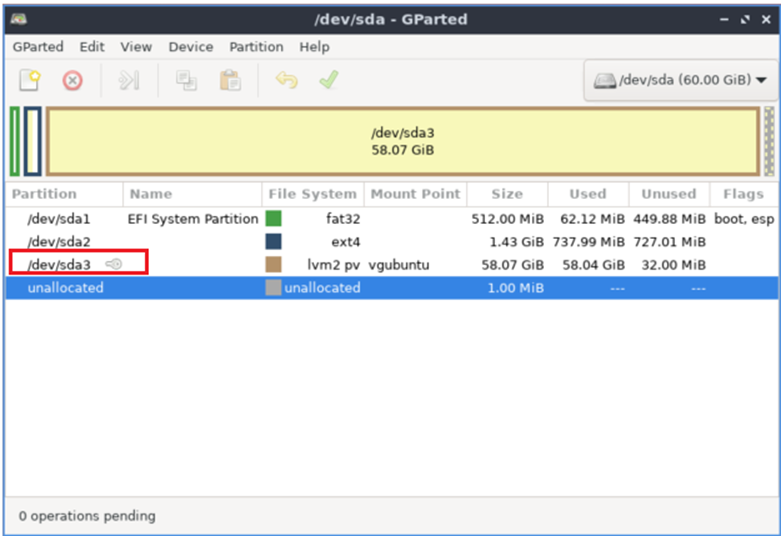
STEP 3. To remove the chosen partitions, select each partition, one at a time, and click the red-circle-x icon on the toolbar.
Then, after all desired partitions are removed, click the green check icon to save these changes.
STEP 4. Once the selected destination disk(s) have been cleared, open the Recovery Wizard, and proceed with the bare metal restore operation.
Local login requirements
When performing a bare metal restore, the Recovery Wizard will require local user credentials for the appliance or vault being used for recovery.
Please review Local login credentials for bare metal restore (BMR)
Prepare the bare metal restore boot media
Bare metal restore is performed from within a live CD, which provides a platform from which to boot a bare hardware system and run recovery utilities.
STEP 1. First, download the x360Recover Bare Metal Restore Utility from axcient.com/downloads.
STEP 2. Once you have downloaded the ISO file, refer to this article for instructions on creating a bootable USB drive.
Boot the bare metal restore environment
STEP 3. Insert your bootable USB media into the hardware system and boot from it.
You may need to make a selection on startup to choose boot device or edit the system BIOS settings to direct the system to boot from USB media. Refer to your hardware manual for assistance configuring your bare metal system to boot from USB.
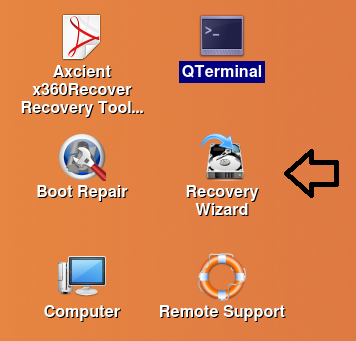
STEP 4. Once booted, the Axcient x360Recover Bare Metal Restore Utility will load. This live CD provides a Linux graphical desktop environment very similar to Windows, with desktop shortcuts and Start-menu-like application launcher.
STEP 5. Locate the Recovery Wizard icon on the desktop and double click it to launch the bare metal Recovery Wizard.
Perform a bare metal recovery from a vault without a local cache
When launched, the Recovery Wizard presents several options for performing a bare metal recovery.
Step 6. Accept the End User License Agreement

Step 7. Choose a Login method
You may select to use local Appliance or Vault user credentials, or x360Portal Cloud User credentials (recommended)

Step 7a. If you select x360Portal credentials, complete the Web user login with MFA

Enter the Username and click Next

Enter the Password and click Next

Enter your MFA Authentication Code and click Next
STEP 8. Select Recover from Vault (without Local Cache) and click Next.

Click Next
STEP 9a. Specify the Vault address
If you selected x360Portal authentication:
Enter the FQDN address of the Vault

Click Next
Step 9b. Login to the Vault
If you selected Local user authentication, specify the FQDN of the Vault and enter the local user login credentials
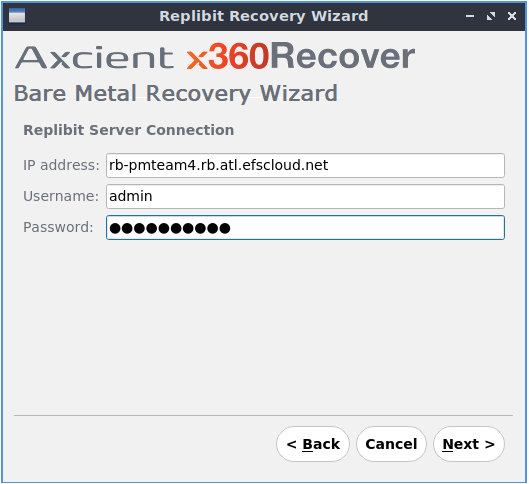
Click Next.
STEP 10. Select the Protected System to be recovered

Click Next
Step 11. Select the snapshot you wish to recover and click Next.

Note: It is recommended to use Smart Recovery when performing Bare Metal Recovery.
Smart Recovery mode returns disk partition layout identical to the original protected system (i.e. multiple partitions may exist on a single logical disk, etc.)
Without Smart Recovery mode, each partition will be returned as a separate logical disk object, which may not match the physical layout of the original system
IMPORTANT: If you wish to perform Incremental Recovery (i.e. apply incremental changes after applying the base image) Select
Start an Incremental Bare Metal Restore Recovery
STEP 12.
At this point, the iSCSI service will construct the protected system disk volumes for recovery.
(Bare Metal Recovery from Vault without Local Cache uses the same Disaster Recovery Access Layer as Local Cache to transport the disk data)
- Hash file data for each volume must be downloaded from the vault.
- Please allow several minutes for this download to complete.
- Note: In this preview edition, there is limited progress information being displayed on this page of the Wizard. If the disk volumes are very large, it may take some time to complete the download of the hash files.
Once the process is complete, the Next button will become available.
Click Next to continue.

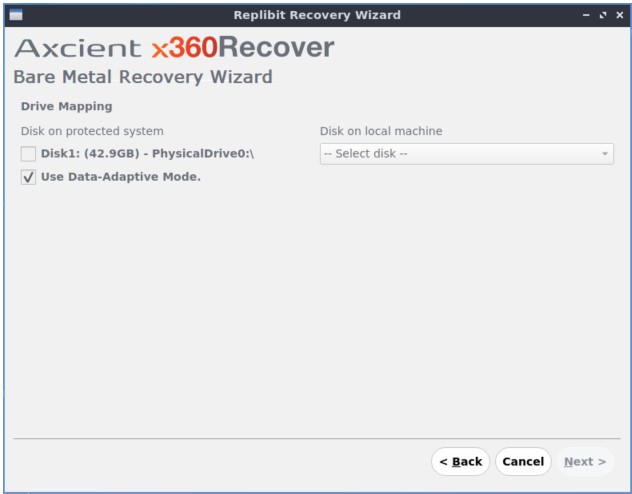
STEP 13. Map Disk Volumes
From the Drive Mapping page, select which of the available physical disks you wish to recover and map them to a local disk for recovery.
IMPORTANT NOTE: The disk on the LOCAL MACHINE must be as large (or larger) than the original protected system disk.
Known issue: If there is only a single disk in the system, this page can be confusing. When you click the disk dropdown, the selection overlaps the widget. Click once to open the dropdown, then click a second time to select the disk.
Click Next to continue.
|
Note: While Windows refers to physical disks as Disk1, Disk2, etc, Linux uses device names that designate both the controller type and physical order.
Generally speaking, Windows Disk1 would align with Linux disk ‘sda’ and so on. Need to recover a source disk larger than the target device? |
Step 14. Confirm you wish to continue and overwrite data on this device. Once you click next, any existing data on disks selected for recovery will be erased and overwritten.

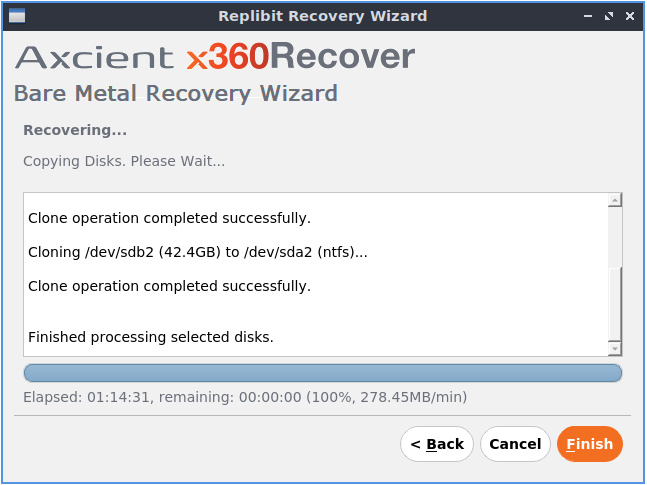
STEP 15. Disk Copy Process
The drive cloning process will begin.
Note: The underlying Disaster Recovery Access Layer drivers will perform multi-threaded read-ahead operations to optimize recovery speed.
Multiple volumes will also be copied in parallel to accelerate recovery.
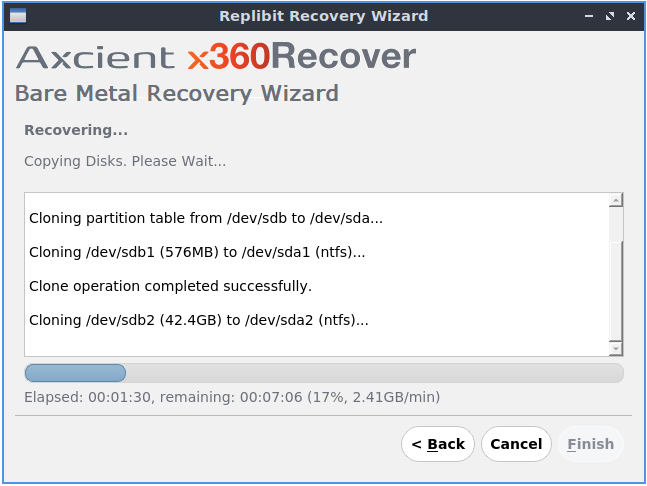
Once all disk volumes have been cloned, click Finish to close and exit the bare metal recovery wizard.
If you are recovering this protected system to new hardware, it may be necessary to run the driver injector to install critical storage controller drivers into the recovered system.
Once the recovery is completed, click Finish to close the wizard.
Note: If you selected Start an Incremental Bare Metal Restore Recovery, Incremental Recovery mode will begin instead
See Perform BMR using Incremental Recovery
ADDITIONAL RESOURES: x360Recover bare metal restore (BMR)
- Bare Metal Restore Guide
- Perform BMR from an appliance
- Perform BMR from a vault with a local cache
- Perform BMR from a virtual disk image
SUPPORT | 720-204-4500 | 800-352-0248
- Contact Axcient Support at https://partner.axcient.com/login or call 800-352-0248
- Free certification courses are available in the Axcient x360Portal under Training
- Subscribe to the Axcient Status page for a list of status updates and scheduled maintenance
907 | 1202 | 1225 | 1267 | 1423 | 1476 | 1540 | 1987