Within x360Recover Manager, you can generate reports detailing usage summary, appliance and vault details, and more.
Interested in the Client Health Digest report? Click here
Want to generate a Client Executive Summary Report? Read more here
How to select a report from the Reports page
There are several rows of tabs that organize Reports .
1. The top row of tabs separates report types .
The x360Recover Reports page includes high-level summaries for x360Recover
The Executive Summary tab allows you to generate a client-facing summary report. Read more about the Executive Summary report here
The Definitions tab allows you to view, edit, or delete reports emailed on a daily, weekly, or monthly basis.
The Auditor tab allows you to filter by certain type of system actions to generate a report useful for auditing purposes.
The Notifications tab shows a list of notification history.
Note: If you are an existing BRC or Fusion partner, you may also see these tabs:
BRC Reports provides information for BRC accounts
Fusion Reports delivers details for Fusion accounts
2. The second row of tabs designates the name of the available reports.
The Usage Summary report summarizes service information and usage information.
The D2C Usage Summary report shows D2C services and usage information
The Appliance Summary report provides details on a specific Axcient appliance.
The Private Vault Summary report provides details on a specific Private Cloud vault.
The Cloud Vault Summary report provides details on a specific Axcient Cloud vault.
The Virtual Office Usage report lists the current year usage and overage, including monthly overage
The Backup Summary report displays backups by type (appliance, D2C), by Autoverify results and by last recovery point.
The Backup History report lists all client backups by status, start time, end time, and completion time.
How to filter report results
After selecting the desired report tab from the second row:
A. Use the dropdown menus in the Filters panel to narrow down your results.
B. Click Run Report to see the report data.
C. Click the Download (csv) button to download the report as a one-time CSV file.
Upload your company logo for white-labeled reports
You can upload your company logo to rebrand (a) the Client Executive Summary report and also (b) the Daily Health Digest report .
PREREQUISITES:
Logo image must be JPEG or PNG.
Logo image must be smaller than 2000 px wide by 500 px tall.
Logo image file size cannot be larger than 2MB.
How to upload your company logo
1. Login to the x360Portal.
2. Launch x360Recover.
3. From the dashboard, click Settings .
4. Locate the Custom Logo section and select Edit.
5. Click Change Logo.
6. In File Explorer, locate and select your company logo.
Additionally, you can change the header background color by inputting the hex code on this screen.
Delete
Create report definition
Once a report has been successfully run, you can click the Create Report Definition button to save that report and email it on a daily, weekly, or monthly basis.
You can edit or delete these schedules in the Definitions tab in the top row.
Create report definitions
In addition to viewing and downloading reports in Manager, you can optionally create report definitions that can be delivered on a recurring schedule.
You can specify one or more recipients who will receive these reports on a daily, weekly, or monthly schedule.
To create report definitions:
1. In Manager, click the Reports tab. The Reports page displays.
2. In the Reports page, find the report you want to view and click the specific report subtab. In this example, we selected the Usage Summary report
3. Next to the filter button, click the Create Report Definition button.
4. In the Create Report Definition pop-up window, define the recurring report.
To define the recurring report:
In the Name field, enter a descriptive name for the report.
In the Delivery Type field, use the drop-down menu to select the report schedule. You can select from Daily , Weekly , or Monthly .
Click the Active checkbox to ensure this report is turned on in the system. You can edit this field at any time in the future.
In the Email Address field, enter one or more recipients , separated by commas.
Click the Save button when you are finished.
5. To view or edit this report definition, click the Definitions subtab within the Reports page.
Delete
View and download reports
You can create reports within x360Recover Manager to help monitor usage, appliances, vaults, and more. You can also download reports in CSV format.
View and download reports
In Manager, you can create the following reports:
The Usage Summary r eport summarizes service information and usage information.
The D2C Usage Summary report summarizes D2C services and usage information
The Appliance Summary report provides details of a specific Axcient appliance.
The Private Vault Summary report provides details of a specific Private Cloud vault.
The Cloud Vault Summary report provides details of a specific Axcient Cloud vault.
The Virtual Office Usage report lists the current year usage and overage, including monthly overage
The Backup Summary report displays backups by type (appliance, D2C), by Autoverify results and by last recovery point.
The Backup History report lists all client backups by status, start time, end To view a report:time, and completion time.
To view a report:
1. In Manager, click the Reports tab.
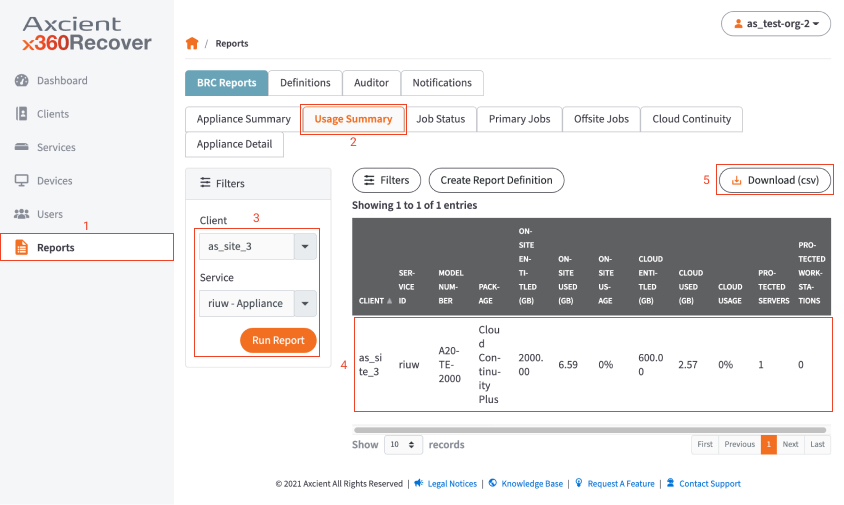
2. In the Reports page, find the report you want to view and click the specific report subtab. In this example, we selected the Usage Summary report
3. Use the left-hand filter tool to select a specific Client and Service and then click the Run Report button.
4. Review the resulting report. 5. Optionally, click the Download link to download the report in CSV format.
Delete
Configure Health Digest notifications
Configure Health Digest notifications for an organization
Health Digest notifications are outgoing messages intended to keep you informed of significant changes in the status of a client's devices.
When you configure Health Digest notifications, you will receive a health overview of your devices and services each day.
Triggers are based on threshold and connectivity settings defined on the Service Configuration page for each service.
You can also configure Health Digest settings for an individual client.
To configure Health Digest notifications:
1. In the Axcient x360Recover Manager, click the Dashboard tab and the Settings button. 2. In the Notification Configuration page, click the Edit button 3. Enter an email address where notifications should be delivered.
Optionally, click the Add Another link to add additional email addresses. 4. Click the Save button when you are finished.
Delete
SUPPORT | 720-204-4500 | 800-352-0248
1155 | 1221 | 1320 | 1616