
For fast, local recovery of a server or workstation, you can:
- Launch a virtual machine from the appliance interface. This recovery approach allows you to host a server or critical workstation directly on the BDR while you rebuild or replace the original hardware.
- Launch a virtual machine from a private (self-hosted) vault.
Note: You should perform a recovery of any system running in Live Mode back to physical or virtual hardware as soon as possible.
Launch a virtual machine
You can choose to launch a virtual machine (a) from within the appliance or (b) from the private cloud vault web interface, which allows you boot a protected system from a specific snapshot. This is useful for testing purposes or for emergencies, when you need to temporarily access a protected system before it is restored to the replacement hardware.
Note: You cannot launch a test virtual machine or a live virtual machine via an Axcient-hosted vault.
Note: After virtualizing a system in Live Mode, x360Recover will automatically perform a new full backup at the next scheduled time in order to synchronize the recovered system with the backup image. This full backup will only write changed data, but it is essential to ensure that the backup image remains in sync with the protected system.
STEP 1. Select the launch method:
|
Method A - Launch from an appliance
|
Method B - Launch from a private cloud vault
|
Note: You cannot launch a test virtual machine or a live virtual machine via an Axcient-hosted vault.
STEP 2. Select the snapshot and configure settings.
(The following steps apply to both an appliance vm launch and a private cloud vm launch.)
2.1. Find the protected system to be virtualized and click the appropriate System Name.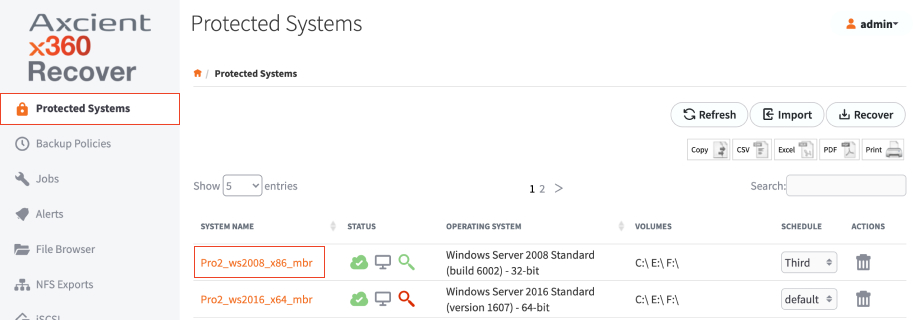
2.2. In the Protected System Details page, find the correct snapshot and click the Start VM button.
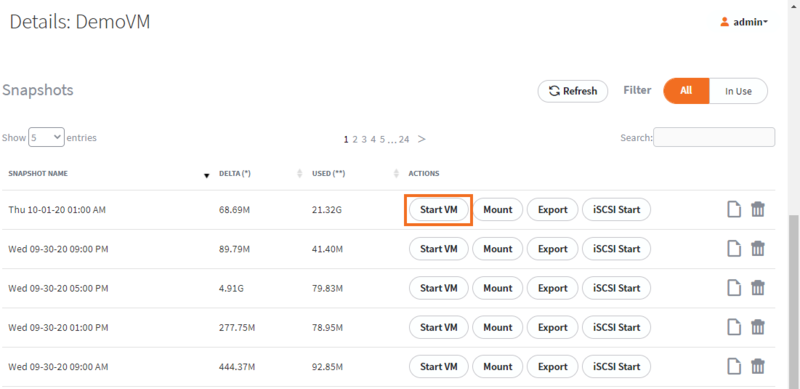
2.3 In the Virtualization Settings pop-up window, define settings for the virtual machine:
- In the RAM field, enter the amount of RAM that will be available for the virtual machine.
- In the CPU (cores) field, enter the number of CPU (cores) that will be available for the virtual machine.
- In the Mode area, select either Test Mode or Live Mode. For details on using Live Mode with Recovery Center, please see Recovery Center live mode
- Test Mode boots the virtual machine in a private network for testing. Any changes made to the virtual machine hard disk images will be destroyed when the system is shutdown.
- Live Mode boots the virtual machine on the same LAN as the appliance web interface. The selected Recovery Point will be marked as Persistent and any changes made to the virtual machine disk volumes will not be lost when the system is shut down. Please note that Live Mode is intended be utilized as an emergency recovery method. You should perform a recovery of any system running in Live Mode back to physical or virtual hardware as soon as possible.
- If you selected Live Mode above, select the appropriate NIC setting.
- Optionally, in the Boot Key drop-down menu, select a key stroke you want sent to the virtual machine, letting you access BIOS or Windows Startup menu during the system boot process.
- Optionally, in the CD-ROM Image drop-down menu, select a Boot Device or CD-ROM Image to allow the Protected System to boot from a CD image for diagnostic or testing purposes.
- If you entered an passphrase when installing the agent, you will also be prompted to enter the password in the Password field.
- Click the Start button when you are finished. The virtual machine will initiate within the appliance web interface.
- When you are finished, close the virtual machine window. If the virtual machine was running in Test Mode, the process is now complete.
2.4. If you elected to run the virtual machine in Live Mode for production purposes, you will need to recover changes made while the virtual machine was running.
- In the Protected System Details page, find the snapshot you used to launch the virtual machine.
- Select your preferred method of recovery (for example, Mount, Export, iSCSI, and so forth).
- If you select Mount or Export, you will have automatic access to the latest state of the protected system.
- If you select iSCSI or Start VM, select Live Mode to access the latest state of the protected system.
- Recover the data as appropriate and restore to the newly repaired protected system.

SUPPORT | 720-204-4500 | 800-352-0248
- Contact Axcient Support at https://partner.axcient.com/login or call 800-352-0248
- Free certification courses are available in the Axcient x360Portal under Training
- Subscribe to the Axcient Status page for a list of status updates and scheduled maintenance
1231 | 1502