Legacy partners with multiple vaults have the option to consolidate their cloud-protected systems onto a single vault.
Consolidating to a single vault reduces total cost of ownership by reducing time spent managing, monitoring, and maintaining multiple cloud vaults that are no longer needed.
Overview
IMPORTANT: Please follow these instructions precisely to avoid any complications that might require intervention by the Axcient support team.
The following procedure applies ONLY to Axcient-hosted cloud vaults. Self-hosted vaults do not employ Scale-Out Cloud technology and cannot benefit from this process..
IMPORTANT!Protected system data is NOT stored directly on the cloud vault with current storage architecture. When migrating a protected system from one vault to another, the data itself is not being moved. Only the database records and logging on the vaults are being transferred from one system to another. Protected system data is stored directly on our storage SAN cluster and individual protected systems are distributed across many physical storage servers and data pools. With Scale-Out Cloud, there is only ONE copy of the data. DO NOT DELETE PROTECTED SYSTEMS when performing vault to vault migration in the Scale-Out Cloud, as this will delete the ONLY copy of the data in the cloud! |
Perform Vault Consolidation
Follow these steps, in order, to perform vault consolidation of your cloud-protected systems1. Identify which vault you intend to keep.
Axcient Cloud vaults are named by product, partner, instance, and data center.
For example: The partner Acme BDR Inc. might have three vaults in our Atlanta data center named
- rb-acmebdr1.rb.atl.efscloud.net
- rb-acmebdr2.rb.atl.efscloud.net, and
- rb-acmebdr3.rb.atl.efscloud.net
We recommended that you keep the vault with the lowest instance number (typically 1) but you are free to choose whichever vault you like.
Note: Ensure that the protected system does not already exist on the destination vault with the same GUID. If it does exist on the destination vault with the same GUID, the migration cannot be performed. You will need to either delete the protected system (which includes the data) from the destination vault or leave the protected system on both vaults. Protected system data with the same GUID on two separate vaults cannot be combined.
2. Migrate protected systems on each appliance
Once you have decided on the vault you will be moving your protected systems onto, complete the following steps for each of your customer appliances.
- Login to your appliance and examine the current vault replication configuration.
- From the left menu, select Vault Configuration and edit the properties of each vault schedule you have configured (there may be more than one) to determine the URL of the configured vault.
- If this appliance is currently configured to replicate protected systems to one of the vaults you wish to retire, then proceed with this migration process. (If all protected systems on this appliance already replicate to the vault that you intend to keep, proceed to the next customer appliance.)
2a. Create a vault schedule
If one does not already exist, create a new vault schedule for the vault you intend to keep.
- From the left menu, select Vault Configuration and click Add Vault.
- Enter a friendly name for the vault, the FQDN URL of the vault and click Test Connection.
- Specify your replication schedule and bandwidth settings and click Save when finished.
2b. Migrate each protected system on this appliance
- Navigate to the protected systems page from the left menu.
- For each protected system on this appliance, click the Details button from the Actions column to navigate to the protected systems Details page.
2c. Disable replication to the current vault
- Click Replication to open the replication configuration for this protected system.
- Uncheck the Enabled option in the left-most column and then click Save.

Note: Check the Jobs -> Replication page to make sure no replication jobs are currently running for this protected system. If there are replication jobs currently running, wait for all active replication jobs to complete before disabling replication for this protected system.
Disable replication for all protected systems on this appliance before proceeding with vault migration.
3. Migrate protected systems from vault to vault
- Log in to the Axcient-hosted Cloud vault where your protected systems are currently being replicated. (Typically, all protected systems on a single appliance replicate to the same vault, but if this is not the case you will need to log in to each vault separately and complete this step for all protected systems.)
- Navigate to the protected systems page, locate each protected system you intend to migrate and click the System Name text to open the protected systems Details page.
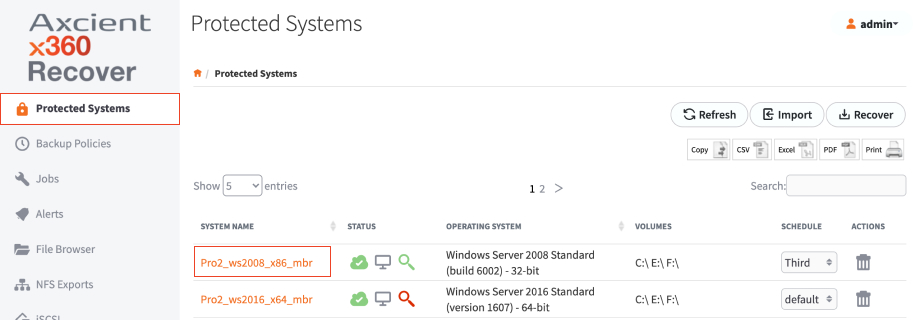
- Click Migrate to open the migrations options window.

- Select Migrate over Network and enter the FQDN URL for the vault you are choosing to consolidate onto.
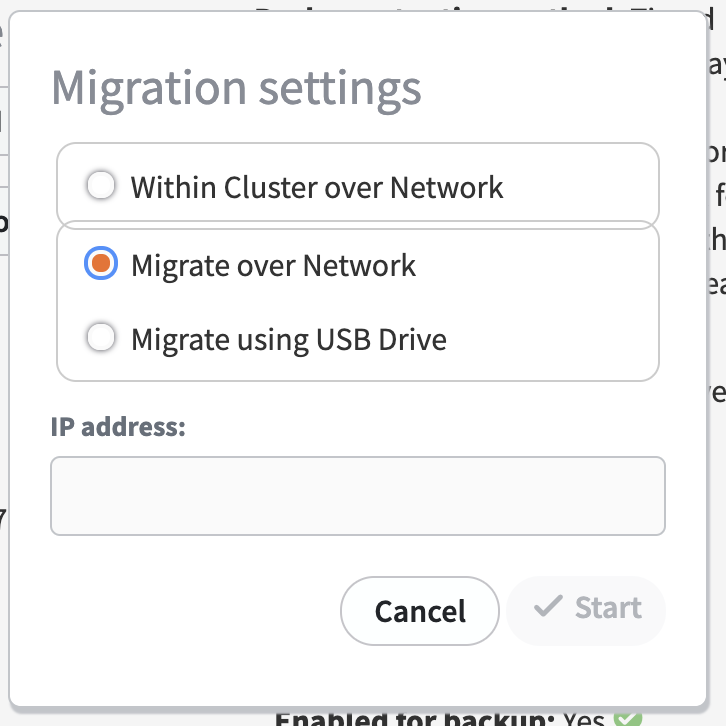
- Click Start to migrate the protected system.
- Click on the the Jobs tab in the lefthand navigation, and then select the System tab at the top. Here, you can verify that the migration process was successful.

- This protected system should now appear on the protected systems page on the target vault. This protected system should no longer appear on the protected systems page on this Vault.
Repeat this process for each protected system from the current appliance until they have all been migrated to the target vault.
4. Open the protected system Details page
Return to the appliance and navigate to the Protected Systems tab on the lefthand navigation. Click the appropriate System Name in the table.
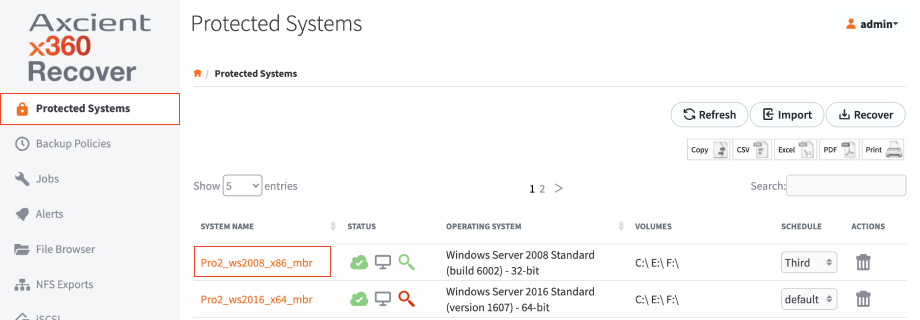 For each protected system being migrated, perform the following steps to update the replication configuration:
4a. Add the new vault destination
- Click Replication to open the Replications Settings window.

- Leave the original vault configuration disabled.
- Click Add Vault to add a second vault replication destination.
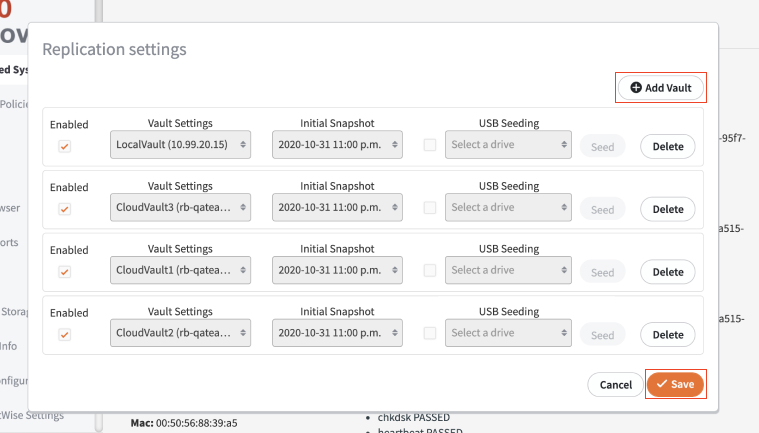
- Select the target vault you are consolidating onto from the dropdown list of vaults.
- Select the oldest available snapshot from the list of initial snapshots.
- Regardless of whether seeding was selected for the original vault, leave Seeding unselected here.
Note: Do not click Save yet.
4b. Remove the original vault destination
- Click Delete to remove the original vault replication configuration.
1. Do NOT enter the hostname of the protected system.
2. IMPORTANT: Be sure to select Delete Replication Settings but leave the Protected System on the Vault
3. Click Delete.
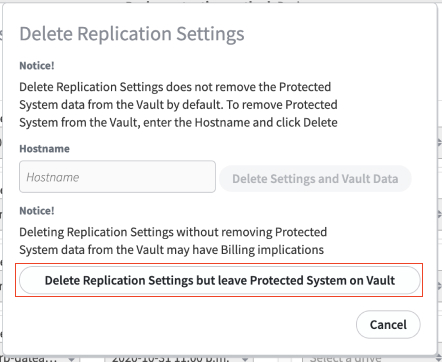
Click Save to update the replication settings for this protected system.
Note: If you receive an error and cannot save the settings at this stage, contact Axcient Support for assistance
Complete this step for each protected system on the appliance.
5. Verify replication
After the next incremental backup completes, replication for each protected system should proceed normally to the new Cloud vault.
After some time, revisit the appliance and check the Jobs -> Replication page to verify that replication to the new vault is being performed successfully.
Proceed with the next customer appliance and repeat this process until all protected systems have been successfully migrated to the single Cloud vault of your choice.
Decommission unnecessary Cloud vaults
Once you have completed migration of all Cloud-protected systems to a single vault, you may proceed with decommissioning excess vaults that are no longer needed.
1. It is important to delete your unused vaults from the x360Recover Manager.
2. Once you have completed decommissioning your excess Vaults, please contact Axcient Support and ask that the Cloud Vault be retired.
SUPPORT | 720-204-4500 | 800-352-0248
- Contact Axcient Support at https://partner.axcient.com/login or call 800-352-0248
- Free certification courses are available in the Axcient x360Portal under Training
- Subscribe to the Axcient Status page for updates and scheduled maintenance
1599