Overview
The x360Sync file store contains compressed and encrypted raw binary data. File stores can become quite large as systems scale in size.
As a file store grows, you might need to migrate the file store to a new storage location.
Supported Method
The instructions listed below outline the currently support method of migrating a file store.
Note: This method requires server downtime. If you have concerns about taking your x360Sync server offline for an extended period of time, please review the Maximum Uptime Method section listed below.
- Check permissions on the new file store location, making sure that the SYSTEM user has full permissions to the folder and all of its subfolders and files. Alternatively, if you have changed the user name under which the x360Sync Server service runs, make sure this user has access to the new file store location.
- Stop the x360Sync server service.
- In Windows Explorer, create and name a new folder (without spaces) on the drive to which you would like to migrate.
- Copy the contents from within the original File Store folder and paste into the new File Store folder. This should include a Files folder and a .store.meta file.
- Navigate to C:\PostGreSQL9.1\bin\pgAdmin3.
- Click pgAdmin3, which launches the PostGreSQL9.1 program.
- Within the menu bar, click the Tools menu item and select Connect. Enter the password to the PostgreSQL user account.
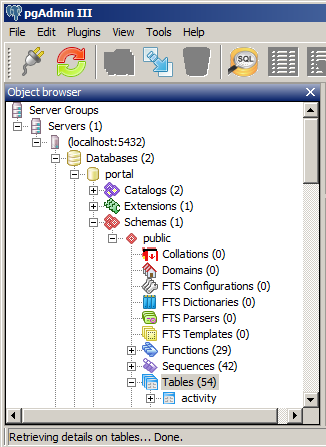
Note: Your PostgreSQL user password is listed in the [portal] section of your x360Sync config.ini file ([target drive]:\x360Sync Server\conf\config.ini). - Navigate to Servers > (localhost:5432) > Databases > portal > Schemas > public > Tables.

- Right-click the file_store_location table and select View Data > View Top 100 Rows.
- In the path column, rename the original File Store path to the new File Store path. For example, rename from original C:/OriginalFileStore to the new C:/NewFileStore.
- Save your changes.
- Start the x360Sync server service.
Maximum Uptime Method
If you have concerns about taking your x360Sync server offline for an extended period of time, you can use the Robocopy (Robust File Copy) command-line utility as a viable workaround.
Note: This process is currently unsupported; please proceed with caution.
Robocopy allows you to copy all file attributes and to mirror the contents of an entire folder hierarchy across local volumes or over a network. When you use robocopy, you can recover from interruptions by resuming a copy operation from the point of failure. In this way, you can incrementally migrate the bulk of your data while the x360Sync server is online, and perform one final, smaller migration process when the x360Sync server is offline.
Step 1: Migrate the bulk of your data while your x360Sync server is online
- Check permissions on the new file store location, making sure that the SYSTEM user has full permissions to the folder and all of its subfolders and files. Alternatively, if you have changed the user name under which the x360Sync Server service runs, make sure this user has access to the new file store location.
- Download and install the Robocopy utility.
- From the command line, run the following command, making sure to replace <source> and <target> with the appropriate paths on your server.
ROBOCOPY <Source> <Target> /MIR /Z /W:5
This command utilizes the following parameters:
| /MIR | Specifies that Robocopy should mirror the source directory and the destination directory; note that this will delete files at the destination location if they were deleted at the source location. |
| /Z | Ensures Robocopy can resume the transfer of a large file in mid-file instead of restarting |
| /W:5 | Reduces the wait time between failures to 5 seconds instead of the 30 second default |
- Rerun this command as often as needed, based on the amount of activity handled by your x360Sync server.
Step 2: Migrate the remainder of the data while your x360Sync server is offline
When you are satisfied that most of your data has been successfully migrated, plan a time period when you can safely and conveniently take your x360Sync server offline. This process should only require minimal downtime (on average, under 1 hour).
- Stop the x360Sync server.
- Rerun the Robocopy command one last time, making sure to replace <source> and <target> with the appropriate paths on your server.
ROBOCOPY <Source> <Target> /MIR /Z /W:5
- Navigate to C:\PostGreSQL9.1\bin\pgAdmin3.
- Click the PostgreSQL user, which launches the PostGreSQL9.1 program.
- Within the menu bar, click the Tools menu item and select Connect. Enter the password to the PostgreSQL user account.
Note: Your PostgreSQL user password is listed in the [portal] section of your x360Sync config.ini file ([target drive]:\x360Sync Server\conf\config.ini).
- Navigate to Servers > (localhost:5432) > Databases > portal > Schemas > public > Tables.

- Right-click the file_store_locationtable and select View Data > View Top 100 Rows.
- In the pathcolumn, rename the original File Store path to the new File Store path.
- Save your changes.
- Start the x360Sync server.
SUPPORT | 720-204-4500 | 800-352-0248
- Contact Axcient Support at https://partner.axcient.com/login or call 800-352-0248
- Free certification courses are available in the Axcient x360Portal under Training
- Subscribe to the Axcient Status page for updates and scheduled maintenance
1532