Overview
This article contains two sections: an Apache Server section, and an x360Sync Server section. You must configure Apache with an SSL certificate in order to allow mobile devices to connect. You must also configure an SSL certificate for your x360Sync application server to support desktop client connections and WebDAV.
Section 1: Apache Server
In order for mobile devices to log in, a valid CA signed SSL certificate must be installed for Apache. Self-signed certificates are not supported.
When you create a new SSL certificate or wildcard certificate, you generate a .key file (private key), as well as a .csr file (certificate signing request file), using your OpenSSL application. You then submit the .csr file to the SSL Certificate Authority of your choice (for example, GoDaddy, Thawte, Verisign, and so forth) in order to receive the appropriate .crt (certificate file)and bundle .crt files, which are then installed on your Apache web server.
This section will review the following steps in detail:
- Use the OpenSSL application to generate a .key file
- Use the OpenSSL application to generate a .csr file
- Purchase a certificate from an SSL Certificate Authority using the newly generated .csr file
- Update the SSLCertificateChainFile path in the http.conf file
Important notes
Note: This section outlines the full process for purchasing a new SSL certificate and configuring it for use. If you already have an existing SSL certificate, please copy your existing .key file, .crt file, and bundled .crt file into the C:\Apache24\conf\ssl\ directory, then skip to the Updating the SSLCertificateChainFile Path section below.
Note: If you already have an existing IIS .pfx file, you must first convert it to a .key file using the OpenSSL application. For more information, please reference Move SSL Certificates from IIS to Apache.
STEP 1. Generate a .key File
To generate a .key file using the OpenSSL application:
- From the Start menu, enter cmd into the search box and press the Enter key. A new Command Prompt window displays.
- In the Command Prompt window, navigate to the Apache bin directory using the cd command, and press the Enter key:
cd C:\Apache24\bin\
- Enter the following command to set the environment variable:
set OPENSSL_CONF=C:\apache24\conf\openssl.cnf - While still in the Command Prompt window, launch the openssl application using the openssl command:
openssl
- Within the OpenSSL application, generate a .key file using the genrsa command:
genrsa –out yourdomainname.key 2048
For example:
genrsa -out yourdomainname.key 2048
STEP 2. Generate a .csr File
To generate a .csr file using the OpenSSL application:
- While still in the OpenSSL application, generate a .csr file using the following command:
req -new -sha256 –key yourdomainname.key –out yourdomainname.csr -config "C:\Apache24\conf\openssl.cnf"
For example:
OpenSSL> req -new -sha256 -key yourdomainname.key -out yourdomainname.csr -config "C:\Apache24\conf\openssl.cnf"
- You will be prompted to enter information into the Command Promptwindow:
- When prompted to enter a Country Name, enter your country’s two letter code (for example, US).
- When prompted to enter a State or Providence Name, enter the full name of your state or providence (for example, California).
- When prompted to enter a Locality Name, enter the full name of your city (for example, San Francisco).
- When prompted to enter an Organization Name, enter the name of your organization.
- When prompted to enter an Organizational Unit Name, enter your organizational unit, or leave this field blank.
- When prompted to enter a Common Name, enter your server FQDN (for example, hostname.yourdomainname.com, or *.yourdomainname.comfor a wildcard certificate).
IMPORTANT: You must include a * symbol in front of your yourdomainname.com if you are registering a wildcard certificate.
- When prompted to enter your email address, enter a valid email address.
IMPORTANT: Make sure you have access to the email account that you provide. Depending upon the SSL Certificate Authority you select, you might need to validate ownership of your domain.
When prompted to enter extra attributes (a challenging password and an optional company name), leave these fields blank.
STEP 3. Purchase a new certificate
To purchase a certificate from an SSL Certificate Authority:
1. Purchase a certificate from an SSL Certificate Authority of your choice using your newly generated .csr file. For example, you may wish to purchase from GoDaddy, Thawte, Verisign, and so forth.
2. Each of these Certificate Authorities will require a specific set of steps for submitting the content of your newly generated .csr file. Follow the specific set of instructions provided by your selected Certificate Authority.
IMPORTANT: Depending upon the SSL Certificate Authority you selected, you might need to validate ownership of your domain.
3. When prompted to submit your .csr file, you can access the file in the Apache directory (for example, C:\Apache24\bin\_.yourdomainname.com.csr).
Your SSL Certificate Authority will provide you with two files: a .crt file and a bundle.crt file. Make sure that you specify Apache server type when you download the files.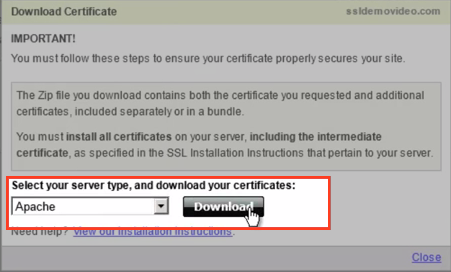
4. After your SSL Certificate Authority provides you with the .crt file and the bundle.crt file, move the files into the C:\Apache24\conf\ssl\ directory. Specifically:
5. Move the .crt file into Apache’s ssl directory (for example, C:\Apache24\conf\ssl\).
6. Move the bundle.crt file into Apache’s ssl directory (for example, C:\Apache24\conf\ssl\).
7. Move the .key file from Apache’s bin directory to Apache’s ssl directory (for example, from C:\Apache24\bin to C:\Apache24\conf\ssl\).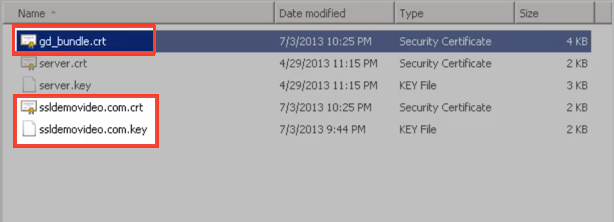
STEP 4. Update http.conf
NOTE: Please create a backup copy of the .conf file prior to editing.
To update the SSLCertificateChainFile path in the http.conf file:
1. Navigate to Apache’s conf directory (for example, C:\Apache24\conf\) and open the httpd.conf file.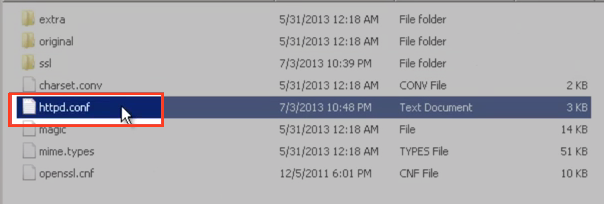
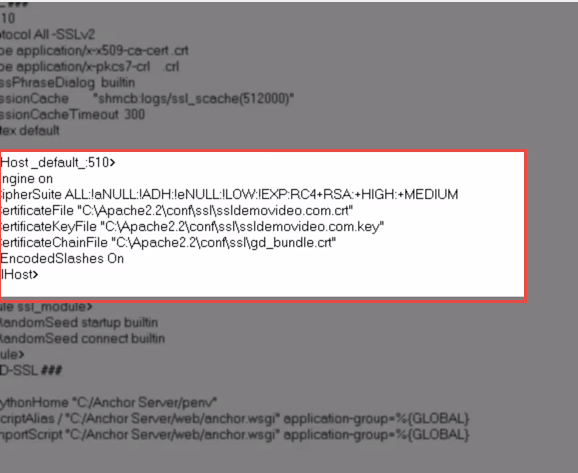
2. For single certificates, in the VirtualHostsection, update the following lines:
- SSLCertificateFile "C:\Apache24\conf\ssl\yourdomainname.crt"
- SSLCertificateKeyFile "C:\Apache24\conf\ssl\yourdomainname.key"
- SSLCertificateChainFile "C:\Apache24\conf\ssl\yourbundle.crt"
For example: -
<VirtualHost_default_:510>
SSLEngine on
SSLCipherSuite ALL:!ADH:!EXPORT56:RC4+RSA:+HIGH:+MEDIUM:+LOW:+SSLv2:+EXP:+eNULL
SSLCertificateFile "C:\Apache24\conf\ssl\yourdomainname.crt"
SSLCertificateKeyFile "C:\Apache24\conf\ssl\yourdomainname.key"
SSLCertificateChainFile "C:\Apache24\conf\ssl\yourbundle.crt"
AllowEncodedSlashes On
</VirtualHost>
3. Alternatively, for wildcard certificates, update the following lines:
- <VirtualHost *:510>
- ServerName yourdomainname.com
- ServerAlias *.yourdomainname.com
- SSLCertificateFile "C:\Apache24\conf\ssl\yourdomainname.crt"
- SSLCertificateKeyFile "C:\Apache24\conf\ssl\yourdomainname.key"
- SSLCertificateChainFile "C:\Apache24\conf\ssl\yourbundle.crt"
For example:
<VirtualHost *:510>
ServerName anchor.com
ServerAlias *.anchor.com
SSLEngine on
SSLCipherSuite ALL:!aNULL:!ADH:!eNULL:!LOW:!EXP:RC4+RSA:+HIGH:+MEDIUM
SSLCertificateFile "C:\Apache24\conf\ssl\yourdomainname.crt"
SSLCertificateKeyFile "C:\Apache24\conf\ssl\yourdomainname.key"
SSLCertificateChainFile "C:\Apache24\conf\ssl\yourbundle.crt"
AllowEncodedSlashes On
</VirtualHost>
4. Save and close the file.
5. In the Start menu, enter Services into the search box and press the Enter key. The Services window displays.
6. Right-click Apache Service and select Restart. The Apache Service will restart.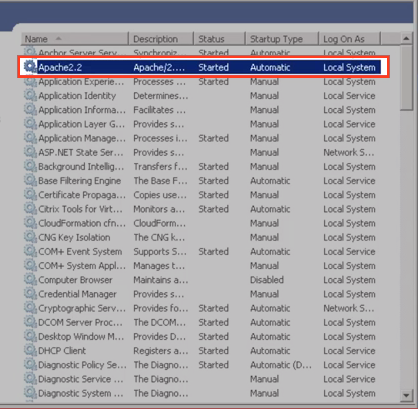
Section 2: Anchor Server
You are also required to configure an SSL certificate for your Anchor application server to support desktop client connections and WebDAV support.
To configure an SSL certificate for your Anchor server, you will follow two main steps:
- Chain copies of your .crt file and bundle.crt together (these were generated when configuring SSL for your Apache server).
- Modify the C:\Anchor Server\conf\config.ini file to point to the new combinedbundle.crt and copied .key file.
STEP 5. Chain the Files
- COPY the following three files from your Apache folder (likely located in C:\Apache24\conf\ssl) and PASTE them into your C:\Anchor Server\conf folder:
- .crt file (corresponding to your secure domain)
- bundle.crt (intermediate certificate)
- .key (key file)
- Open up the newly copied .crt file, SELECT ALL of its contents, and then COPY its contents.
- Open up the newly copied bundle.crt file and place your mouse cursor at the beginning of the document (before the first character).
- PASTE the contents of the .crt file into the top of bundle.crt.
- Save the modified bundle.crt file as combinedbundle.crt or other recognizable name.
STEP 6. Modify config.ini
- Open up your C:\Anchor Server\conf\config.ini file
- Under the [server] heading, change the two following values to point to your modified combinedbundle.crt and your copied .key file (in order, respectively):
- ssl_crt = "C:/Anchor Server/conf/combinedbundle.crt"
- ssl_key = "C:/Anchor Server/conf/yourdomainname.key"
- Save the config file and restart your Anchor Server Service.
SUPPORT | 720-204-4500 | 800-352-0248
- Contact Axcient Support at https://partner.axcient.com/login or call 800-352-0248
- Free certification courses are available in the Axcient x360Portal under Training
- Subscribe to the Axcient Status page for updates and scheduled maintenance
1532