Overview
The following information describes the steps needed to perform a system migration.
Preparing for migration
- If you need to migrate any other Private Cloud Server components, except for the database server, from one machine to another, please refer to Setting up a High Availability (HA) environment. This article covers such scenarios in great detail.
-
You need to ensure you have the same PostgreSQL version on both environments before migrating the database server. Fresh installs of Private Cloud 3.6.20 and newer have PostgreSQL 12 by default, while Private Cloud 3.6.10 and older have PostgreSQL 9. Note that updating an existing Private Cloud environment doesn't upgrade PostgreSQL automatically.
If your old (source) environment has PostgreSQL 9, you have two options to migrate:- Migrate within PostgreSQL 9, then update. Install Private Cloud 3.6.10 (download AnchorServer-3.6.10.630.exe, 556 MB) to the new (target) environment to keep in on PostgreSQL 9. Update the target environment to the same Private Cloud version that the source environment has using the embedded Updater tool. Complete the migration according to the steps for PostgreSQL 9 listed below. Then, update to PostgreSQL 12 manually using the PostgreSQL upgrade manual.
- Update to PostgreSQL 12, then migrate. Install the latest Private Cloud to the target environment. If the source environment has PostgreSQL 9, update it to the same PostgreSQL version as the target environment. Then, complete the migration according to the tips for PostgreSQL 12 below (we don't have a detailed manual; this is a more complicated process that needs to be performed by your qualified on-site personnel).
Migrating Private Cloud server running PostgreSQL 9
Follow these steps to complete the migration:
STEP 1. Stop the PostgreSQL 9.1 service and then stop the x360Sync Server service.
STEP 2. Copy your entire PostgreSQL9.1 folder (the default location is C:\PostgreSQL9.1) and both your File Store and DB Store to the new machine.
Your file store was chosen during system setup and your DB store is located by default in C:\x360Sync Server\store_1
For example, you might copy:
- C:\PostgreSQL9.1\
- C:\x360Sync Server\store_1\
- D:\User defined file store\
STEP 3. Make sure that your PostgreSQL9.1 folder and your x360Sync Server folder are placed on a drive letter and path that matches your previous installation (for example, C:\).
We recommend that you place your file store in a path that matches your previous installation (for example, D:\) since changing this will require modification of the PostgreSQL9.1 database.
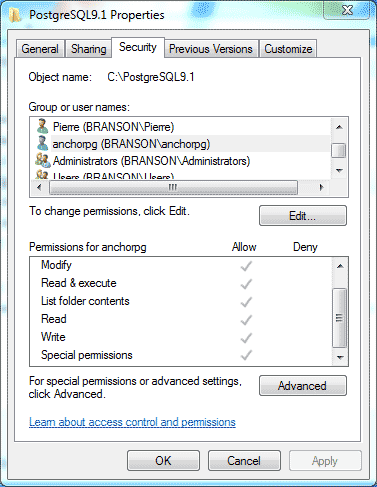
STEP 4. Create a user in Windows with the same username and password of the PostgreSQL user from the original server (e.g. anchorpg).
Then, give this user full control to the PostgreSQL 9.1 folder before attempting the install.
Note: Your PostgreSQL user password is listed in the [portal] section of your x360Sync config.ini file ([target drive]:\x360Sync Server\conf\config.ini).
STEP 5. Install the x360Sync Server; it should detect the PostgreSQL9.1 database.
Then, select, Yes, I would like to use the existing database and complete your installation.
STEP 6. If you had previously configured SSL for Apache and the x360Sync Server, copy your previous SSL certificates and config files over to the new server.
For example:
C:\Apache24\conf**
C:\x360Sync Server\conf**
STEP 7. If you had previously configured custom branding for any organizations, copy the following folder over to the new server:
C:\x360Sync Server\web\greensnake\static
STEP 8. Restart the x360Sync Server service, attempt to connect to localhost, and attempt to upload files to the web portal.
If all of these steps are successful, your migration is complete.
STEP 9. You can now point the DNS record from the old server to the new server.
Notes about migrating Private Cloud server running PostgreSQL 12 or newer
At the current moment, we have a detailed manual that is only applicable to PostgreSQL 9.x (see the previous section of this document). If you are running PostgreSQL 12.x or newer, the database server migration is significantly more complex and must be performed by qualified on-site personnel from your organization. There are two valid migration methods that can be used:
- pg_dumpall / pg_restore, with "--no-owner" flag - this method involves downtime and needs no clients to be connected. The pg_dumpall tool dumps the whole database cluster with all the databases to files, which then should be imported on the new server using pg_restore. See these articles for more details: https://www.postgresql.org/docs/current/app-pgrestore.html and https://www.postgresql.org/docs/current/app-pg-dumpall.html
It's advised to test the dump beforehand and check how much time it would take to dump, to be able to plan the proper maintenance windows. The restoration process would take around 2x the time required to dump. - pg_basebackup + hot standby server. pg_basebackup is used to take a base backup of a running PostgreSQL database cluster. The backup is taken without affecting other clients of the database, and then can be used as a base to spin up the hot standby replica server. Then, after the replica fully syncs with the old primary server, the primary can be stopped and the replica promoted to master using "pg_ctl promote". See these articles for more details: https://www.postgresql.org/docs/current/runtime-config-replication.html and https://www.postgresql.org/docs/current/runtime-config-replication.html#RUNTIME-CONFIG-REPLICATION-STANDBY and https://www.postgresql.org/docs/current/app-pg-ctl.html
Any of the above operations should be planned ahead. It's not advisable to perform database server migration in parallel with other complex upgrade operations.
SUPPORT | 720-204-4500 | 800-352-0248
- Contact Axcient Support at https://partner.axcient.com/login or call 800-352-0248
- Free certification courses are available in the Axcient x360Portal under Training
- Subscribe to the Axcient Status page for a list of status updates and scheduled maintenance
1084 | 1425 | 1532