

1. Prepare your environment
| Onboarding task | What's involved? | What are my options? | Documentation |
| Prepare your environment |
Review the basic requirements before you get started |
Supported configurations for x360Recover | |
| Set up firewall ports (inbound) | Verify that your inbound firewall port settings are correct | Firewall ports (inbound) | |
| Set up firewall ports (outbound) | Make sure that your outbound firewall ports are set up properly | Firewall ports (outbound) | |
| Review agent best practices | What is a backup agent? | Configure an agent | Agent best practices |
| Configure antivirus | You may need to make exclusions to your scanning settings | Exclude an agent from antivirus scans |
2. Access your x360Portal account
| Onboarding task | What's involved? | What are my options? | Documentation |
| Access your x360Portal account | This is where you will register and log in to your Axcient x360Portal | The x360Portal is where you set up users. You can also access billing, contacts, support, and training | Introduction to x360Portal |
| Set up users | Assign roles to your users and grant access to product portals | Basic portal users default to read-only access without SSO access to the vault within x360Recover Manager. x360 Portal admins can upgrade x360Recover user access from the Users tab within x360Recover Manager | Navigate x360Portal |
| Configure MFA | MFA login to the x360Portal is mandatory | You can choose to authenticate using an app or with SMS text message via your phone | Configure MFA for x360Portal |
| Manage SSO | If you use NetSuite, you'll need to configure SSO access to invoices. |
Manage SSO for x360Recover (Customer Service can also assist with SSO) |
Configure x360Recover Manager settings |
| Billing | Pay invoices and get details on usage | If you use NetSuite, you'll need to configure SSO access to invoices. (Customer Service can assist with SSO) | Manage your Axcient invoices from x360Portal |
|
Contacts: Find people |
Get in touch with your Partner Success Manager | Do you need a new x360Portal account? | |
| Ask Support | Create Support ticket | You can also request a feature and follow our roadmap | How to submit a Support ticket |
| Training | Schedule free, live, one-on-one training or access DIY resources | You can take certification courses on our products, do some DIY reserach in our Knowledgebase or opt for live training with a live person |
Certification (Log in required) Knowledgebase (DIY) Free, live, one-on-one training |
| More x360Portal tools | Learn about additional x360Portal features | Navigate and configure your x360Portal | x360Portal Essential User Guide |
3. Access your vault
| Onboarding task | What's involved? | What are my options? | Documentation |
| Access your vault |
a. Login to x360Portal b. Launch the x360Recover Manager c. Click the Vaults tab d. Click Details on the desired vault e. Click Vault GUI for SSO to the vault web GUI Basic portal users default to read-only access without SSO access to the vault within x360Recover Manager. x360 Portal admins can upgrade x360Recover user access from the Users tab within x360Recover Manager |
[Larger image] 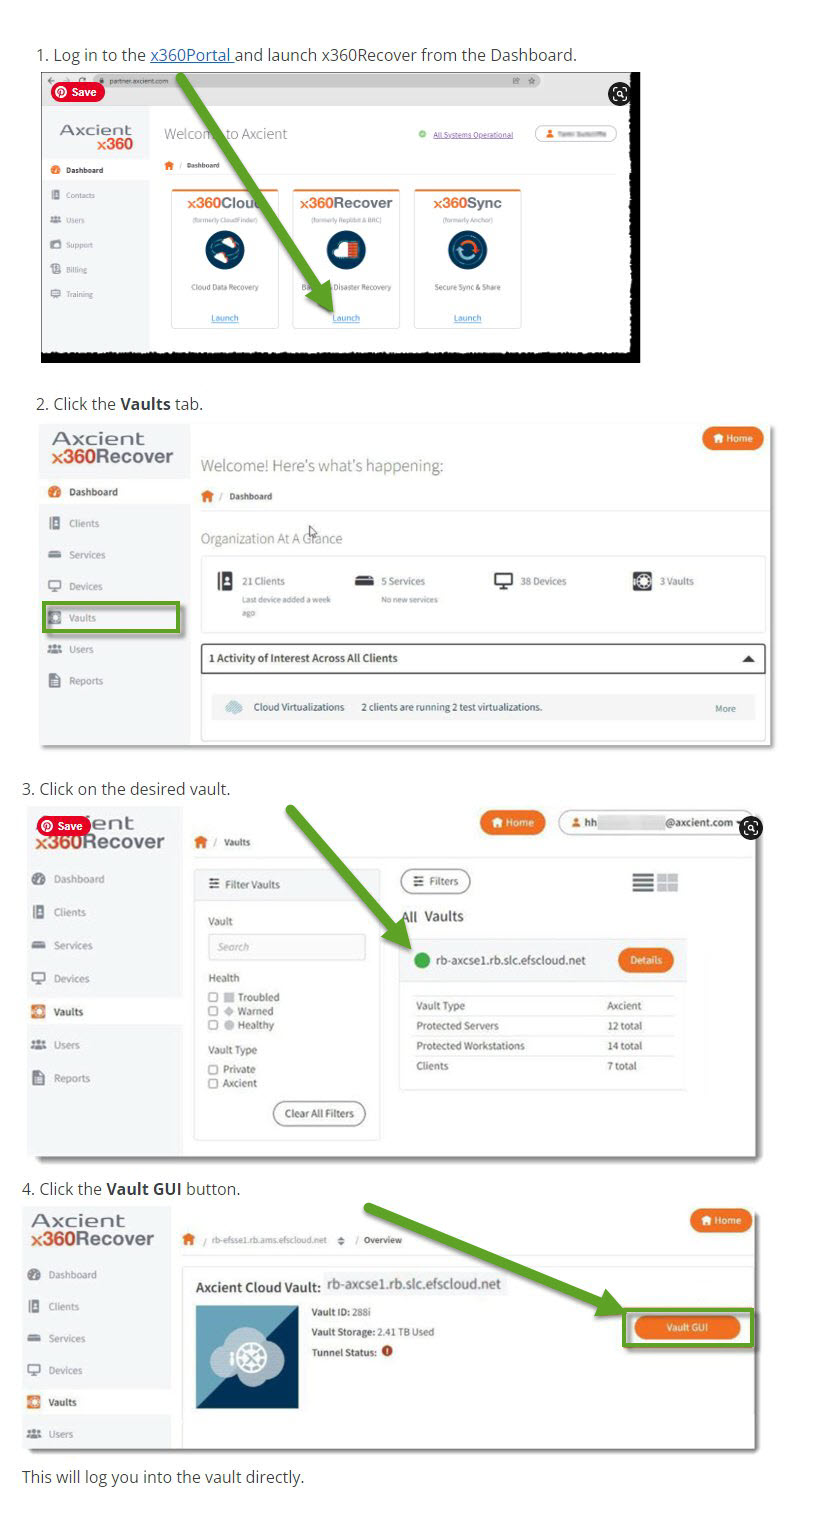
|
See STEP 1. in the D2C Quick Start Guide |
| Review default scheduled backups in your vault | In your vault, review the existing default backup schedule. Initial default backup (from 12 AM to 12 AM) starts immediately and runs until completed | If you disable the default schedule, no endpoint backups will run until they are assigned a different schedule | Create D2C backup schedules |
| Edit & create new backup schedules in your vault |
Customize backups for each client's slowest internet bandwidth Create additional schedules by clicking +Add Schedule; |
After the initial full backup, customize your start and end times. For example, start in the evening, and run until the morning. You can also select manual intervals, with multiple times |
See STEP 3. in the D2C Quick Start Guide. |
| Add a client to a vault |
a. Login to x360Portal b. Launch the x360Recover Manager c. Click Clients d. Click Add Client e. Enter User Name and Company (This is not an individual user) |
Username is case sensitive; Do not include spaces or dashes ; Company field can have spaces and only _ or . The same agent will be used for all endpoints to be protected for this client | |
| Modify an agent |
IMPORTANT: Use Local cache for D2C to pair with a local USB or NAS device - and substantially decrease recovery times |
Add local cache Enable Fast Delta Manage agent throttling Install via RMM agent Add or remove volumes |
Local cache for D2C Enable Fast Delta Manage agent throttling Install via RMM agent |
4. Work with a backup agent
| Onboarding task | What's involved? | What are my options? | Documentation |
| Work with a backup agent | All x360Recover protected systems require a backup agent | Configure an agent | Understand agents |
| Download a D2C agent | Log in to the x360Portal, open a vault, select the client, and download the specialized install file. Do not change that file name | The agent can be installed on multiple endpoints for 180 days; Download the agent file again at any time | Download a D2C agent |
| Install an agent |
Specify the drives to backup (– i.e. C,D) Your initial backup is based on the schedule selected here. You can monitor backups in the Jobs tab. Installation takes appox. 60 seconds before it appears on the vault |
You can opt to create an “Agent Encryption Password”, which will be required for all data recovery actions. Reset or change this later with a Powershell script. You can also re-configure backup schedules for specific endpoints |
Install an agent |
| Modify an agent |
IMPORTANT: Use Local cache for D2C to pair with a local USB or NAS device - and substantially decrease recovery times |
Add local cache Enable Fast Delta Manage agent throttling Install via RMM agent Add or remove volumes |
Local cache for D2C Enable Fast Delta Manage agent throttling Install via RMM agent |
5. Manage backups
| Onboarding task | What's involved? | What are my options? | Documentation |
| Manage Backups | Monitor protected systems and generate alerts and daily notifications | Send a daily email to each client with a detailed summary | Manage & monitor from x360Recover Manager |
| Health Dashboard | See an overview of all of your protected systems | Review and set retention | Health Dashboard |
| Alerts | Enable various alerts to keep you informed of potential issues |
Agent event logs and alerts |
Configure health digest notifications |
| PSA | Integrate with a Professional Services Automation (PSA) platform | Integrate ConnectWise with x360Recover Manager | Integrate x360Recover Manager with a PSA |
| Troubleshooting | When you open a support ticket for a backup issue, you may be asked to run the x360Recover Analysis Tool (AT) |
Run the Analysis Tool from --An appliance --A vault --An installed agent --Recovery Center --Axcient DirectRestore (ADR) |
Agent event logs and alerts Basic troubleshooting with aristos.log Axcient Analysis Tool How to submit a Support ticket |
6. Set up local cache for D2C
| Onboarding task | What's involved? | What are my options? | Documentation |
| *Set up Local Cache for D2C | Speed up recovery by eliminating bulky downloads from the cloud | Requirements and limitations | What is local cache for D2C? |
| Enable local cache | You'll provide a path, (and user credentials, if you are using a network-shared location) | You can fine tune local cache later but simply turning it on enables all the needed default behaviors | How to enable local cache |
| Recover with local cache | Recoveriing with or without a local cache requires internet access to the Cloud vault and x360Recover Manager | How to recover with local cache |
7. Recover
| Onboarding task | What's involved? | What are my options? | Documentation |
| Recover | What are you recovering? | RTO calculator: Compare D2C local cache recovery speeds against an FTPS client or a bare metal restore |
Recovery Playbook Recovery Best Practices [PDF] |
| File and folder recovery | Mount a snapshot and browse the file system | Types of file and folder recoveries | Mount a snapshot |
| Export a virtual disk image | Choose from a variety of formats to export a virtual disk image, then download the disk with an internet connection |
From an appliance From a private vault From Axcient Cloud vault Recovery Center |
Virtual disk export using x360Recover D2C and Recovery Center |
| Recovery Center | Install our stand-alone application to recover data directly from the cloud (yours or ours) | Bare metal restore (BMR) | Recovery Center |
| Axcient Virtual Office | Use a local failover VM to temporarily replace production devices; Runs in Axcient’s cloud | Access from x360Recover Manager | Virtual Office (VO) |
Additional documentation
SUPPORT | 720-204-4500 | 800-352-0248
- Contact Axcient Support at https://partner.axcient.com/login or call 800-352-0248
- Free certification courses are available in the Axcient x360Portal under Training
- To learn more about Axcient products, sign up for a free one-on-one training
- Subscribe to the Axcient Status page for updates and scheduled maintenance
1550